Managing Backups
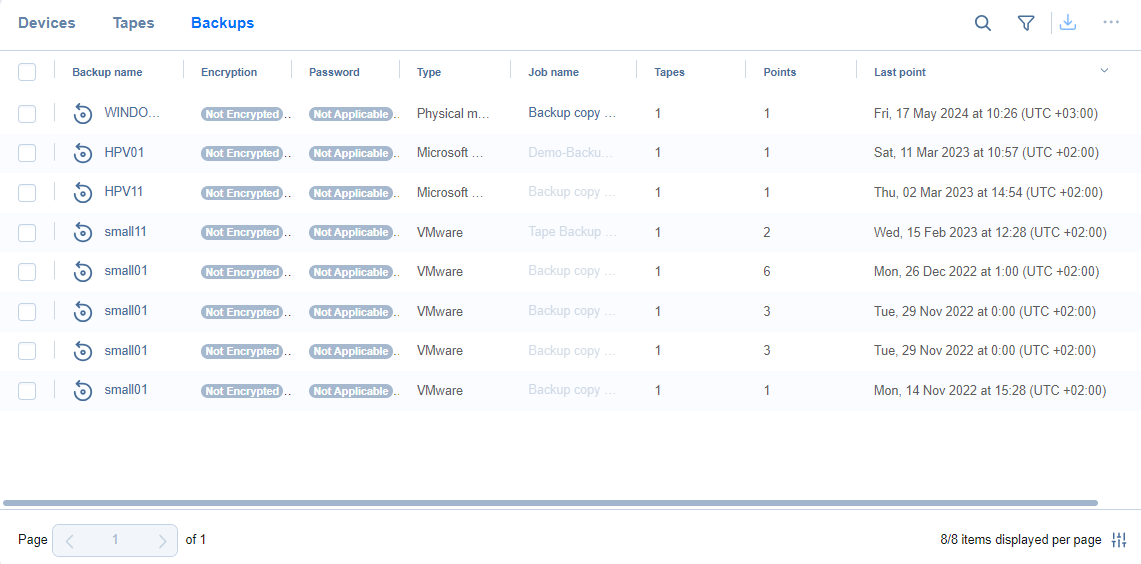
From the Tape tab, you can also manage all backups stored on tape cartridges by clicking the Backups tab.
In this view, you can search for backups and filter them, recover from backups, and view backup details.
Searching for Backups
You can search for a specific backup by entering its name (or part of its name) into the Search box. The table will dynamically change to display the search results matching your query.
Clicking the Clear button in the search box clears the query, and the table displays all backups.
Filtering Backups
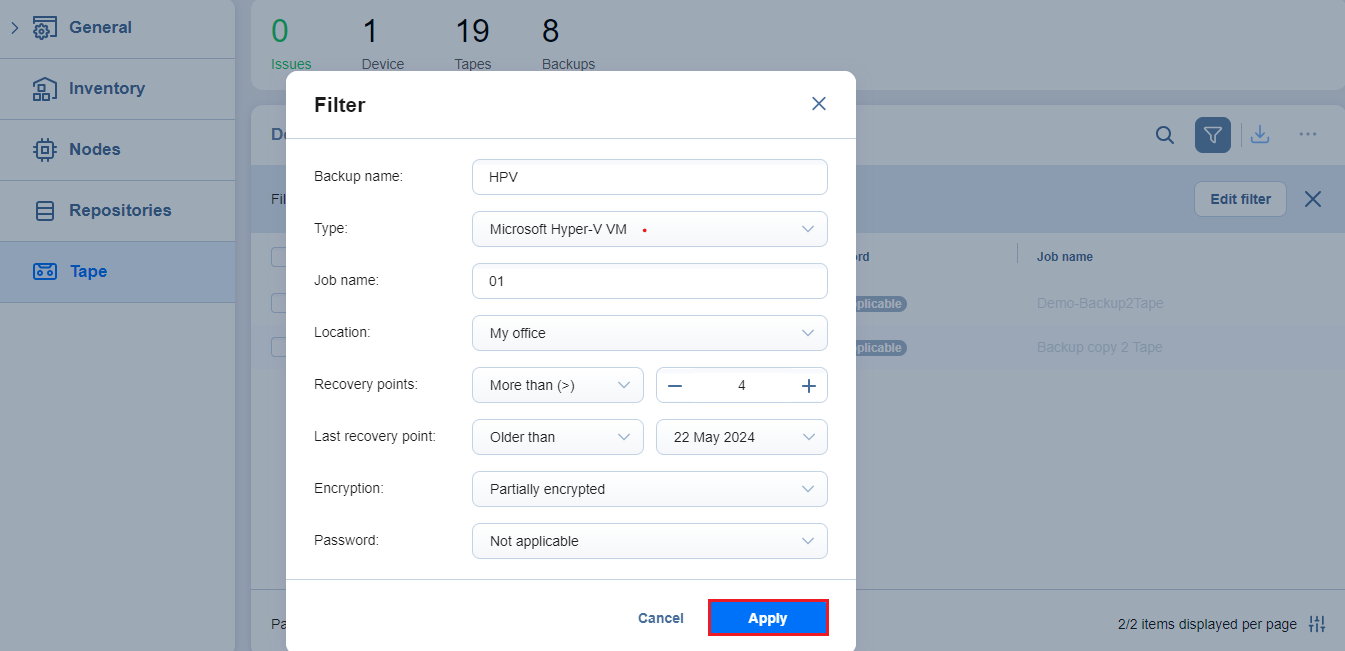
The Backups tab also provides sophisticated filtering options that can be applied to search for particular backups. To access filtering options, click the Filter icon in the top right corner. In the dialog box that opens, you can select one or several filtering criteria that are applied with the AND statement.
You can apply the following filtering criteria:
-
Backup name: The backups with the provided name are displayed. Part of the name can be entered.
-
Type: Specify the type of backups to be displayed:
-
Any
-
VMware VM
-
Hyper-V VM
-
EC2 instance
-
Nutanix AHV VM
-
Physical machine
-
-
Location: Only the backups from the tape cartridges of the specified device location are displayed.
-
Job name: Only the jobs with the specified string in their name are displayed.
-
Recovery points: Only the backups with less or more recovery points are displayed.
-
Last recovery point: Only the backups with the last recovery point created on/newer/later than the date specified are displayed.
-
Encryption: Specify the type of encryption to be displayed:
-
Encrypted
-
Partially encrypted
-
Not encrypted
-
-
Password: Specify the password option to be displayed:
-
Available
-
Partially available
-
Not available
-
Not applicable
-
Note
The Search and Filter features can only be applied separately; you cannot simultaneously search for a tape cartridge by name and select filtering options.
Backups Table
The Backups table provides detailed information about each backup:
-
Backup name: Displays the name of the backup. Clicking the name opens the Recovery screen.
-
Encryption: The state of encryption of the backup object, which can be one of the following:
-
Not encrypted: None of the recovery points of the backup object are encrypted.
-
Encrypted: All recovery points of the backup object are encrypted.
-
Partially encrypted: Some recovery points of the backup object are encrypted.
-
-
Password: The state of the password of the backup object, which can be one of the following:
-
Available: All or some recovery points of the backup object are encrypted, and the password hash is available for all encrypted recovery points.
Note
In case of a self-backup, the status is displayed if all or some recovery points of the backup object are encrypted and the product database contains details of encryption for all encrypted recovery points.
-
Not available: All or some recovery points of the backup object are encrypted, and the password hash is not available for all encrypted recovery points.
Notes
-
In case of a self-backup, the status is displayed if the recovery point is encrypted and the product database does not contain encryption details for this recovery point.
-
In case of a self-backup, the status is displayed if you are upgrading your product from the version that does not support backup encryption to the version that supports it (for example, from 10.11 to 11.0).
-
After a system configuration backup, the encrypted recovery points passwords that were created and saved in the password manager become unavailable and providing them manually is required.
-
-
Partially available: All or some recovery points of the backup object are encrypted, and the password hash is not available for some encrypted recovery points.
Note
In case of a self-backup, the status is displayed if all or some recovery points of the backup object are encrypted and the product database contains details of encryption for all encrypted recovery points.
-
Not applicable: The backup object does not contain encrypted recovery points.
-
-
Type: The type of the source object
-
Job name: The name of the job associated with the backup
-
Tapes: The number of tape cartridges that the backup occupies
-
Points: The number of recovery points the backup has
-
Last point: The date of the last recovery point on the backup
-
Size: Summarized original size of all recovery points
Managing Passwords
If the currently selected tape backup is encrypted (some or all recovery points of the backup are encrypted) and the corresponding password hash is not available, you can provide the password manually. To provide the password, do the following:
-
Click Settings in the left pane of the product.
-
Go to Settings > Tape.
-
In the Backups tab, select the checkboxes next to the backup names you want to manage, click the ellipsis Manage button, and then select Provide password in the drop-down list.
-
Optionally, hover over the backup you want to manage, and on the right side, click Manage, then select Provide password in the drop-down list.
-
In the dialog box that appears, select the needed password or create a new one.
-
Optionally, you can click the Manage passwords link to manage the existing or add a new password to the list of passwords.
-
Click Apply.
Notes
The Provide password option is disabled if the selected backups are not encrypted (none of the recovery points are encrypted)
The Provide password option is disabled if the selected backups are encrypted (some or all recovery points are encrypted) and the password hash is available for all encrypted recovery points.
The Provide password option is disabled for self-backup recovery points created from an older version that does not support backup encryption.
It’s recommended that you enable the (AWS) Key Management Service in the Settings > General > System Settings > Encryption tab. If AWS is enabled, all backup encryption passwords are encrypted with the Key Management Service cryptographic key to be available for recovery in case of product re-installation. For more information, refer to Enabling KMS.
Recovering from Backups
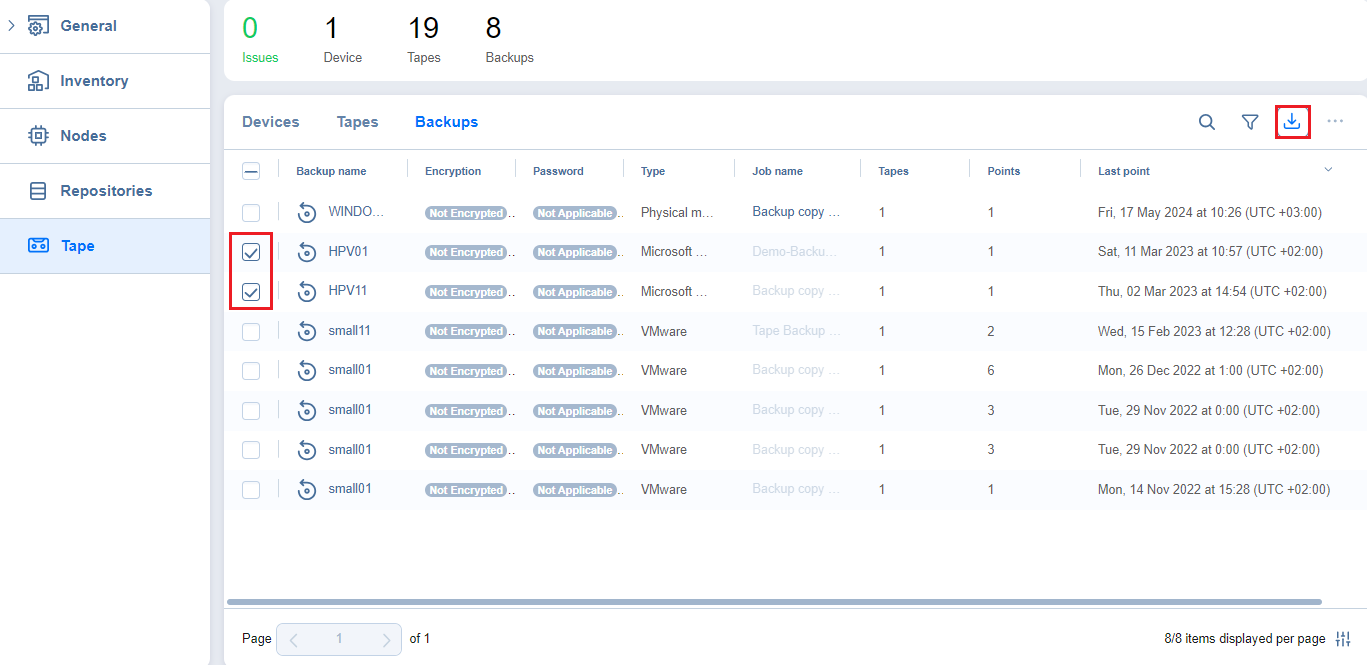
You can initiate the recovery process from the Tape > Backups tab by selecting the checkboxes next to backup names, clicking the Manage button, and then selecting Recover in the drop-down list.
Optionally, hover over the backup you want to recover, and on the right side, click Manage, then select Recover in the drop-down list.
Note
If you are recovering from multiple backups, you may only select backups of the same Type. If you select multiple backup types, the Recover button is disabled.
The New Recovery Job Wizard opens with the specified backups and their latest recovery points selected.
Tape Backup Details
Clicking a tape backup name opens the Backup Details page where you can view the backup information and see all recovery points available for this backup. You can also initiate the recovery or password management process from here.
The Backup Details section provides the following information about the backup:
-
Name: The name of the backup
-
Type: The type of backup: VMware VM, Hyper-V VM, EC2 instance or physical machine
-
Tapes: The number of tape cartridges this backup is stored on
-
Job name: The name of the job the backup belongs to
-
Recovery points: The number of recovery points within the backup
-
First recovery point: The date of the latest recovery point of the backup
-
Last recovery point: The date of the most recent recovery point of the backup
-
Location(s): The location the backup is assigned to
You can view the details of a recovery point in the lower part of the screen. To find a recovery point for a specific date, use the Search bar on the right.
The Recovery points table lists all the recovery points available for the current backup and provides the following information:
-
Date: The date the recovery point was created. Clicking this parameter initiates recovery for this recovery point.
-
Type: The type of backup: Full or Incremental
-
Encryption: The state of encryption of the backup object, which can be one of the following:
-
Not encrypted: None of the recovery points of the backup object are encrypted.
-
Encrypted: All recovery points of the backup object are encrypted.
-
-
Password: The state of the password of the backup object, which can be one of the following:
-
Available: All or some recovery points of the backup object are encrypted, and the password hash is available for all encrypted recovery points.
-
Not available: All or some recovery points of the backup object are encrypted, and the password hash is not available for all encrypted recovery points.
-
Not applicable: The backup object does not contain encrypted recovery points.
-
-
Tape: The name of the tape cartridge the backup is stored on
-
Size: The total size of the backup
-
Protected until: The date when the recovery point expires
You can initiate the recovery process from the Recovery points table. To start recovery, hover over the recovery point you want to recover from, and on the right side, click Manage, then select Recover in the drop-down list.
This opens the Recovery from Tape Wizard for the selected recovery point. For more information about recovering from a tape backup, refer to Starting Recovery from Tape.
If the currently selected recovery point is encrypted and the corresponding password hash is not available, you can provide the password manually.
To provide the password, do the following:
-
Click Settings in the left pane of the product.
-
Go to Settings > Tape.
-
In the Backups tab, click a tape backup name.
-
In the Recovery points table, hover over the recovery point you want to manage, and on the right side, click the ellipsis Manage button, then select Provide password in the drop-down list.
Optionally, you can select the checkboxes next to the recovery points you want to manage, and click the Manage button.
-
In the dialog box that appears, select the needed password or create a new one.
-
Optionally, you can click the Manage passwords link to manage the existing or add a new password to the list of passwords.
-
Click Apply to proceed.
Notes
The Provide password option is disabled if the selected recovery points are not encrypted (none of the recovery points are encrypted).
The Provide password option is disabled if the selected recovery points are encrypted (some or all recovery points are encrypted) but the password hash is available for all encrypted recovery points.
The Provide password option is disabled for the self-backup recovery point created from an older version.
It’s recommended that you enable the (AWS) Key Management Service in the Settings > General > System Settings > Encryption tab. If AWS is enabled, all backup encryption passwords are encrypted with the Key Management Service cryptographic key to be available for recovery in case of product re-installation. For more information, refer to Enabling KMS.


