Adding Physical Machines
NAKIVO Backup & Replication allows you to use a physical machine agent or Transporter already installed on a Windows or Linux physical machine to add that machine to the NAKIVO Backup & Replication Inventory. For this option to be available, you need to install or update the Physical Machine Agent (PMA) on the physical machine that you want to add.
For more information, see How to Add a Physical Machine to the NAKIVO Inventory.
Before adding physical machines, ensure your environment meets the platform and network requirements. Check the supported platforms and required TCP ports.
Make sure the following system requirements are met:
-
For Windows:
-
Administrative credentials should be provided to the physical machine.
-
PowerShell must be installed.
-
SMB v1 or higher version of SMB protocol must be enabled. In case a firewall is enabled, the corresponding rule for SMB-in needs to be enabled too.
-
Selected users should have permissions to Log on as a batch job.
-
-
For Linux:
-
openssh-server package should be installed.
-
sshd service should be running.
-
parted utility should be installed.
-
Root login over SSH should be enabled if you use the root user. Check the /etc/ssh/sshd_config file to have a line: PermitRootLogin yes.
-
Manual Installation of Physical Agent
To install a physical machine agent, do the following:
For Windows:
-
Go to Settings > Nodes and click the Download button.
-
Select Physical machine agent package for Windows to download the package for Windows OS.
- Extract the package to the C:\Program Files\NAKIVO Backup & Replication\transporter folder of NAKIVO Backup & Replication on the physical machine. If the folder does not exist, create this folder.
-
Extract the file transporter-physical-windows.7z to the folder C:\Program Files\NAKIVO Backup & Replication\transporter.
-
Run the command: bhsvc.exe -b [keyPassword] to generate the bhsvc.id file with a pre-shared key.
Notes
-
You can replace [keyPassword] with your password.
-
Full path: C:\Program Files\NAKIVO Backup & Replication\transporter\bhsvc.exe -b
-
-
Run the install.bat file as an Administrator.
-
Add the agent as an installed service.
Notes
-
Check the permissions to make sure that the user is the Administrator.
-
UAC must be turned off on the PC.
-
For Linux:
Note
Make sure you have the required permissions. Note that the creation of the pam.d file is necessary for RHEL, CentOS, and SLES operating systems but is not required for Ubuntu OS.
-
Go to Settings > Nodes and click the Download button.
-
Select Physical machine agent for Linux to download the installer for Linux OS.
-
Copy the installer to the tmp folder on the target physical machine.
-
Run the following command for silent installation/update of the agent:
sudo bash /tmp/transporter-physical-linux-installer.sh -s 9446 -i /opt/nakivo/transporter -p [keyPassword] --pam-conf --eula-accept
Note
You can replace [keyPassword] with your password.
-
Add the agent as an installed service. If you encounter errors when adding the agent or Transporter as an installed service, you may need to downgrade the security for Linux, including the following:
-
Adding new firewall rules for port 9446 and data transfer ports
-
Editing sudoers
-
Disabling SELinux
-
Updating Manual Agent
To update a physical machine agent, do the following:
For Windows:
-
Go to Settings > Nodes and click the Download button.
-
Select Physical machine agent package for Windows to download the package for Windows OS.
-
Copy bhsvc.id and certificate.pem in the C:\Program Files\NAKIVO Backup & Replication\transporter folder to some temporary folder for later use.
-
Uninstall the existing agent. See Uninstalling Manual Agent for more details.
-
Extract the package to the C:\Program Files\NAKIVO Backup & Replication\transporter folder of NAKIVO Backup & Replication on the physical machine. If the folder does not exist, create this folder.
-
Copy bhsvc.id and certificate.pem that were saved (see Step 3) back to C:\Program Files\NAKIVO Backup & Replication\transporter folder.
-
Run the install.bat file as an Administrator.
For Linux:
-
Go to Settings > Nodes and click the Download button.
-
Select Physical machine agent for Linux to download the installer for Linux OS.
-
Copy the installer to the tmp folder on the target physical machine.
-
Run the following command for silent update of the agent: sudo bash /tmp/transporter-physical-linux-installer.sh -u --eula-accept -i <installation path>.
Uninstalling Manual Agent
You can manually uninstall the physical machine agent. See the uninstallation details below:
-
Windows: Run C:\Program Files\NAKIVO Backup & Replication\transporter\uninstall.bat, accessed from Physical Machine Agent on the Windows OS.
-
Linux: Run the /opt/nakivo/transporter/uninstall command.
The physical machine agent is automatically uninstalled if:
-
The physical machine is removed from the Inventory;
Exception
Physical Machine Agent is used by other inventory items.
-
The user has initiated the Director uninstall.
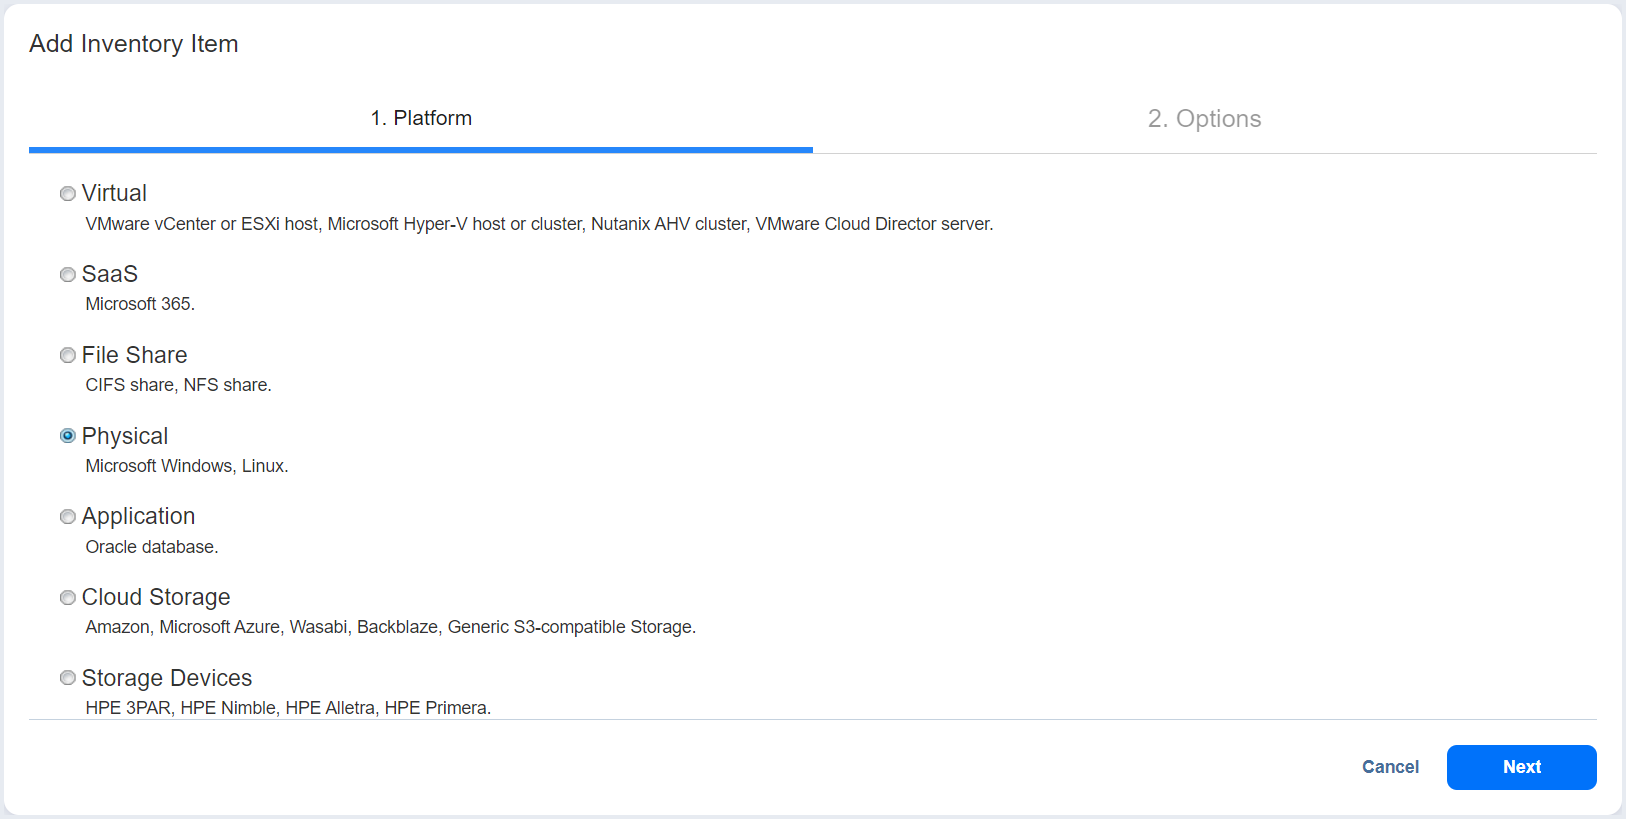
Adding a Physical Machine
To add a Windows or Linux physical machine to NAKIVO Backup & Replication, follow the steps below:
-
Make sure that the physical machine has a supported operating system and all prerequisites are met before proceeding. For more details, refer to Supported Platforms.
-
Click Settings in the left pane of the product.
-
Go to the Inventory page and click +.
-
On the Platform page of the wizard, select Physical and click Next to proceed.
-
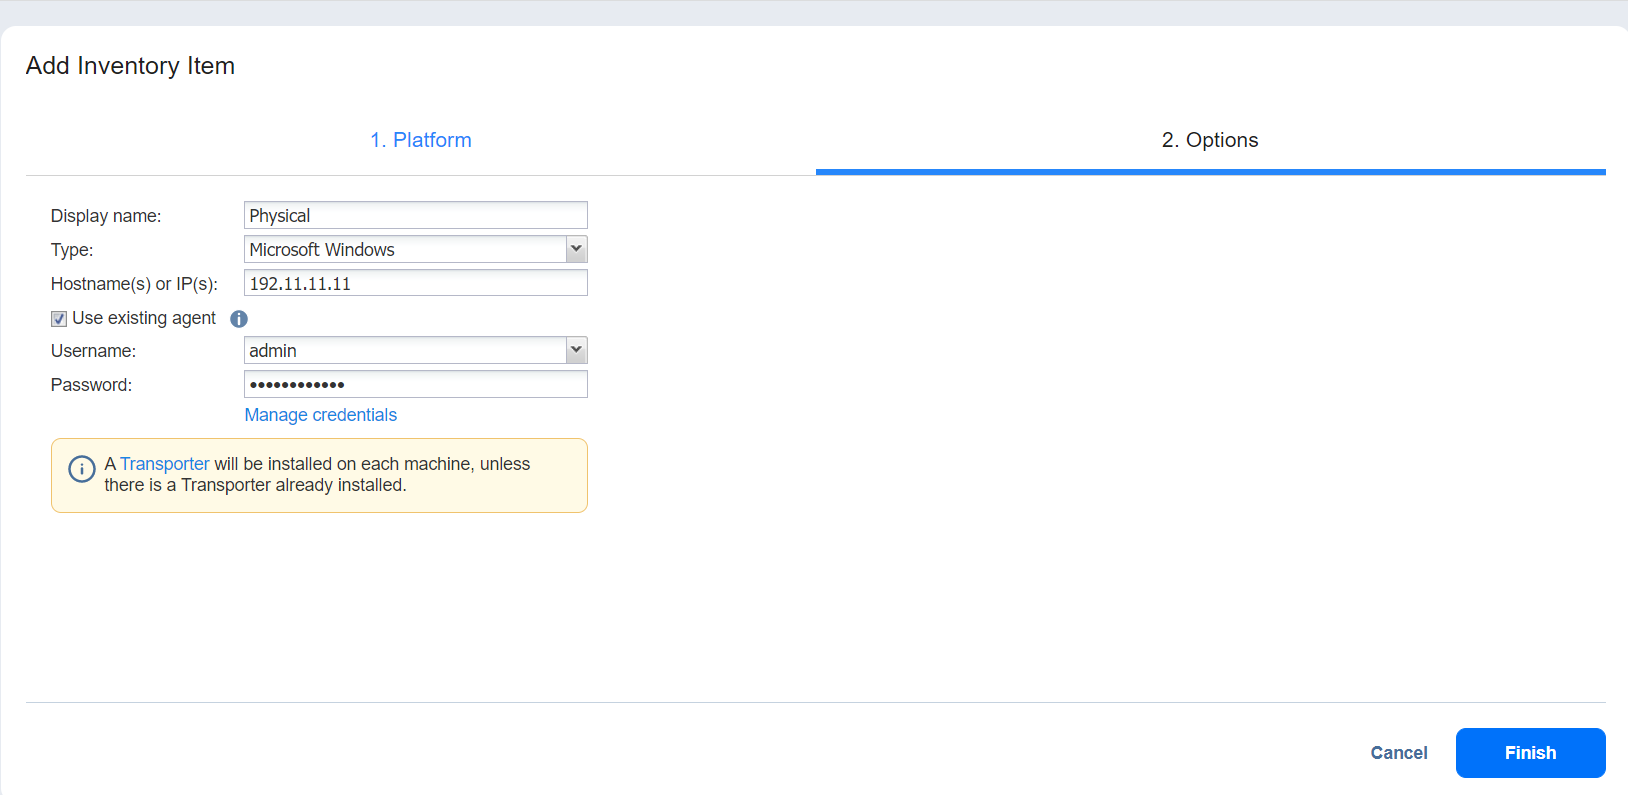
On the Options page of the wizard, fill in the following fields:

For Windows physical machines:
-
Display name: Specify a name for the physical machine. This name will be displayed in the Inventory.
-
Type: Specify the type of machine that you add to the Inventory.
-
Hostname(s) or IP(s): Specify the hostname or IP address of the physical machine that you want to add to the Inventory. To add multiple physical machines at once, use commas to separate hostnames or IP addresses, or use a dash for an IP address range.
- Use existing agent: When this option is selected, the product uses the existing physical machine agent to discover the machine.
-
Username: Provide a username for the physical machine.
-
Password: Provide a password for the physical machine.
Note
This option is disabled in case Direct Connect is enabled.
-
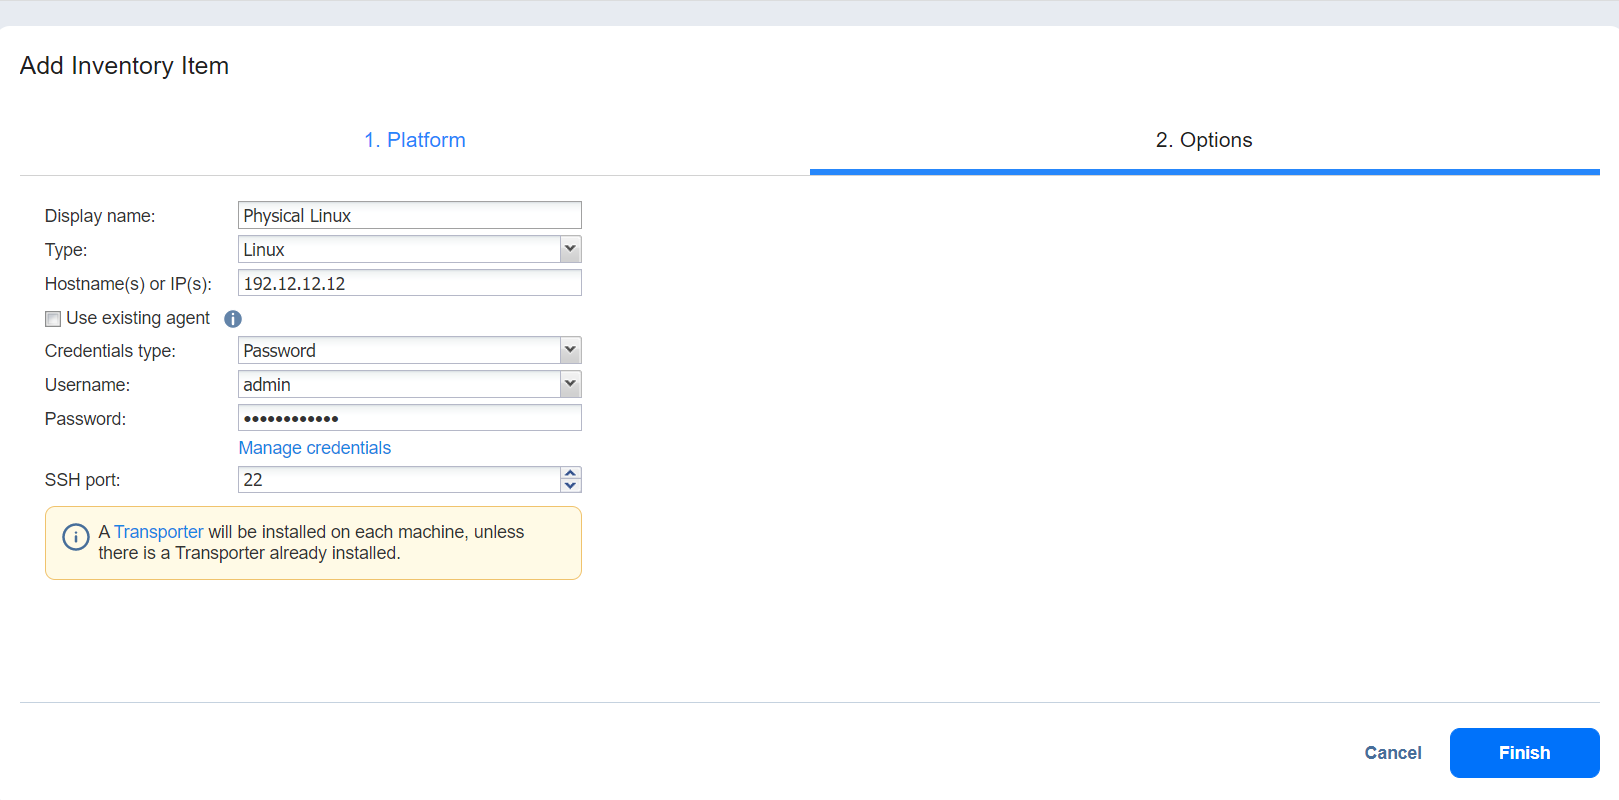
For Linux physical machines:
Note
If the Linux machine has Oracle installed and the bashrc contains ". oraenv" line, NAKIVO Backup & Replication may not be able to discover this machine.
-
Display name: Specify a name for the physical machine. This name will be displayed in the Inventory.
-
Type: Specify the type of machine that you add to the Inventory.
-
Hostname(s) or IP(s): Specify the hostname or IP address of the physical machine that you want to add to the Inventory. To add multiple physical machines at once, use commas to separate hostnames or IP addresses, or use a dash for an IP address range.
-
Use existing agent: When this option is selected, the product uses the existing physical machine agent to discover the machine.
Notes
-
For this option to be available, you need to manually install the physical agent.
-
The manually installed agent is not updated automatically during product auto-update.
-
The Use existing agent option is disabled when the Private Key credentials type is selected.
-
This option is disabled in case Direct Connect is enabled.
-
-
SSH port: Specify the SSH port number to provide access to the physical machine. The default SSH port number is 22.
-
Credentials Type: Select the type of credentials used to access the physical machine.
-
Password
-
Username: Provide a username for the physical machine.
-
Password: Provide a password for the physical machine.
-
-
Private Key Select the saved private key-based credentials. Refer to Managing Credentials for details.
Note
You will not be able to change the type of key credentials through the Manage Credentials option.
-
-
Optionally, you can enable the Use Direct Connect option for this item to discover a physical machine located in a remote environment using the Direct Connect functionality. To do this:
-
Select Use Direct Connect.
Notes
-
This option is disabled when Use existing agent is enabled.
-
Physical machine agent doesn't support Direct Connect. Follow the steps below to install the normal transporter (Universal transporter) to enable it:
-
Install the Universal transporter on a physical machine and add it as installed service in the Nodes tab.
-
Configure the network (port mapping). Refer to Cannot Add Physical Machine via Direct Connect for more details.
-
Add the physical machine via Direct Connect.
-
-
In the Assigned transporter drop-down list, choose the Transporter that was installed in the remote environment with Direct Connect enabled. Note that this Transporter must be discovered in the multi-tenant deployment of NAKIVO Backup & Replication.
Note
This option is only available when there is a Transporter with Direct Connect enabled on a remote side. For details, refer to Enabling Direct Connect.
-
-

6. Click Finish. The successfully added physical machine is displayed on the Inventory list.
Notes
If the physical machine host has an already installed physical machine agent or a Transporter, that agent/Transporter is used to discover and manage the physical machine.
Physical machine agents can manage tape devices.
Physical machine agents can be upgraded to Universal Transporters that can be used to discover and back up Hyper-V VMs, Oracle databases, and Physical servers located on the same host.
Check the following options to enable additional capabilities for the Universal Transporter and click Proceed when done:
Repository management
VMware vSphere support
Transporter capabilities can be modified at any point in the Editing Nodes tab.