Adding Existing Nodes
After you have installed a Transporter or Agent, you need to add it to NAKIVO Backup & Replication so that the Transporter or Agent can be used for backup, replication, and recovery tasks.
Important
Before adding the existing Transporter to your NAKIVO Backup & Replication, make sure that this Transporter is not used by any other Director as it may lead to unforeseen errors.
Refer to the following topics:
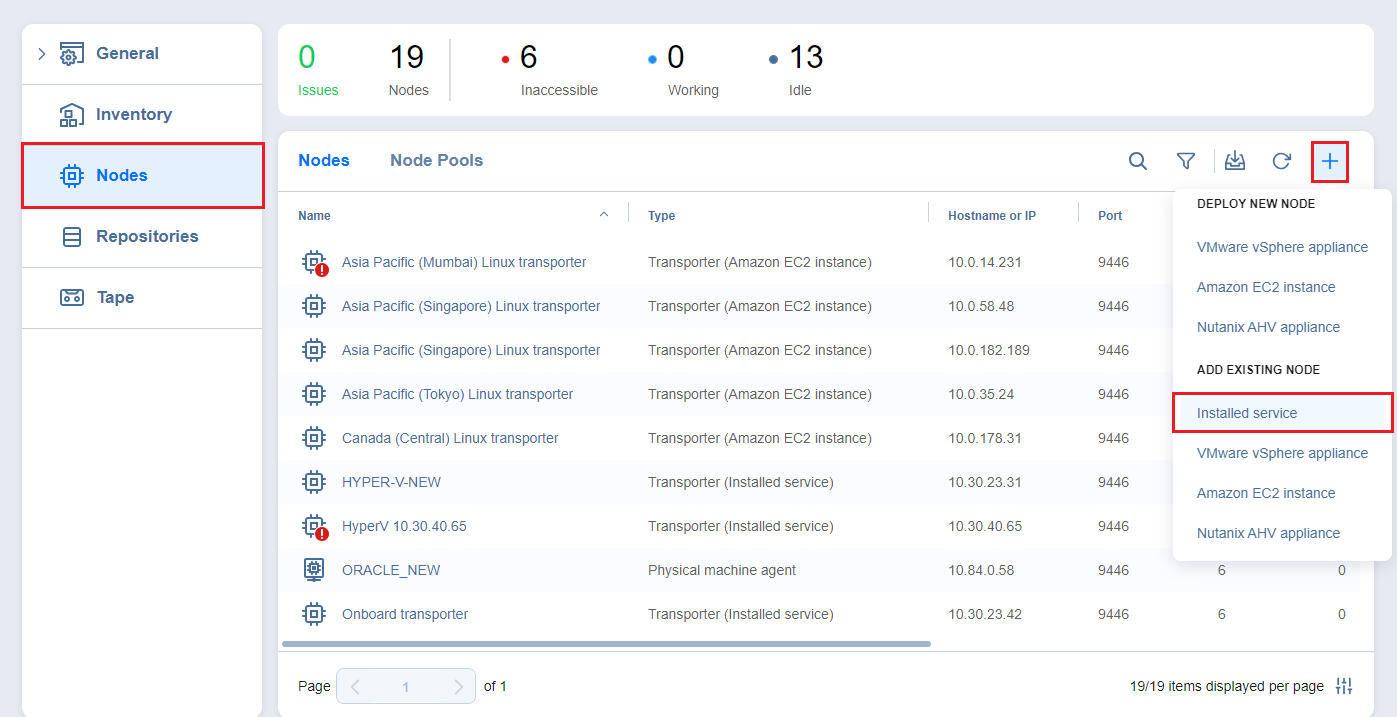
Installed Service
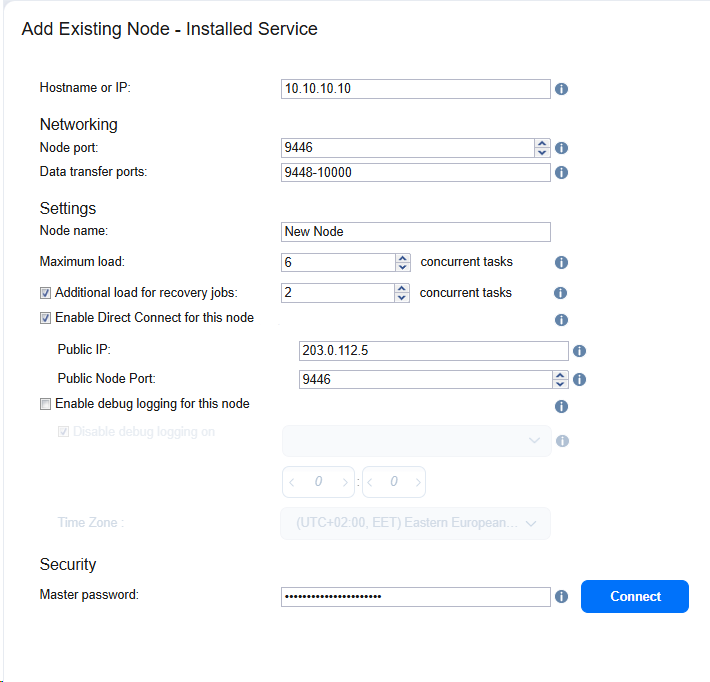
Follow the steps below to add a node that is installed as a service:
-
Click Settings in the left pane of the product, go to the Nodes tab, and click +.
-
In the Add Existing Node section, click Installed service.

-
The Add Existing Node - Installed Service menu opens. In the Hostname or IP box, enter the IP address or hostname of the machine on which the node is installed.
Note
If you are adding the node by a DNS name, make sure this DNS name can be resolved on the machines on which the Director and any other nodes (which you plan to use in conjunction with the current one) are installed.
-
-
Click More options... to reveal and edit the following fields:
-
In the Networking section:
-
Node port: Specify the port number that will be used to connect to the node.
-
Data transfer ports: Specify a range of port numbers (from 1 to 65535) that will be used to transfer data. The range you specify should contain at least 100 ports. Make sure that the ports you specify are open in your firewall.
-
-
In the Settings section:
-
Node name: Specify a display name for the node.
-
Maximum load: Specify the maximum number of tasks that the node should process simultaneously. A task, for example, is a backup or replication of a single VM disk, or one granular recovery session.
-
Additional load for recovery jobs: If selected, the specified amount of tasks will be added to set maximum node load to be used for recovery jobs exclusively. This allows running the specified amount of concurrent recovery jobs along with other types of jobs without the need to wait for their completion.
-
Enable Direct Connect for this node: When this option is enabled, you can access remote resources via a single port connection without establishing a VPN connection. For more information refer to Enabling Direct Connect.
-
Public IP: The IP address of external MSP Transporter that is reachable from the internet and used for communication with the Direct Connect Transporter.
-
Public Node Port: The port of external MSP Transporter that is reachable from the internet and used for communication with the Direct Connect Transporter.
Ensure that the entered combination of the Public Node Port and Public IP address is not used by other transporters.
The following conditions must be met at the remote infrastructure to enable this feature:
-
A NAKIVO Transporter or Agent must be installed.
-
A master password must be set for security reasons. A pre-shared key is generated based on the entered master password.
-
The node port on the local machine must be exposed to external availability via the Internet.
-
The Public IP and Public Node Port fields are available only with the license that supports MSP Direct Connect.
-
-
Enable debug logging for this node: If needed, enable debug level logging for the current node. It is not recommended to use this option on a permanent basis.
-
-
In the Security section:
-
Master Password: Optionally, you can set a password to secure the connection. The set password must match the one configured on the Transporter or Agent. Note that setting a master password is required when the Enable Direct Connect for this node option is enabled. Proceed as follows:
-
After entering the password, click Connect.
-
The Certificate Details dialog box appears. Verify the certificate details, and click Accept.
Notes
-
The master password must adhere to the following requirements:
-
Minimal length - 5 characters.
-
Maximum length - 50 characters.
-
-
The master password can be set and re-set manually by running the command on the machine housing the Transporter or Agent. Follow these steps:
-
Enter the following command
bhsvc -b password, replacing "password" with your master password. -
Restart the Transporter or Agent.
-
-
-
-
-
-
Click Add. The node is added to the product and can be used for backup, replication, and recovery jobs.

VMware Appliance
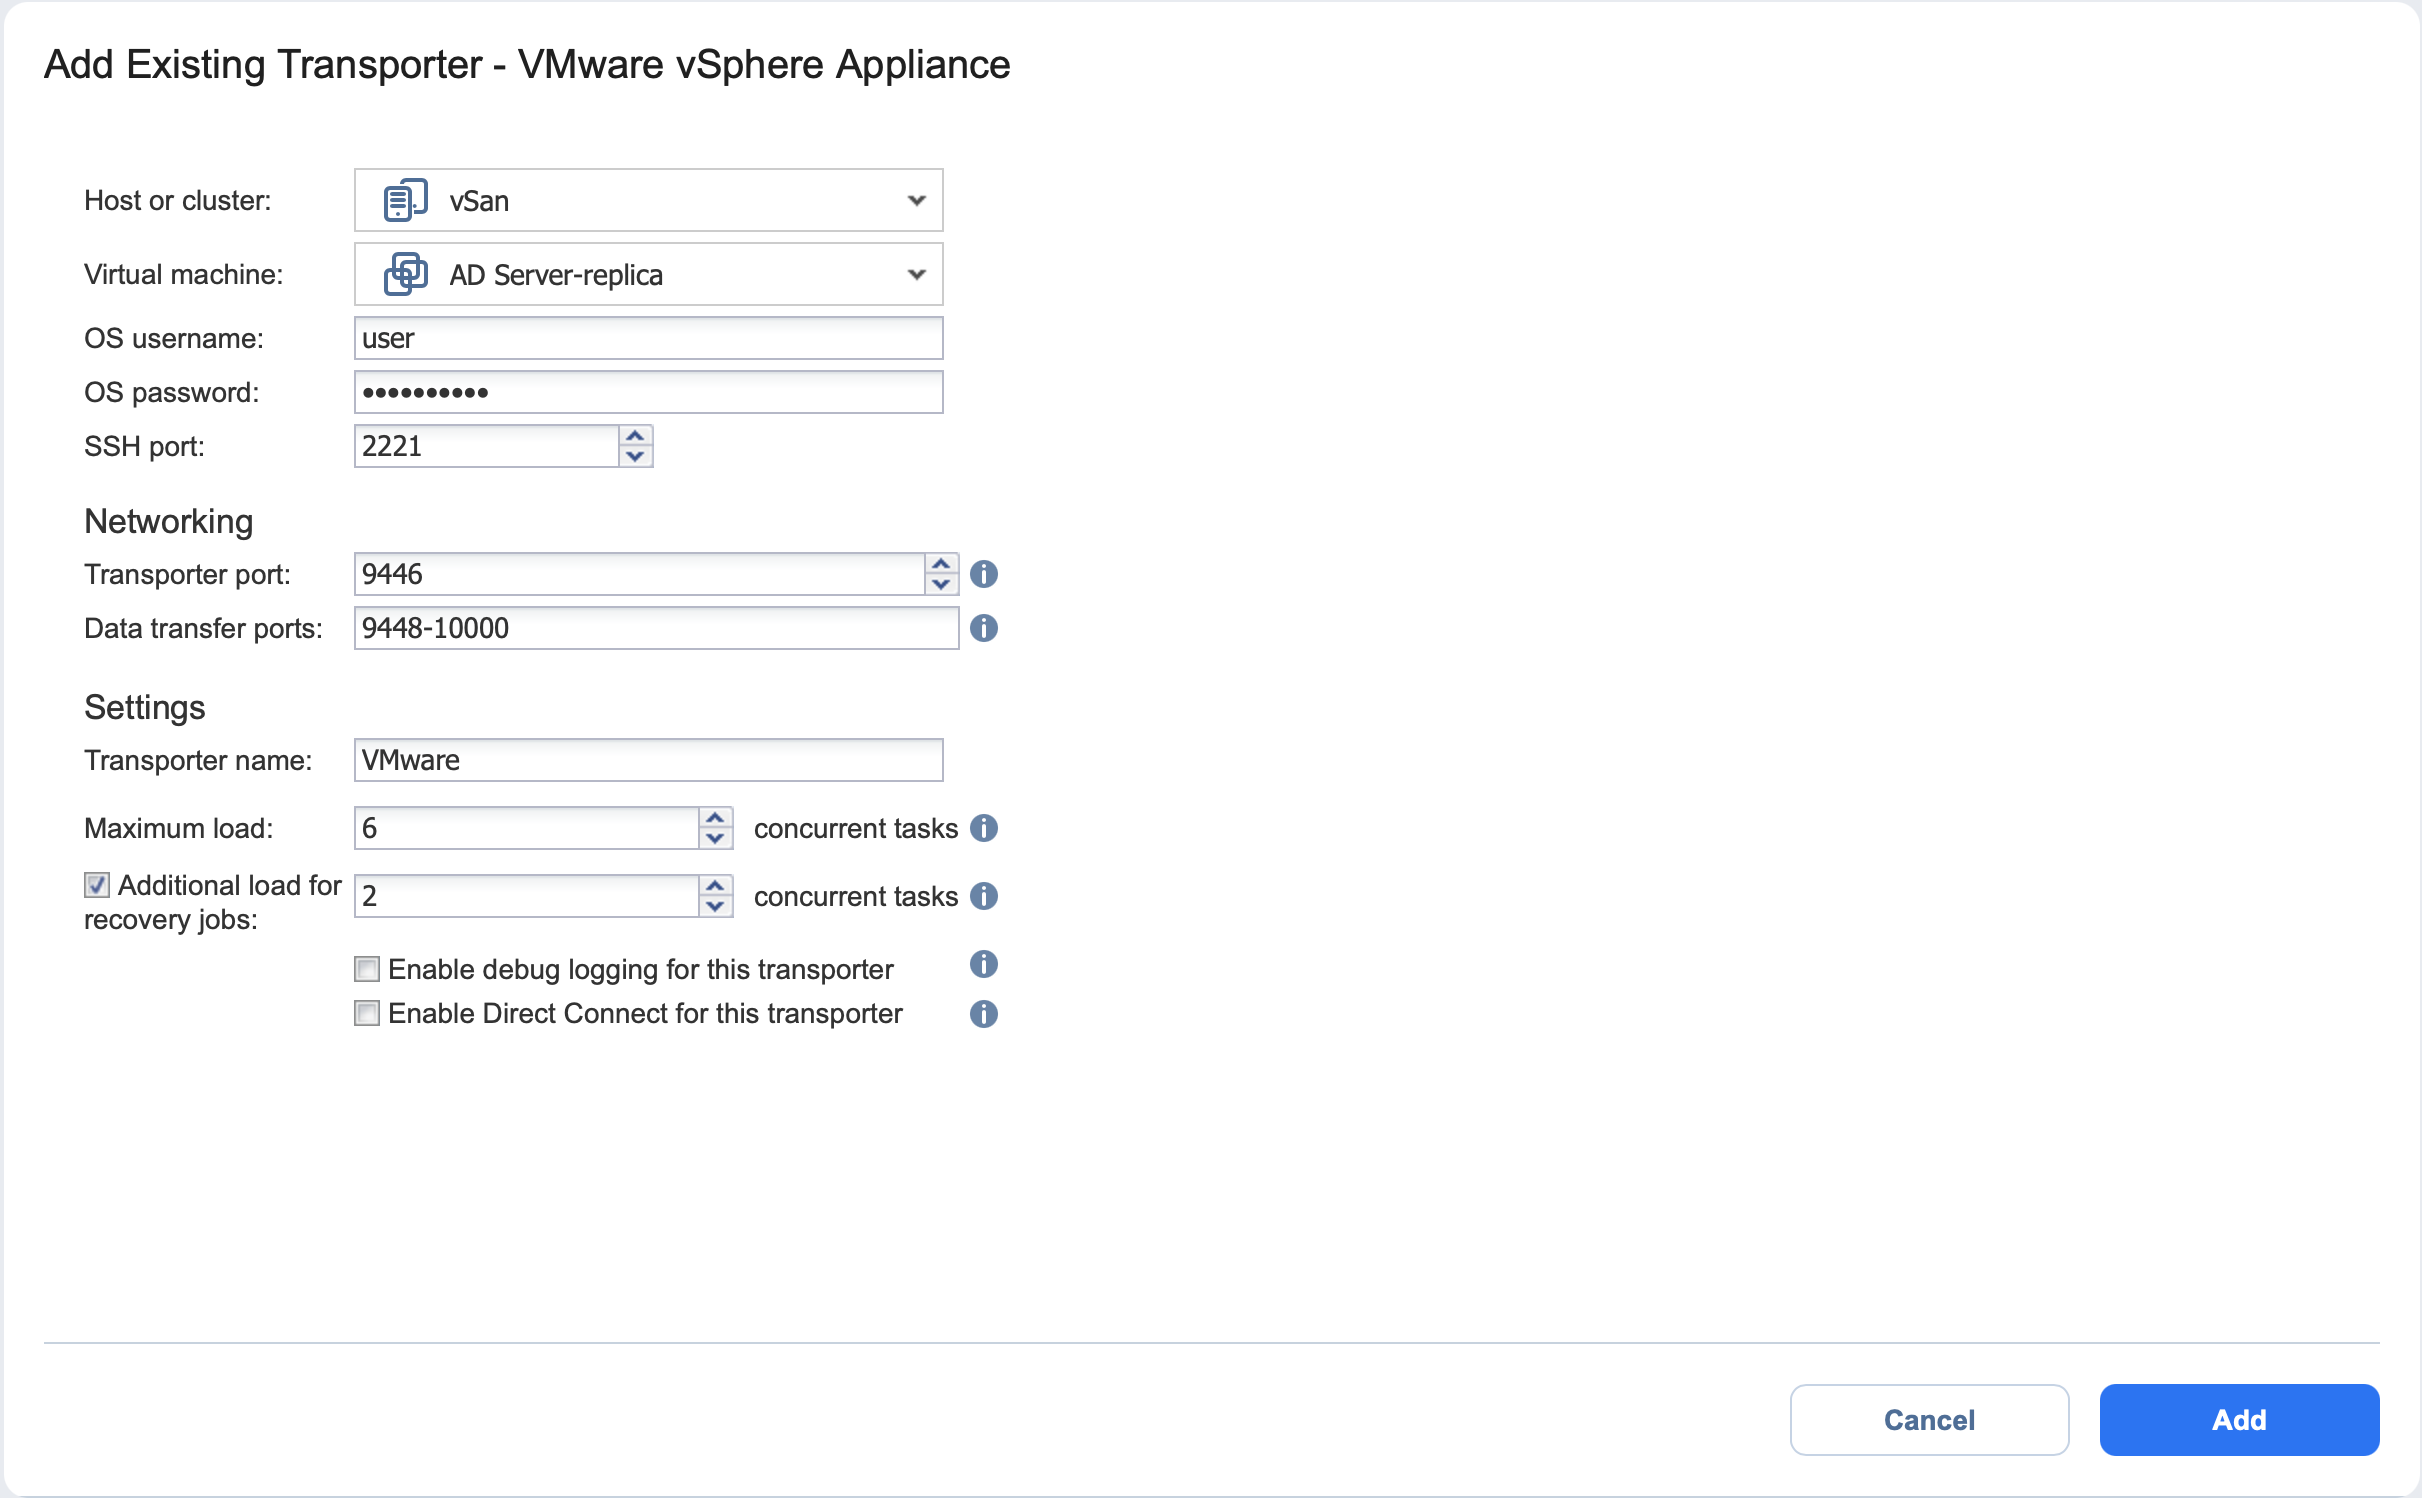
Follow the steps below to add a Transporter that is deployed as a VMware appliance:
-
Click Settings in the left pane of the product, go to the Nodes tab, and click +.
-
In the Add Existing Node section, click VMware vSphere appliance.
_thumb_0_0.png)
-
The Add Existing Transporter - VMware vSphere Appliance dialog opens. Fill out the fields as described below:
-
In the Host or cluster box, specify the location of the host or cluster where the corresponding virtual machine is deployed.
-
In the Virtual machine box, specify the virtual machine on which the Transporter is installed.
-
In the OS Username and OS Password fields, specify credentials for accessing the virtual machine.
-
In the SSH port box, enter the SSH port if needed.
-
Click More options to reveal and edit the following fields:
-
In the Networking section:
-
Transporter port: Specify the port number that will be used to connect to the Transporter.
-
Data transfer ports: Specify a range of port numbers (from 1 to 65535) that will be used to transfer data. The range you specify should contain at least 100 ports. Make sure that the ports you specify are open in your firewall.
-
-
In the Settings section:
-
Transporter name: Specify a display name for the Transporter.
-
Maximum load: Specify the maximum number of tasks that the Transporter should process simultaneously. A task, for example, is a backup or replication of a single VM disk, or one granular recovery session.
-
Additional load for recovery jobs: Selecting this option reserves the Transporter's resources exclusively for recovery jobs. This allows you to run recovery jobs concurrently with other types of jobs without the need to wait for their completion. The Transporter resources will be reserved according to the specified number.
-
Enable debug logging for this transporter: If needed, enable debug level logging for the current transporter. It is not recommended to use this option on a permanent basis.
- Enable Direct Connect for this transporter: When this option is enabled, you can access remote resources via a single port connection without establishing a VPN connection. The following conditions must be met at the remote infrastructure to enable this feature:
A NAKIVO Transporter must be installed.
A master password must be set for security reasons. A pre-shared key is generated based on the entered master password.
The Transporter port on the local machine must be exposed to external availability via the Internet.
-
-
-
-
Click Add. The Transporter is added to the product and can be used for backup, replication, and recovery jobs.
.png)
Amazon EC2 Instance
If you have already deployed a Transporter in Amazon EC2 and now wish to re-import the Transporter in a new instance of NAKIVO Backup & Replication, do the following:
-
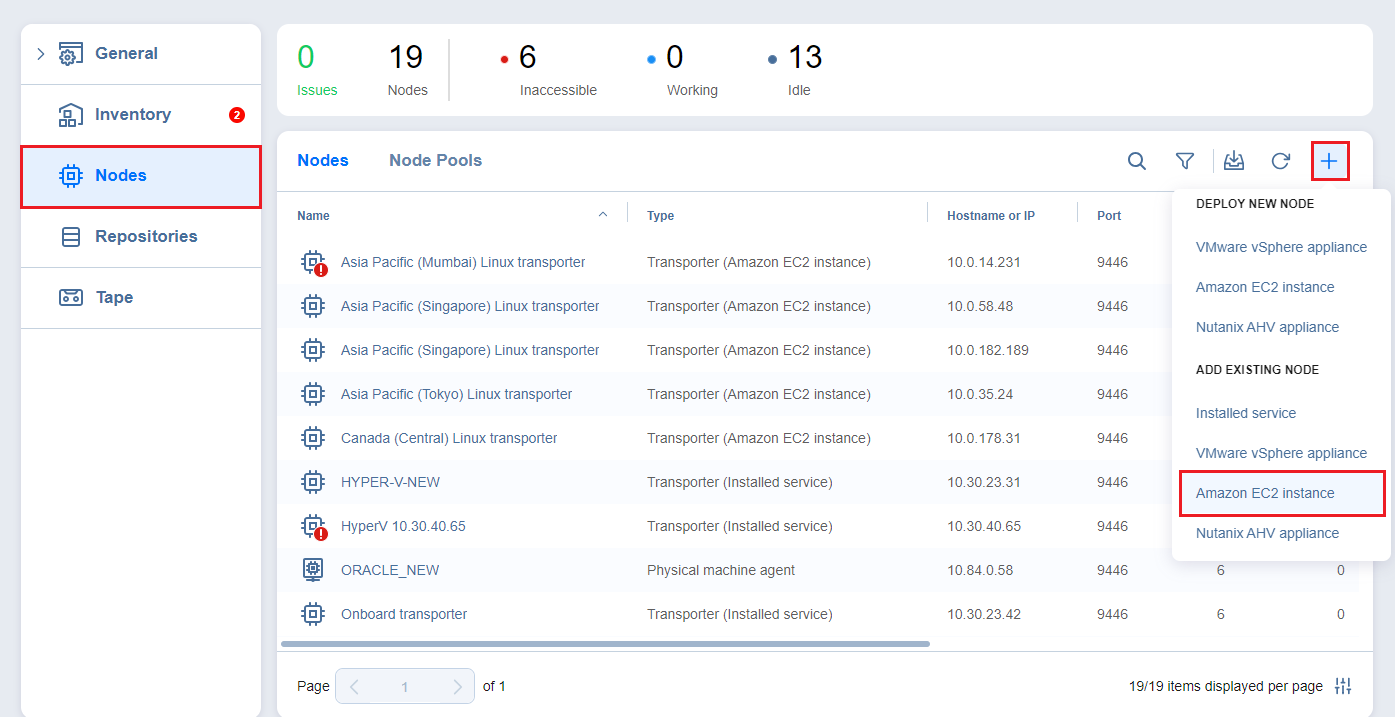
Click Settings in the left pane of the product, go to the Nodes tab, and click +.
-
In the Add Existing Node section, click Amazon EC2 instance.
-
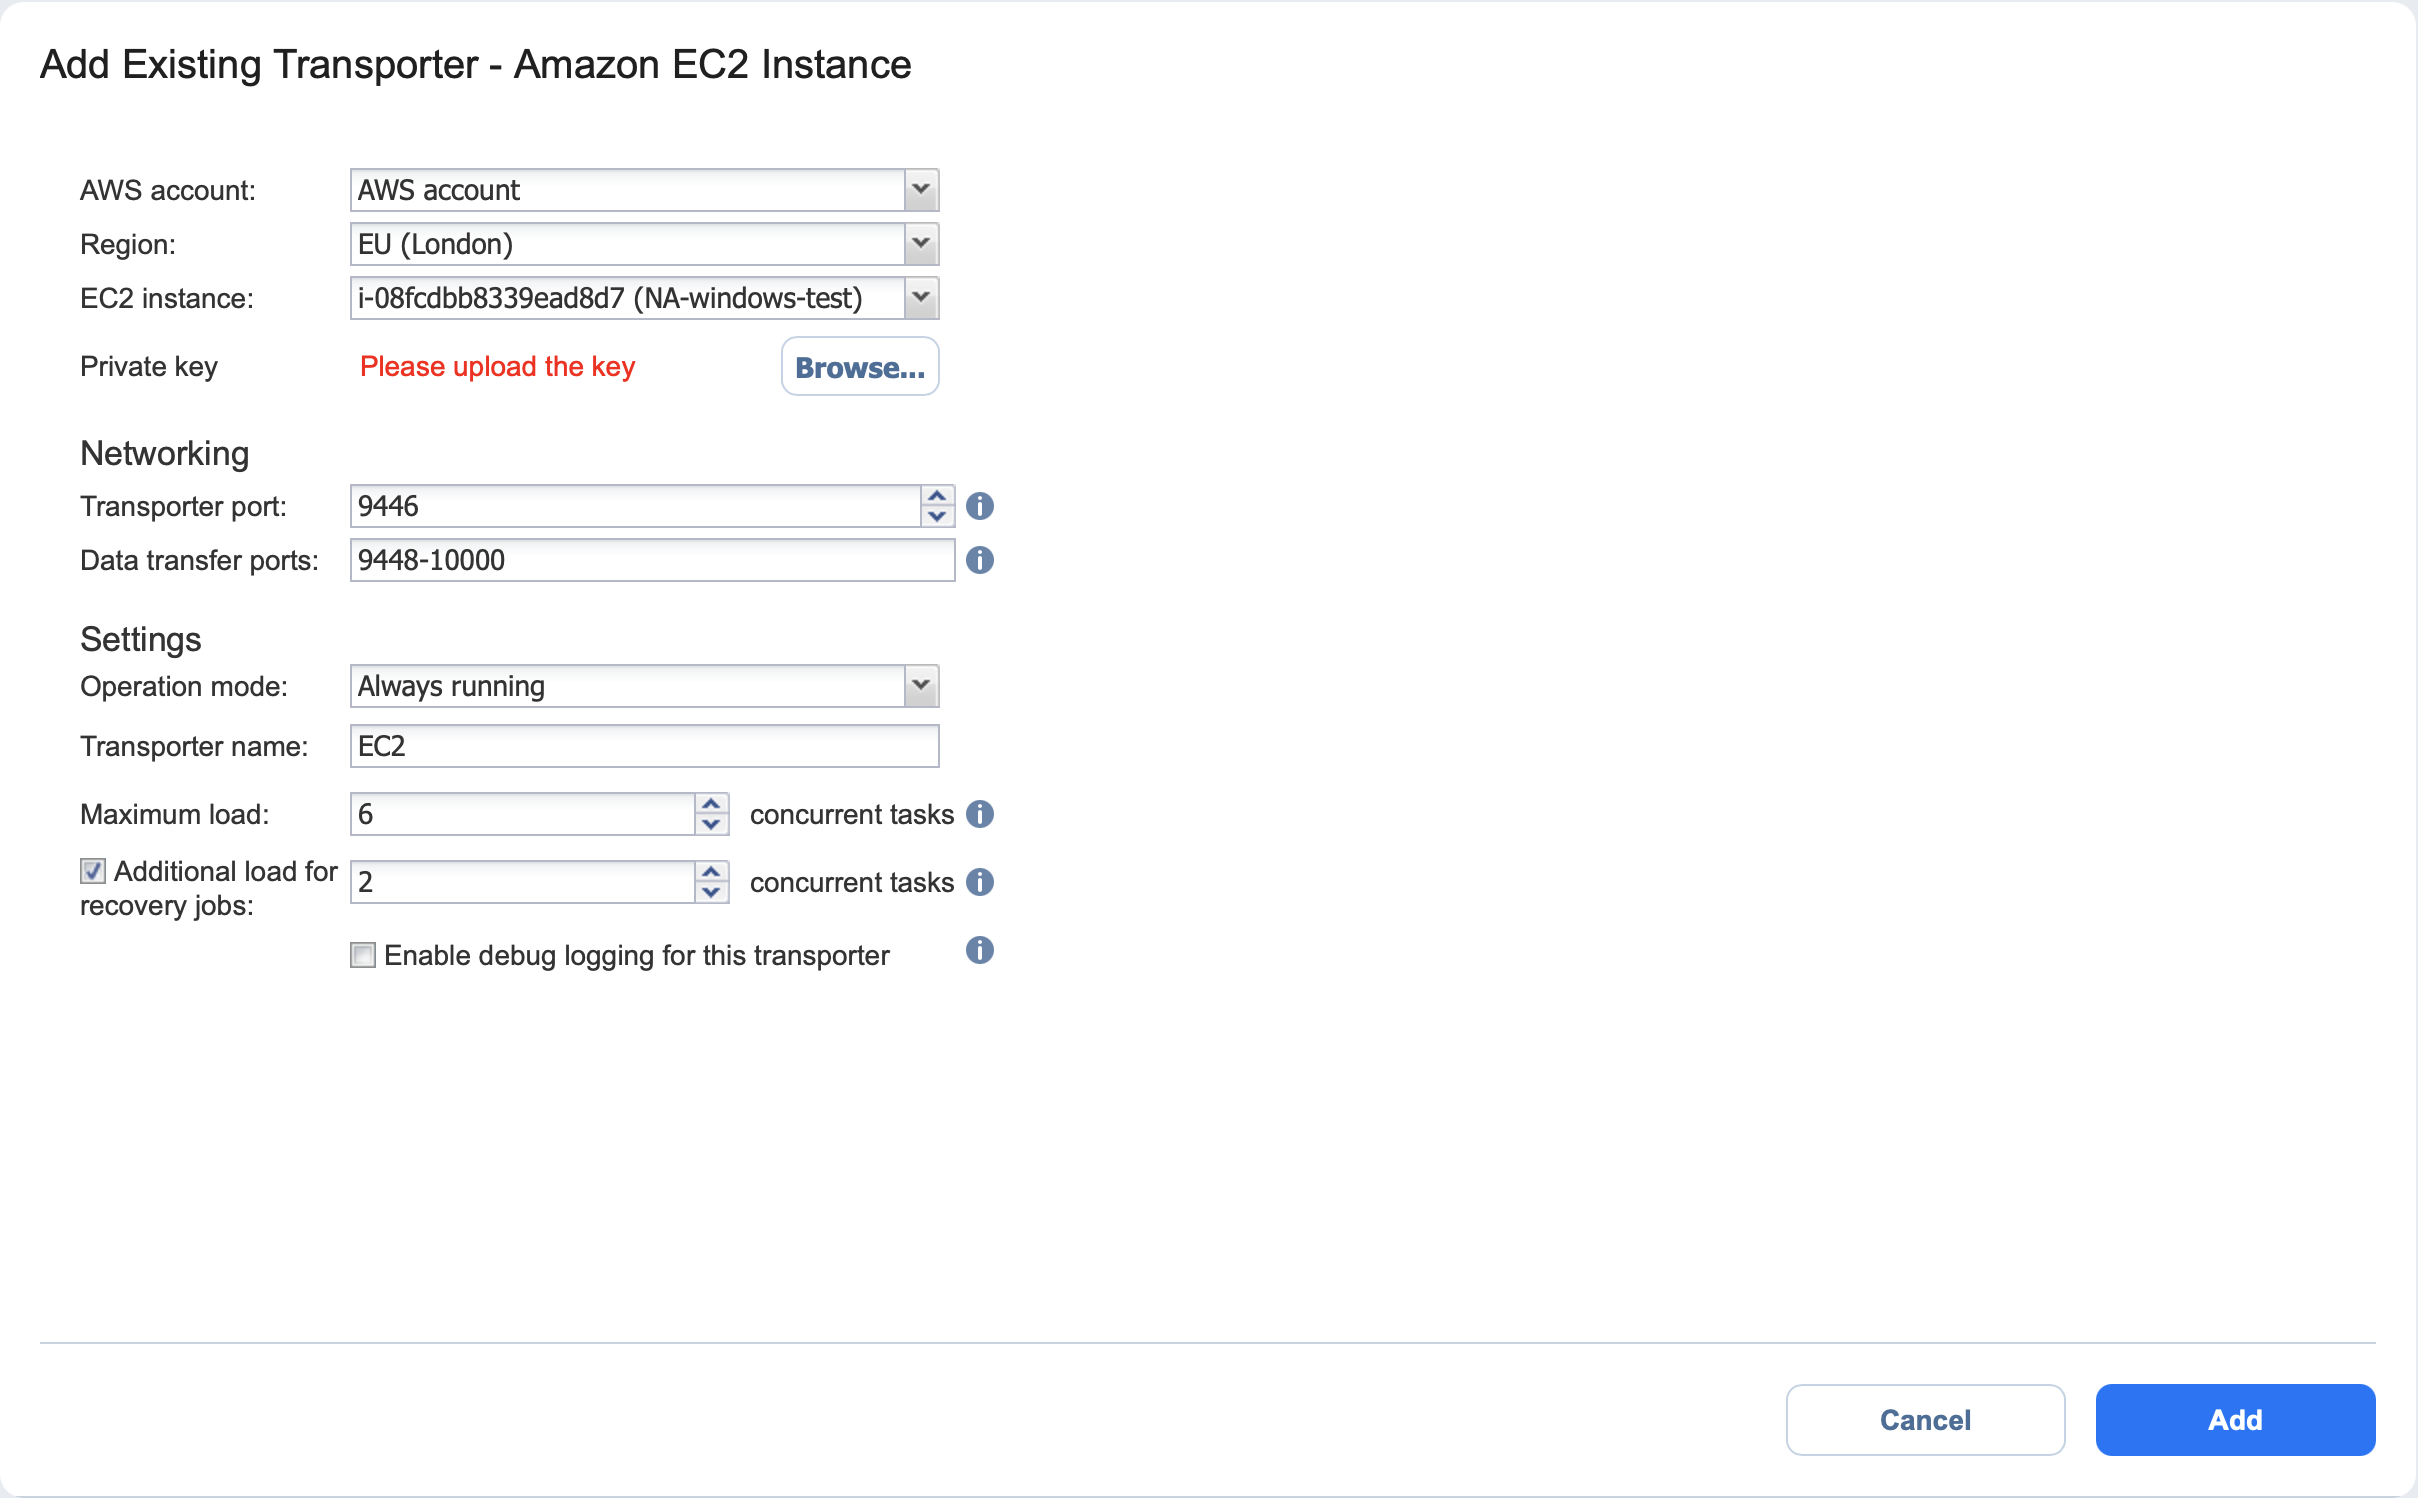
The Add Existing Transporter - Amazon EC2 Instance dialog opens. Fill out the fields as described below:
-
AWS account: Choose an appropriate Amazon AWS Account from the list of Amazon AWS Accounts added to the Inventory.
-
Region: Choose a region in which an AWS EC2 instance with the Transporter is deployed.
-
EC2 Instance: Select the Amazon EC2 Instance with the Transporter that you wish to add to the product.
-
Private key: Click the Browse button to locate and upload the Private key for the Transporter Instance that was created when you deployed the Transporter in the cloud.
-
Click More options to reveal and edit the following fields:
-
In the Networking section:
-
Transporter port: Specify the port number that will be used to connect to the Transporter.
-
Data transfer ports: Specify a range of port numbers (from 1 to 65535) that will be used to transfer data. The range you specify should contain at least 100 ports. Make sure that the ports you specify are open in your firewall.
-
-
In the Settings section:
-
Operation mode: Choose one of the following Transporter operation modes:
-
Always running
-
Running while required
-
-
Transporter name: Specify a display name for the Transporter.
-
Maximum load: Specify the maximum number of tasks that the Transporter should process simultaneously. A task, for example, is a backup or replication of a single VM disk, or one granular recovery session.
-
Additional load for recovery jobs: If selected, the specified amount of tasks will be added to set maximum transporter load to be used for recovery jobs exclusively.
-
Enable debug logging for this Transporter: If needed, enable debug level logging for the current transporter. It is not recommended that you use this option on a permanent basis.
-
-
-
-
Click Add. The Transporter is added to the product and can be used for backup, replication, and recovery jobs.

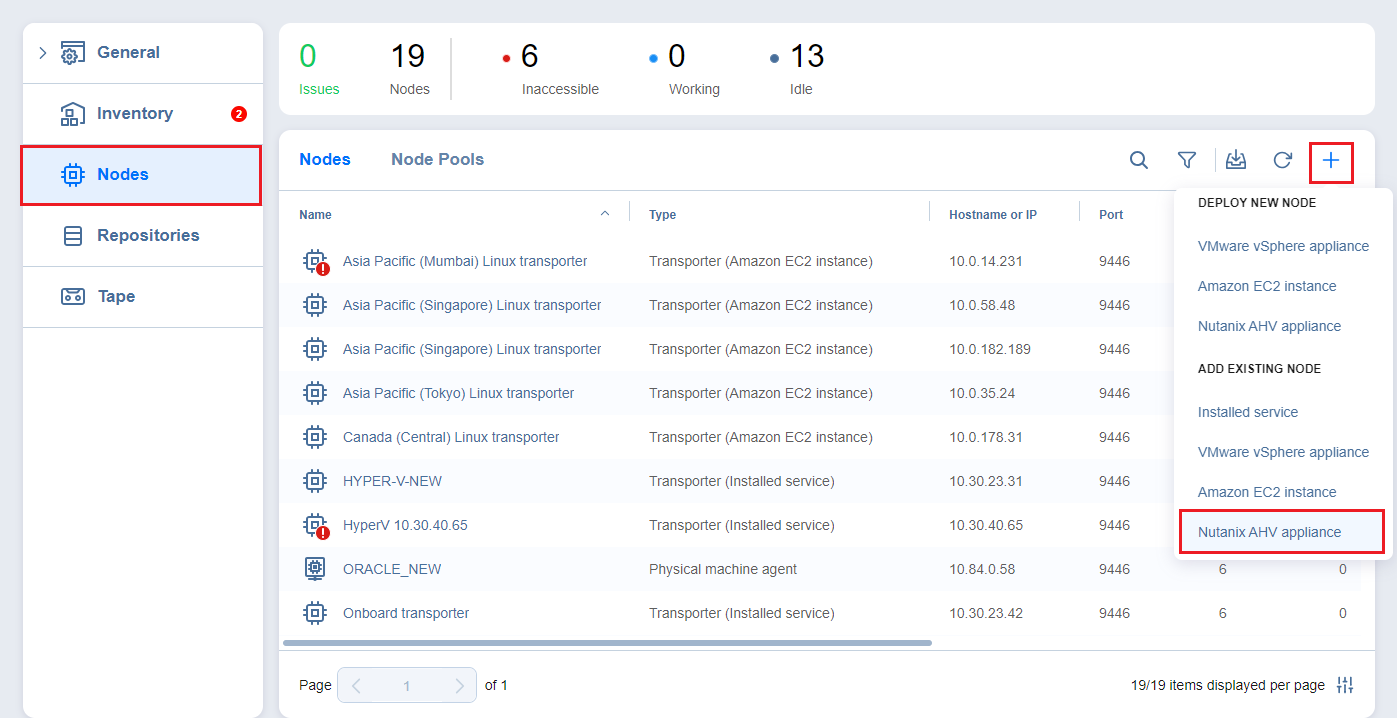
Nutanix AHV Appliance
Follow the steps below to add a Transporter that is deployed as a Nutanix AHV appliance:
-
Click Settings in the left pane of the product, go to the Nodes tab, and click +.
-
In the Add Existing Node section, select Nutanix AHV appliance.

-
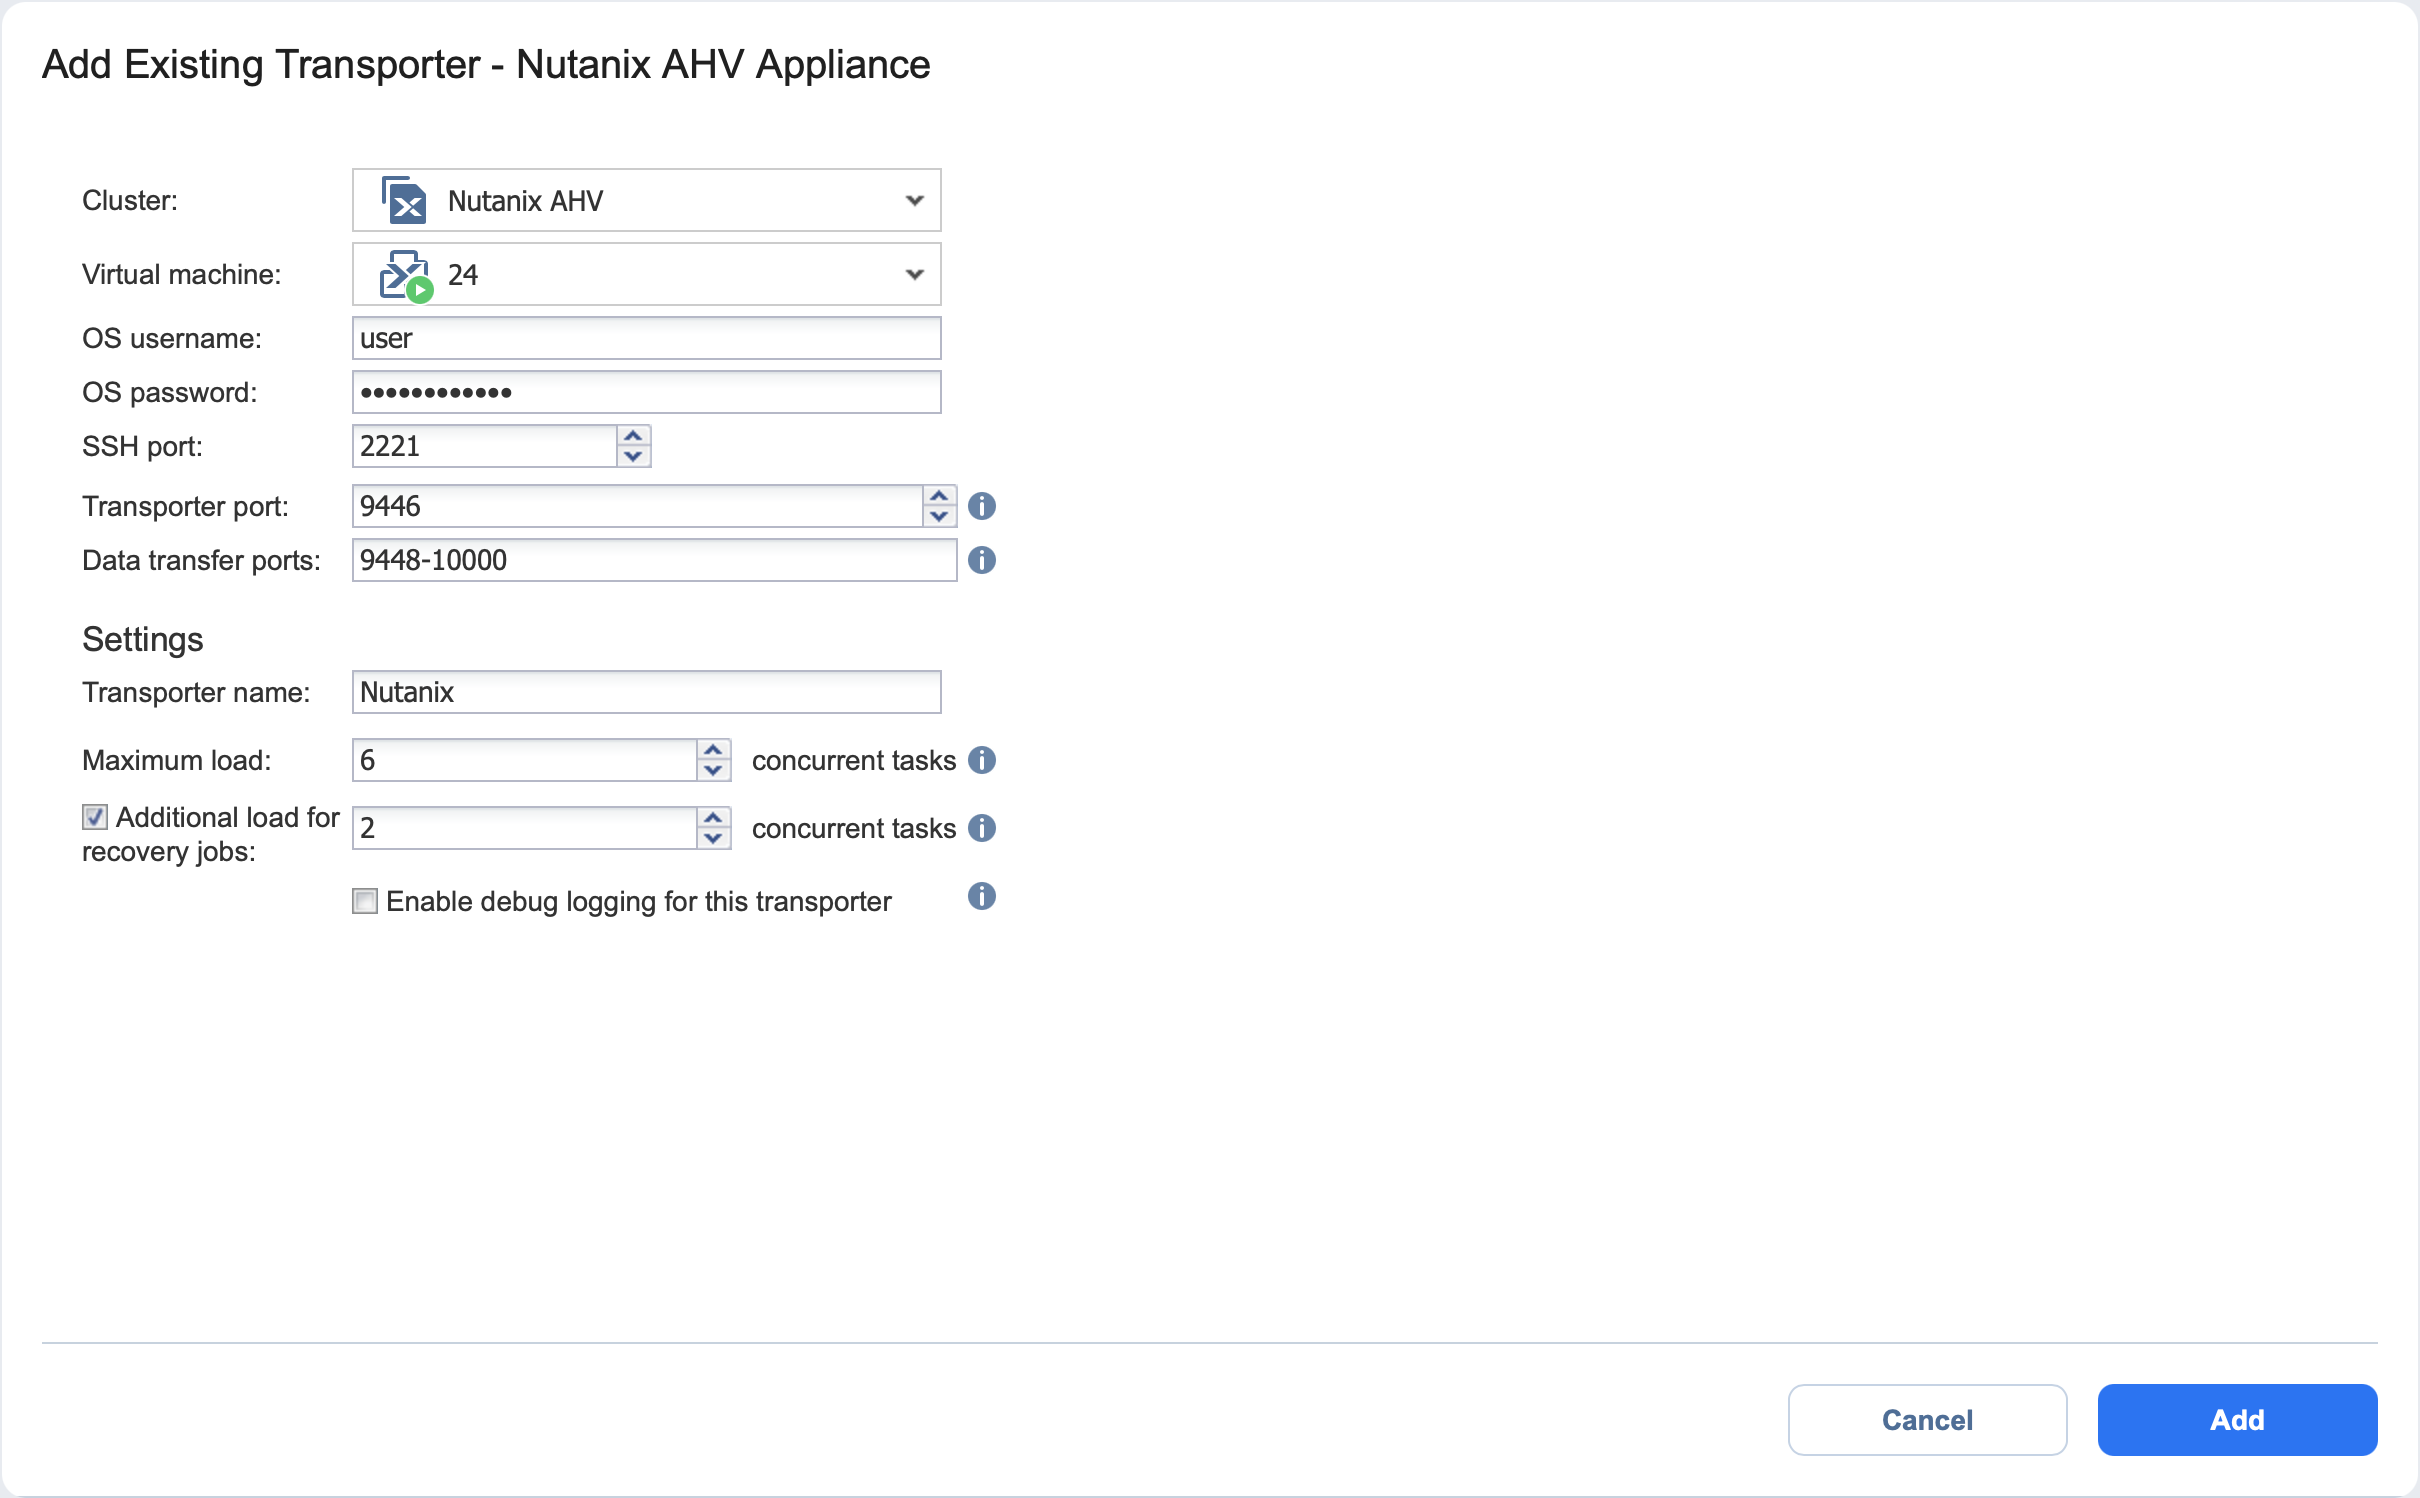
In the Add Existing Transporter - Nutanix AHV Appliance dialog, enter the following options:
-
In the Cluster box, select the cluster where the corresponding virtual machine is deployed.
-
In the Virtual machine box, specify the virtual machine on which the Transporter is installed.
-
In the OS Username and OS Password fields, specify credentials for accessing the virtual machine.
-
In the SSH port box, enter the SSH port if needed.
-
Click More options to reveal and edit the following fields:
-
In the Networking section:
-
Transporter port: Specify the port number that will be used to connect to the Transporter.
-
Data transfer ports: Specify a range of port numbers (from 1 to 65535) that will be used to transfer data. The range you specify should contain at least 100 ports. Make sure that the ports you specify are open in your firewall.
-
-
In the Settings section:
-
Transporter name: Specify a display name for the Transporter.
-
Maximum load: Specify the maximum number of tasks that the Transporter should process simultaneously. A task, for example, is a backup or replication of a single VM disk, or one granular recovery session.
-
Additional load for recovery jobs: If selected, the specified amount of tasks will be added to set maximum transporter load to be used for recovery jobs exclusively.
-
Enable debug logging for this Transporter: If needed, enable debug level logging for the current transporter. It is not recommended that you use this option on a permanent basis.
-
-
-
-
Click Add. The Transporter is added to the product and can be used for backup, replication, and recovery jobs.