Recovery Job Wizard for VMware: Options
On the Options page of the wizard, set the recovery job options.
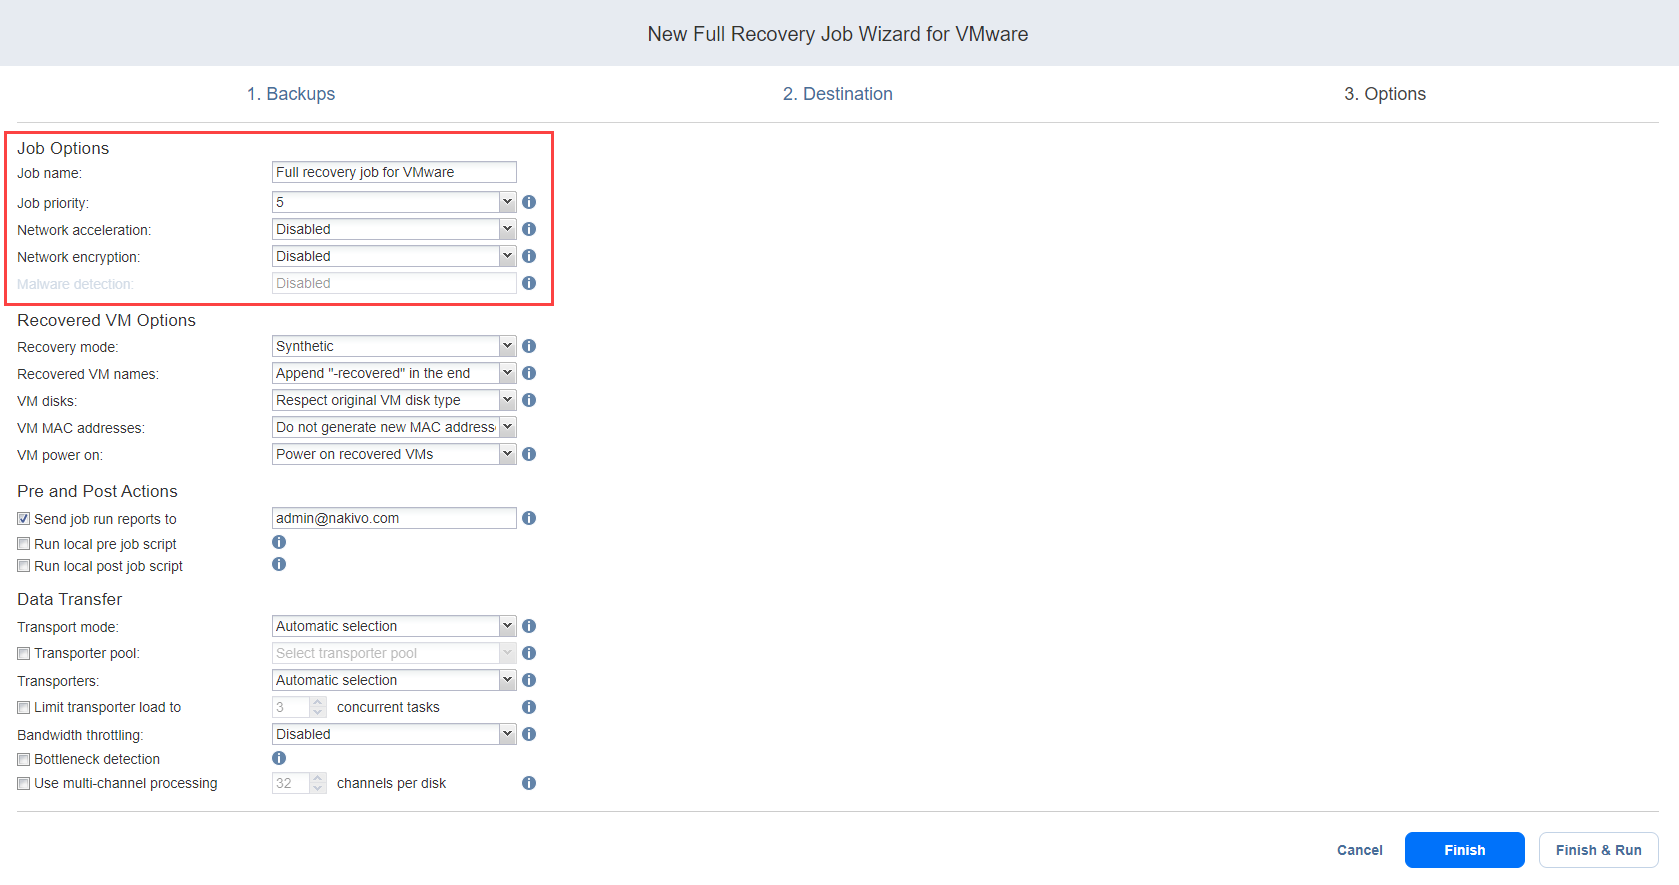
Job Options
Specify the general options as follows:
-
Job name: Specify a name for the recovery job.
-
Job priority: Select a job priority level between 1 and 5, with 1 being the highest priority. Jobs with higher priority levels are prioritized by Transporters during job processing.
Note
This option is only available in the Enterprise, Enterprise Essentials, Enterprise Plus, MSP Enterprise, and MSP Enterprise Plus editions. -
Network acceleration: With network acceleration enabled, NAKIVO Backup & Replication uses compression and traffic reduction techniques to speed up data transfer. Enable this option if you plan to recover VMs over WAN or slow LAN links.
-
Network encryption: With network encryption enabled, VM data is protected with AES 256 encryption while traveling over the network. Data encryption increases the backup time and CPU load on machines running Transporters. Select this option when recovering over WAN without a VPN connection.
-
Malware detection: With this option enabled, the backups are scanned for malware using the configured antivirus software on the scan server.
-
Optionally, if you have selected Enabled for the Malware detection option, click the settings link to configure the following options:
-
Scan server: Select a specific scan server for the job or leave the Default setting. If Default is selected, the Transporter is used as the scan server and can support a maximum of 2 concurrent scan tasks.
Notes
-
For the Default option, if the Repository Transporter is the installed Transporter, it require the master password to function as the scan server.
-
For more details on the requirements for Scan Server, refer to the Feature Requirements.
-
-
Scan type: Choose between the Deep scan and the Quick scan:
-
Deep scan: When this option is selected, the antivirus software scans the entire backup and may take longer to complete.
-
Quick scan: When this option is selected, the antivirus software scans only OS disks in the backup.
-
-
If malware is detected: Choose the behavior if malware is detected:
-
Fail the recovery job: With this option, the recovery process fails in case the job has only one VM. If the job has several VMs, the infected VMs are skipped and the job continues to run.
-
Continue and recover to isolated network: When this option is selected, the recovery job completes the scanning process and recovers the infected VMs to a temporary isolated network.
-
-
Scan timeout: Specify the timeout for the malware detection process. If the specified amount of time is exceeded, the recovery job fails.
-
Click Apply when you’re done.
-

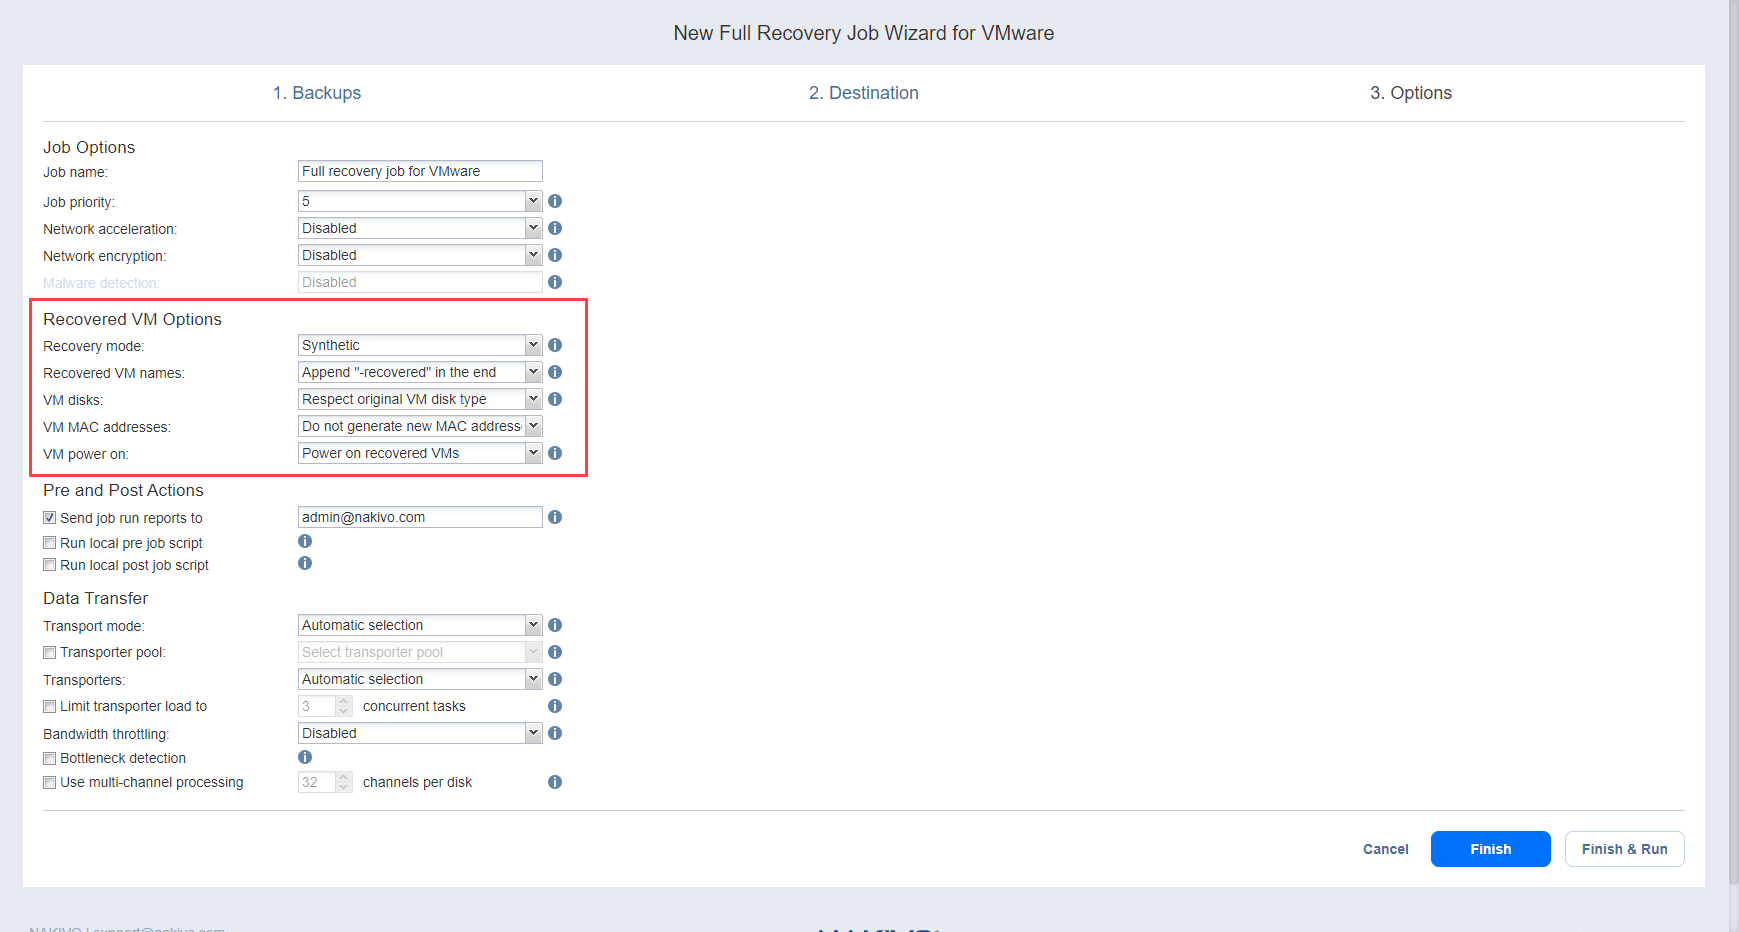
Recovered VM Options
Specify the recovery options as follows:
-
Recovery mode: Choose one of the following:
-
Synthetic: With this recovery mode, the VMs are recovered with the environmental dependencies (such as CPU affinity) removed. Select this option when recovering VMs to a new location.
-
Production: With this recovery mode, environment dependencies are preserved on recovered VMs. Make sure the location to which the VMs are recovered does not contain the original VMs, otherwise, UUID and MAC address conflicts may occur.
-
-
Recovered VM names: Choose one of the following:
-
Append "-recovered" in the end: Source VM names are used for recovered VM names and “-recoverd” is added after the name of the recovered VMs.
-
Leave recovered VM names as is: Recovered VM names are identical to the source VM names.
-
Enter custom recovered VM names: You can enter custom names for recovered VMs.
-
-
VM disks: Choose one of the following:
-
Respect original VM disk type: When specified, disks that respect the original VM disk type are created on target VMs. Select this option to recover VMs to their original location.
-
Create only thin disks on target VMs: When specified, only thin disks are created on target VMs. Use this option to save space on the target datastore.
-
-
VM MAC addresses: Choose one of the following:
-
Do not generate new MAC addresses: When this option is selected, the recovered VM has the same MAC address as the source VM.
-
Generate new MAC addresses: When this option is selected, a new MAC address is generated for the recovered VM.
-
-
VM power on: When the Power on recovered VMs option is selected, the recovered VMs are powered on.

Pre and Post Actions
NAKIVO Backup & Replication allows you to run a script before VM recovery begins (a pre-job script) and after the recovery of all VMs in the job has completed (a post-job script). The scripts can only be executed on the machine on which the Director is installed.
Setting a Pre-Job Script
To run a script before the product begins recovering VMs, do the following:
-
Place a script file on the machine on which the Director is installed.
-
Select the Run local pre job script option and click the settings link.
-
Specify the following parameters in the dialog box that opens:
-
Script path: Specify a local path to the script on the machine on which the Director is installed. A script interpreter should be specified.
Example (Windows): cmd.exe /c D:\script.bat
Example (Linux): bash /root/script.sh
-
-
Job behavior: Choose one of the following job behaviors in relation to script completion:
-
Wait for the script to finish: With this option selected, VM backup is started only after the script is completed.
-
Do not wait for the script to finish: With this option selected, the product runs the script and starts backing up VMs at the same time.
-
-
Error handling: Choose one of the following job behaviors in relation to script failure:
-
Continue the job on script failure: With this option selected, the job performs VM backup even if the script has failed.
-
Fail the job on script failure: With this option selected, if the script fails, the job is failed and VM backup is not performed.
-
Setting a Post-Job Script
To run a script after the product has finished backing up all VMs, do the following:
-
Place a script file on the machine on which the Director is installed.
-
Select the Run local post job script option and click the settings link.
-
Specify the following parameters in the dialog box that opens:
-
Script path: Specify a local path to the script on the machine on which the Director is installed. A script interpreter should be specified.
Example (Windows): cmd.exe /c D:\script.bat
Example (Linux): bash /root/script.sh
-
-
Job behavior: Choose one of the following job behaviors in relation to script completion:
-
Wait for the script to finish: With this option selected, the job is in the “running” state until the script is completed.
-
Do not wait for the script to finish: With this option selected, the job is completed even if the script execution is still in progress.
-
-
Error handling: Choose one of the following job behaviors in relation to script failure:
-
Continue the job on script failure: With this option selected, script failure does not influence the status of the job.
-
Fail the job on script failure: With this option selected, if the script fails, the job status is set to “failed” even if VM backup is successful.

-
Email Notifications
NAKIVO Backup & Replication can send email notifications about job completion status to specified recipients. This feature complements global notifications and allows you to configure notifications on a per-job level.
To enable this option, make sure that Email settings are configured.
To send email notifications, do the following:
-
In the Pre and Post Actions section, select the Send job run reports to.
-
Specify one or more email addresses in the text box. Use semicolons to separate multiple email addresses.
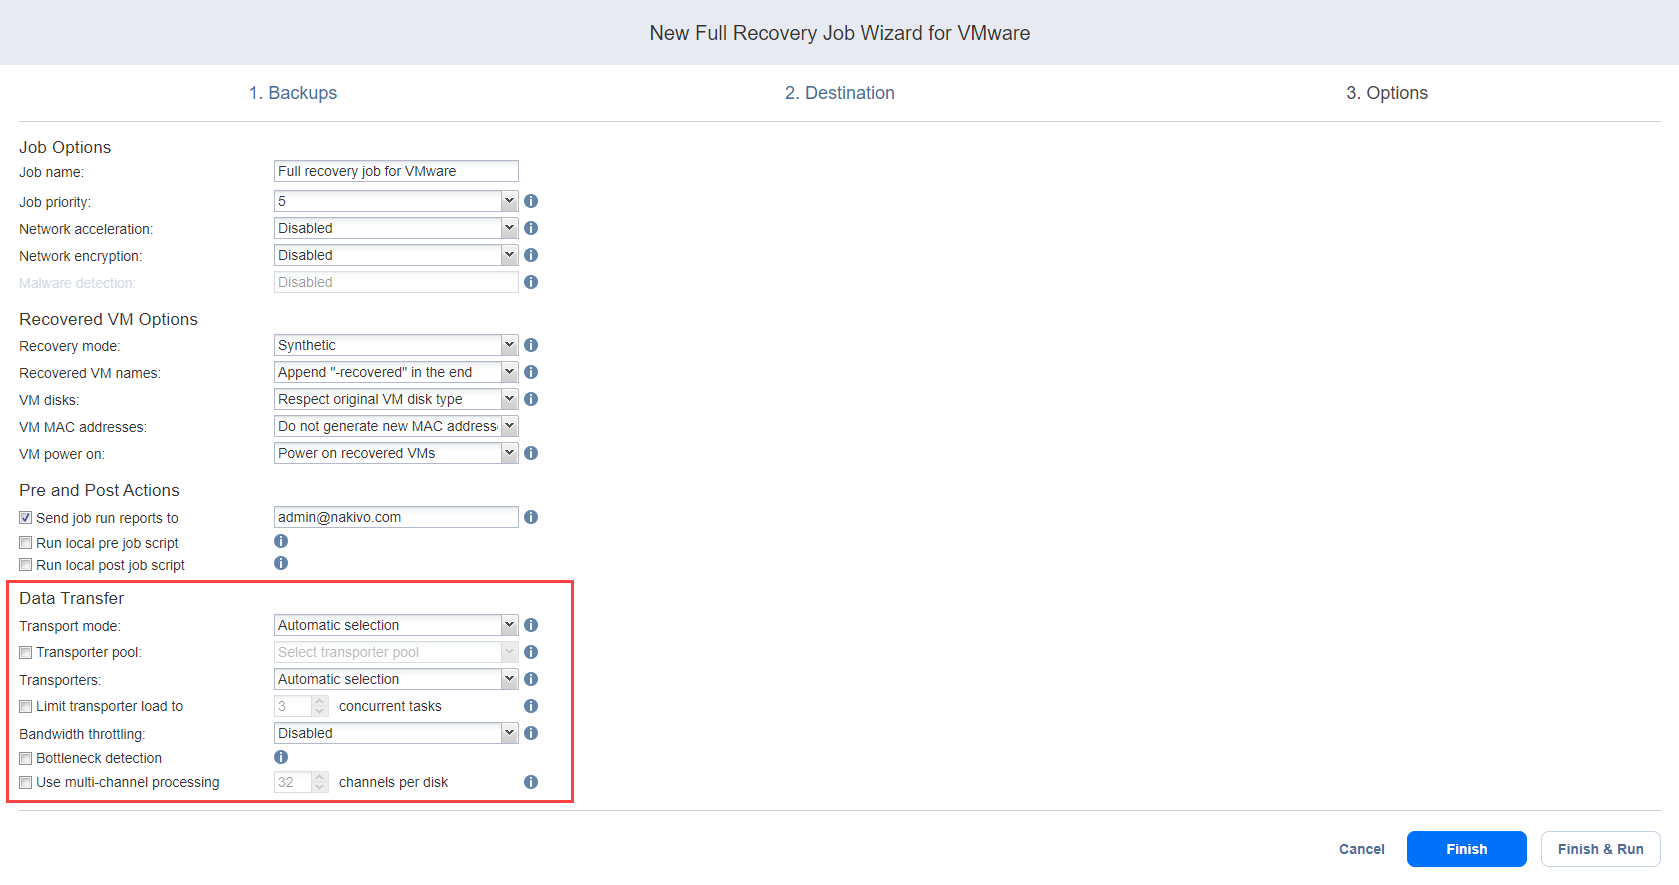
Data Transfer
In the Data Transfer section, choose a transport mode for writing VM data, select which Transporter to be used for reading data from the source VM, and set bandwidth throttling.

Transport Mode
NAKIVO Backup & Replication provides the following transport modes for writing VM data:
-
Automatic: When this option is chosen, Hot Add mode is used where possible. If the product cannot use Hot Add, LAN mode is used.
-
Hot Add only: NAKIVO Backup & Replication can write data directly to the datastore, bypassing the network, which can significantly improve job performance. This is achieved with the help of VMware's Hot Add technology. In order for the Hot Add feature to work, the target Transporter (the one that will be writing data ) should run on a host that has access to the target datastore(s).
-
LAN only: Data will be written over LAN.
Transporter Pool
If this option is enabled, only the transporters that belong to the selected transporter pool shall be used during the job run.
Transporters
By default, the product automatically determines which Transporter should be used to read data from the source VM. However, you can manually specify which Transporters should be used for the job:
-
Automatic selection: The product automatically determines the Transporters that are closest to the source and target hosts.
-
Manual - configured for all VMs: Select this option to manually specify a single source and a single target Transporter to be used for data transfer by the job.
-
Manual - configured per host: Select this option to manually specify Transporters for all source and target hosts.
Transporter Load
You can limit the maximum number of transporter tasks used by the job. By default, this number is set to 3 concurrent tasks.
To change the default number of tasks, do the following:
-
In the Data Transfer section, select the Limit transporter load to checkbox.
-
Specify the number of concurrent tasks in the corresponding box.
Bandwidth Throttling
Follow the steps below to set the speed of data transfer over the network for your recovery job:
-
For the Bandwidth throttling option, choose Enabled.
Note
If bandwidth throttling is disabled for the current job, global bandwidth rules may still apply to your job. Refer to Bandwidth Throttling for details.
-
Click the Settings link that becomes available.
-
The Job Bandwidth Rules dialog box opens displaying the list of available rules. You have the following options:
-
Create a new bandwidth rule for your recovery job:
-
Click the Create New Rule button.
-
The New Bandwidth Rule dialog box opens. Refer to the Bandwidth Throttling topic for details on creating a bandwidth rule.
-
Click Save.
-
-
Activate an existing bandwidth rule for your job: Select the checkbox to the left of the required bandwidth rule. To deactivate a bandwidth rule for your job, deselect the corresponding checkbox.
-
Edit a bandwidth rule: Click the Edit link for a bandwidth rule and modify it in the Edit Bandwidth Rule dialog box that opens.
-
Disable a bandwidth rule: Click the Disable link. The bandwidth rule is disabled for all jobs.
-
Remove a bandwidth rule: Click the Remove link and then click Delete to confirm your operation.
-
Multi-Channel Processing
When this option is enabled, NAKIVO Backup & Replication performs recovery in multiple channels simultaneously, which can increase recovery speed. Specify the number of threads in the # channels per disk field.
Important
The Transporter needs to have at least 2 CPU cores and 8 GB RAM available to perform recovery in multiple channels.
Multi-channel processing is not supported for items added using Direct Connect.
Bottleneck Detection
When the Bottleneck detection option is enabled, additional information is collected and recorded in NAKIVO Backup & Replication logs in the course of data transfer for the purpose of bottleneck detection. Check this option to enable the Bottleneck detection capability of the Transporters engaged in the job.
Completing the New Recovery Job Wizard for VMware
Click Finish or Finish & Run to complete the job creation.
Note
If you click Finish & Run, you will have to define the scope of your job. Refer to Running Jobs on Demand for details.