Adding Physical Machines to Inventory
NAKIVO Backup & Replication allows you to use the existing agent when adding Windows or Linux physical machine to NAKIVO Backup & Replication inventory. For this option to be available, you need to install or update the agent on the physical machine.
Manual Installation of Physical Agent
To install or update a physical agent, do the following:
For Windows:
-
Copy file C:\Program Files\NAKIVO Backup & Replication\packages\transporter-physical-windows.zip in machine housing NAKIVO Backup & Replication and extract to C:\Program Files\NAKIVO Backup & Replication\transporter folder in the physical machine. Create the folder if it does not exist.
-
Copy VC redists (vcredist_v90_x64.exe, vcredist_v120_x64.exe, vcredist_v170_x64.exe) to "C:\Program Files\NAKIVO Backup & Replication\transporter" folder in the physical machine.
-
Download the installer archive here and extract to C:\Program Files\NAKIVO Backup & Replication\transporter folder in the physical machine. Note that the installer.zip file may be periodically updated so you may need to redownload it with each product release.
-
Run the command: bhsvc.exe -b [keyPassword] to generate bhsvc.id file with pre-shared key. Note that you can replace [keyPassword] with the desired password.
-
Full path: C:\Program Files\NAKIVO Backup & Replication\transporter\bhsvc.exe -b
-
Run the install.bat file as an Administrator.
Notes
-
Make sure to check permissions in case the user is not the Administrator.
-
UAC must be turned off on the PC.
-
-
Add the agent as the installed service.
For Linux:
-
Make sure you have the required permissions. Note that the creation of pam.d file is necessary for RHEL, CentOS, and SLES operating systems, but is not required for Ubuntu OS.
-
Copy transporter-physical-linux-installer.sh to the server (/tmp) located in packages folder of NAKIVO Backup & Replication installation folder to the /tmp folder on the target physical machine.
-
Run the following command for silent installation/update of the agent.
sudo bash /tmp/transporter-physical-linux-installer.sh -s 9446 -i /opt/nakivo/transporter -p [keyPassword] --pam-conf --eula-accept
-
Create and edit the bhsvc file. Do the following:
-
Launch the vi editor and create a new bhsvc file using the following command:
vi /etc/pam.d/bhsvc
-
Edit the content of the bhsvc file to have it contain the following:
auth required pam_unix.so nullok
auth required pam_nologin.so
account required pam_unix.so
session required pam_selinux.so close
session required pam_loginuid.so
-
Save the bhsvc file and close the vi editor:
-
Press the Esc button to switch the vi editor to the Normal mode.
-
Enter the ":" symbol to switch to the Command-line mode.
-
In the Command-line mode, enter the "x" symbol and then press Enter.
-
-
Provide the necessary permissions for the bhsvc file with the following command:
chmod 644 /etc/pam.d/bhsvc"
-
-
Make sure to exclude “--pam-conf” for Ubuntu-type of OSes.
-
Add the agent as the installed service. If you encounter errors when adding the agent or Transporter as an installed service, you may need to downgrade the security for Linux, including the following:
-
Adding new firewall rules for port 9446 and data transfer ports.
-
Editing sudoers.
-
Disabling SELinux.
-
Adding a Physical Machine
To add a Windows or Linux physical machine to NAKIVO Backup & Replication, follow the steps below:
-
Make sure that a physical machine is a supported version and all prerequisites are met before proceeding. For more details, refer to Supported Platforms.
-
Click Settings in the left pane of the product.
-
Go to the Inventory page and click Add New.
-
On the Platform page of the wizard, select Physical and click Next to proceed.
-
On the Options page of the wizard, fill in the following fields.
-
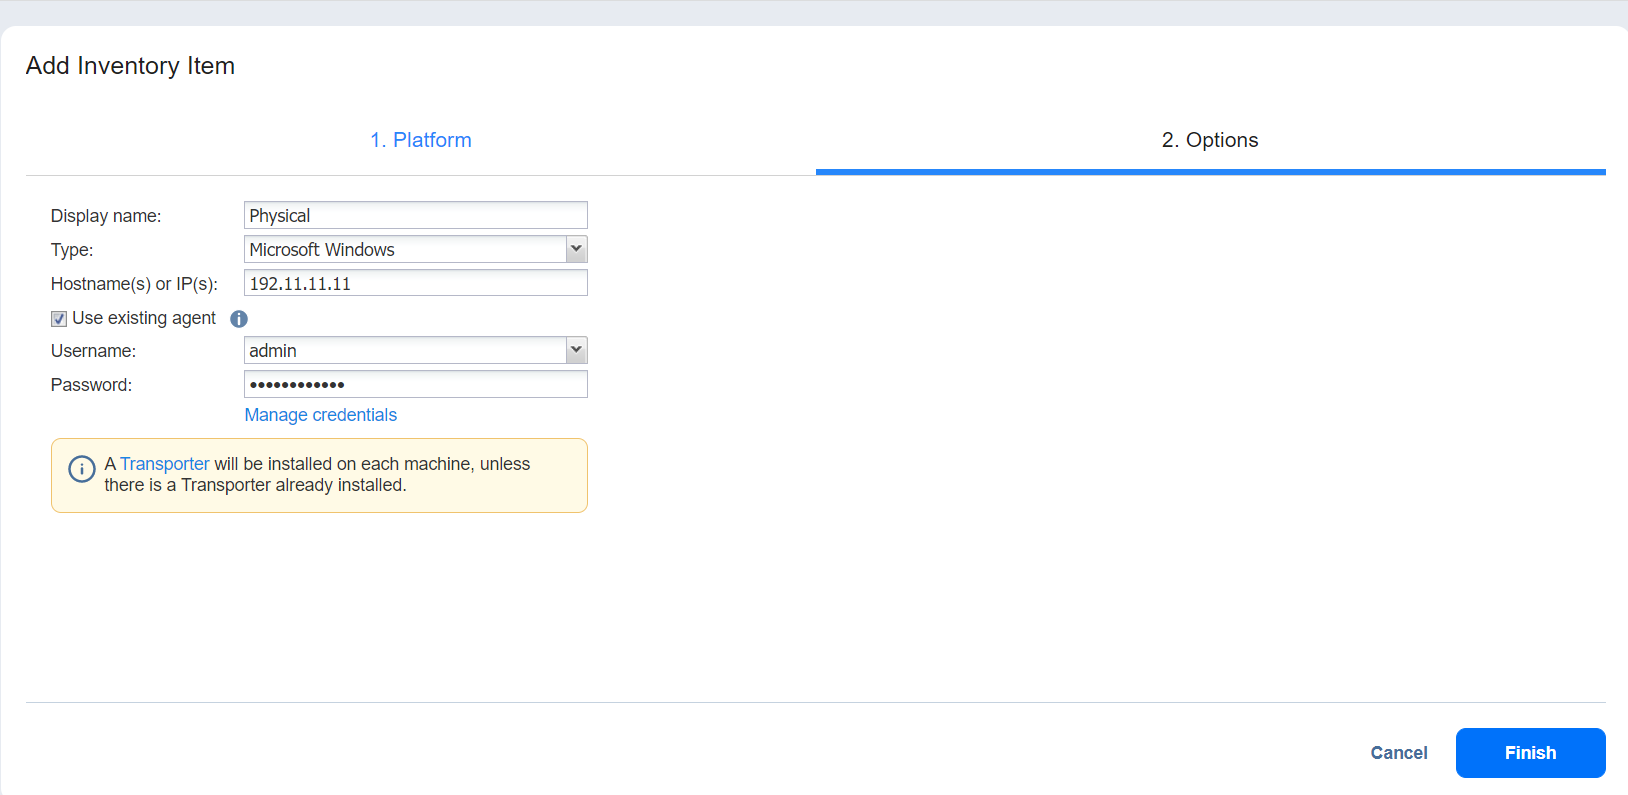
For Windows physical machines:
-
Display name: Specify a name for the physical machine. This name will be displayed in the inventory.
-
Type: Display the type of machine that you add to the inventory.
-
Hostname(s) or IP(s): Specify the hostname or IP address of the physical machine that you want to add to the inventory. To add multiple physical machines at once, use commas to separate hostnames or IP addresses, or use a dash for an IP address range.
- Use existing agent: If this option is selected, the product will use the existing physical machine agent for discovering the machine.
-
Username: Provide a username for the physical machine.
-
Password: Provide a password for the physical machine.
-
-
-
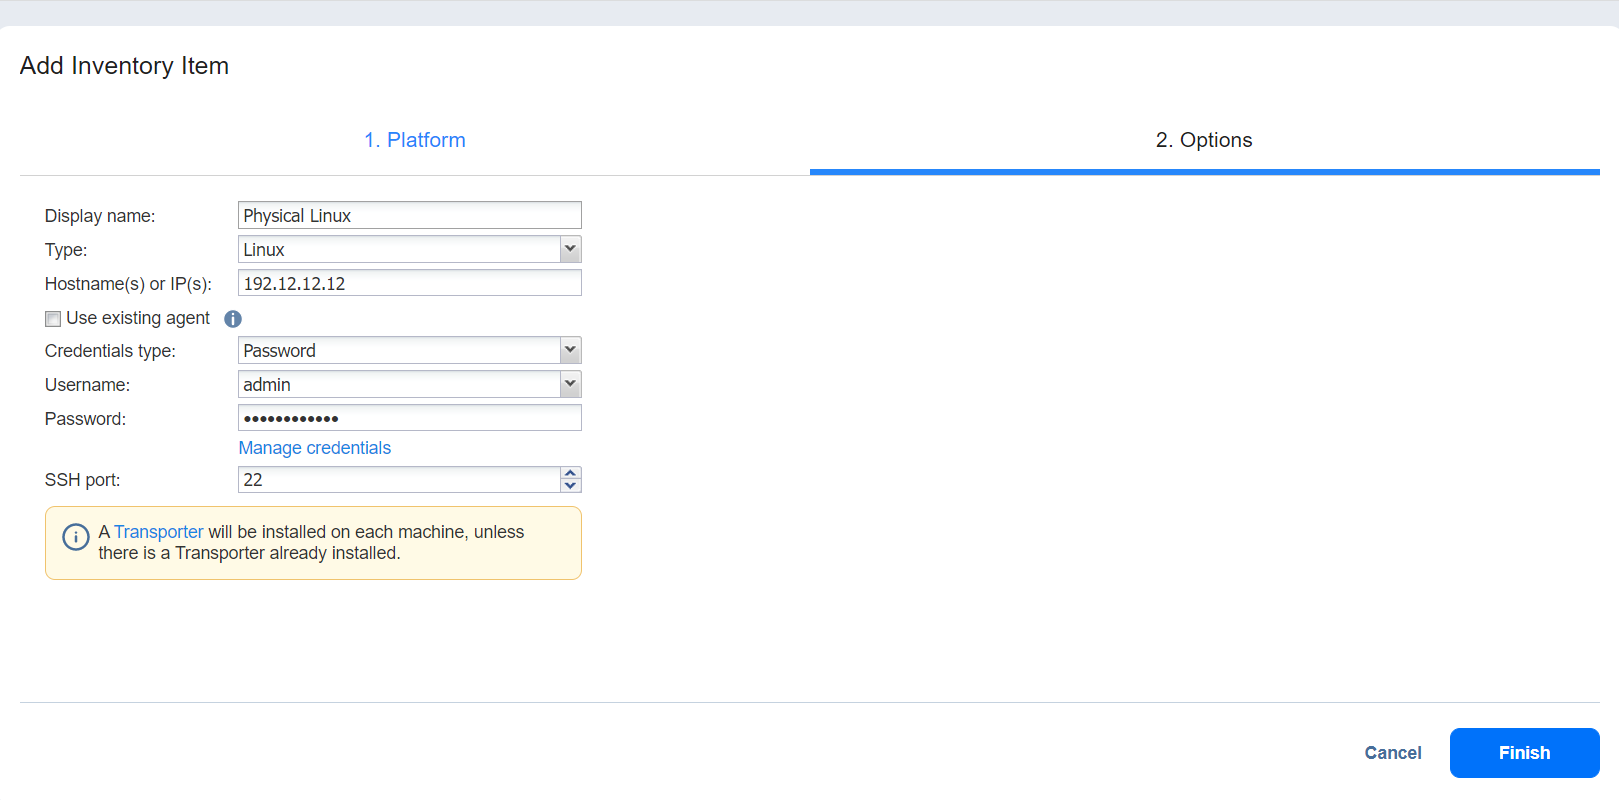
For Linux physical machines:
-
Display name: Specify a name for the physical machine. This name will be displayed in the inventory.
-
Type: Display the type of machine that you add to the inventory.
-
Hostname(s) or IP(s): Specify the hostname or IP address of the physical machine that you want to add to the inventory. To add multiple physical machines at once, use commas to separate hostnames or IP addresses, or use a dash for an IP address range.
-
Use existing agent: If this option is selected, the product will use the existing physical machine agent for discovering the machine.
Notes
-
For this option to be available, you need to manually install the physical agent.
-
The manually installed agent is not updated automatically during product auto-update.
-
The Use existing agent option is disabled in case Private Key credentials type is selected.
-
-
SSH port: Specify the SSH port number to provide access to the physical machine. The default SSH port number is 22.
-
Credentials Type: Select the type of credentials used to access the physical machine.
-
Password
-
Username: Provide a username for the physical machine.
-
Password: Provide a password for the physical machine.
-
-
Private Key
-
Credentials: Select the saved private key-based credentials. Refer to Managing Credentials for details.
Note
You will not be able to change the type of key credentials through the Manage Credentials option.
-
-
-
6. Click Finish. The successfully added physical machine is displayed on the inventory list.
-
-