Installing I/O Filter
I/O Filter is a software module that installs into a cluster and allows intercepting and manipulating VM's I/O. In order to create and run a real-time replication job for VMware, the source cluster(s) must have the I/O Filter tool installed. See the sections below for details.
Installation
I/O Filter is a software module that installs into a cluster and allows intercepting and manipulating VM's I/O. I/O Filter should be installed into a Cluster. There is no need to install the I/O Filter on the target side. The Setup Real-Time Replication Service wizard is used to install I/O Filter on Cluster and assign VM Storage policy to the source VMs.
Installing the I/O Filter on a cluster will create an instance of I/O Filter Daemon on every ESXi host of the cluster.
Notes
The ESXi host's acceptance level must be set to Community level. Therefore, only clusters using baselines are supported (no clusters using a single image are supported).
To check a host's acceptance level, select the host and navigate to Configure > System > Security Profile. The acceptance level is displayed under Host Image Profile Acceptance Level.
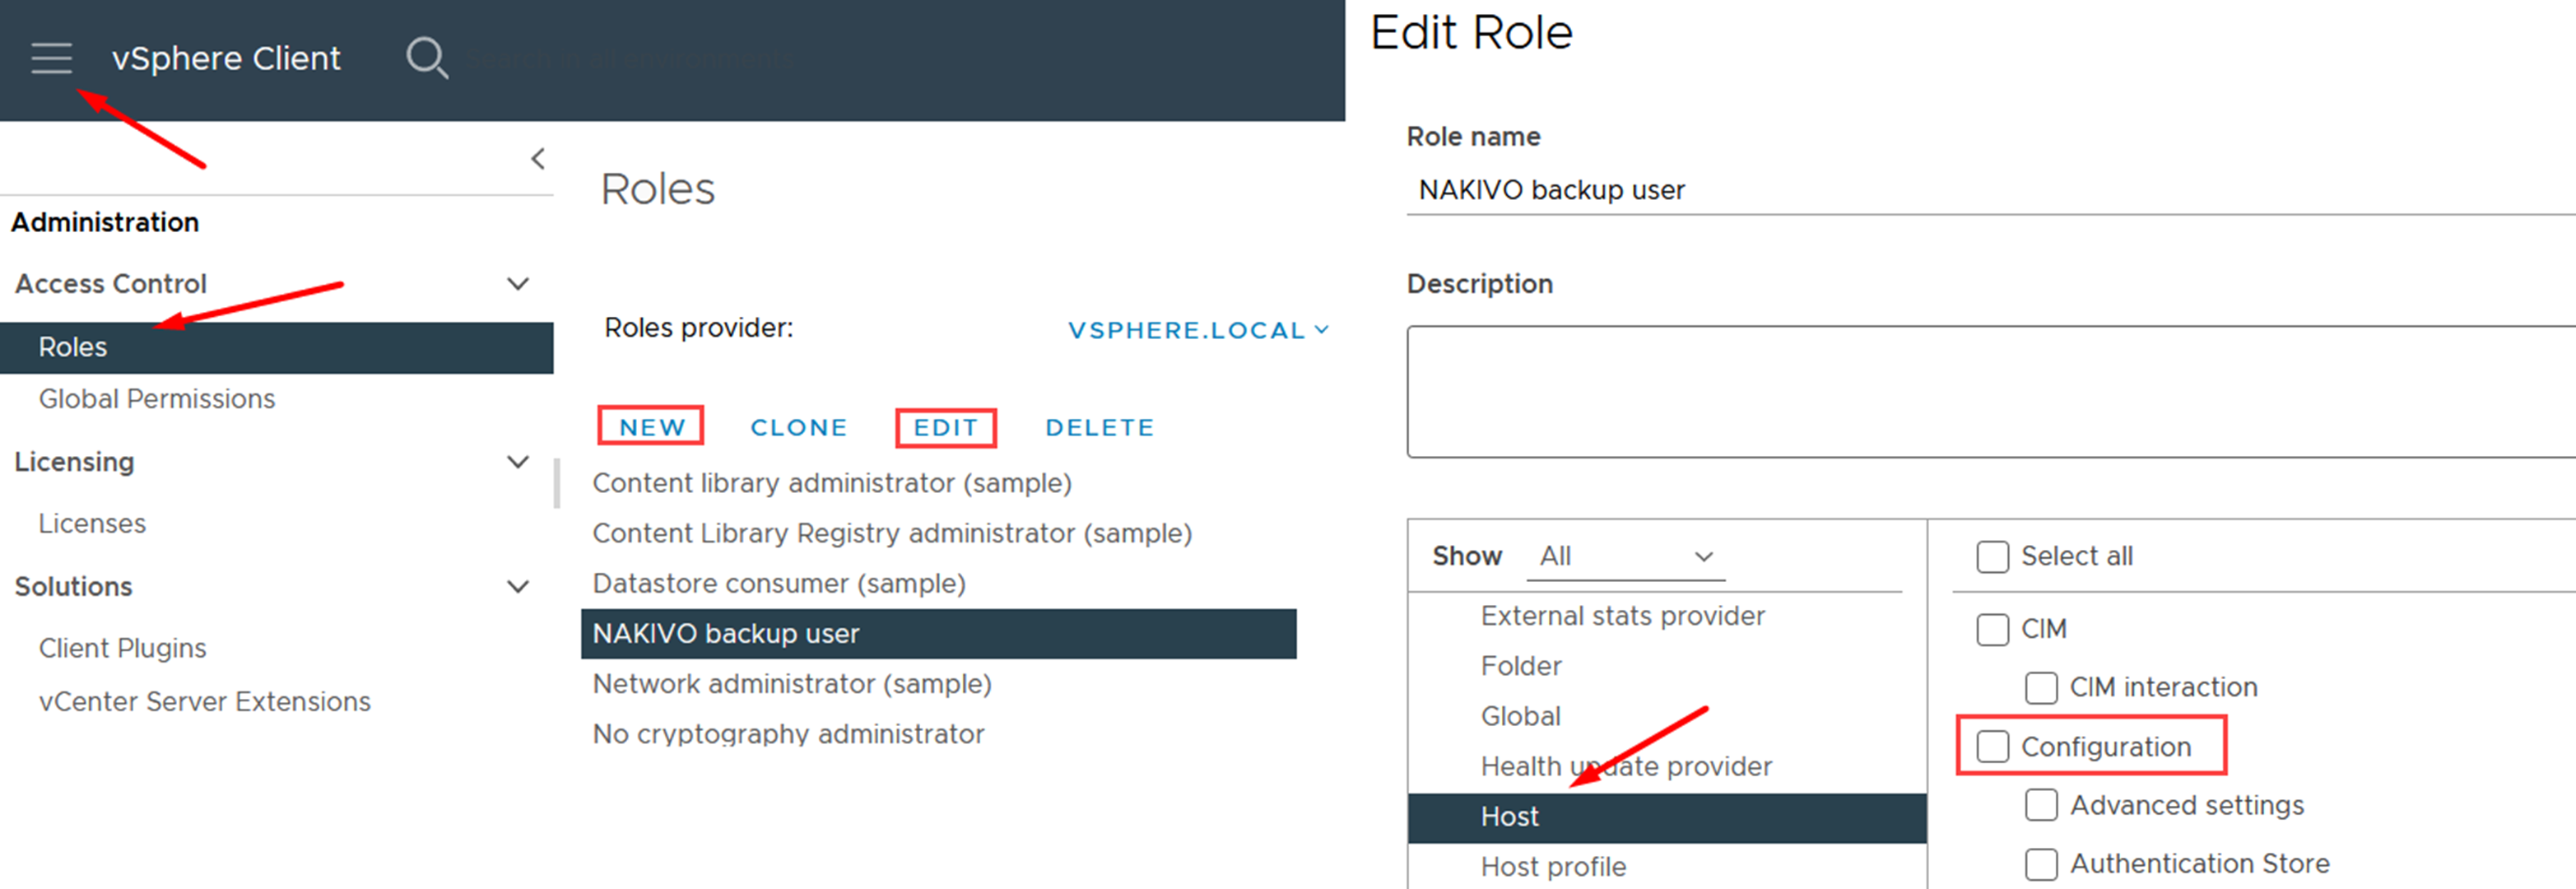
The Query patch vCenter permission must be granted to NAKIVO Backup & Replication to manage the I/O Filter (Host > Configuration > Query patch). Note that the Query patch vCenter permission must be granted for the user who used to add to the NAKIVO Inventory. Refer to the following screenshots for details:
Note
By default, the I/O Filter bundle file is located in the NAKIVO Backup & Replication iofilter folder:
On Windows:
C:\Program Files\NAKIVO Backup &Replication\packages\iofilter-vaio7
C:\Program Files\NAKIVO Backup & Replication\packages\iofilter-vaio8
On Linux:
/opt/nakivo/director/packages/iofilter-vaio7
/opt/nakivo/director/packages/iofilter-vaio8
The VAIO SDK 7 can be used for vSphere versions 7.0 – 8.0.3 and is automatically installed on vSphere version 7.0. The VAIO SDK 8 can be used for vSphere versions 8.0 – 8.0.3 and is automatically installed according to the vSphere version.
Proceed as follows:
-
Navigate to the main UI and select the Settings > Nodes tab.
-
Click “+” (plus) button and select Real-Time Replication Service under the Deploy New Node section.
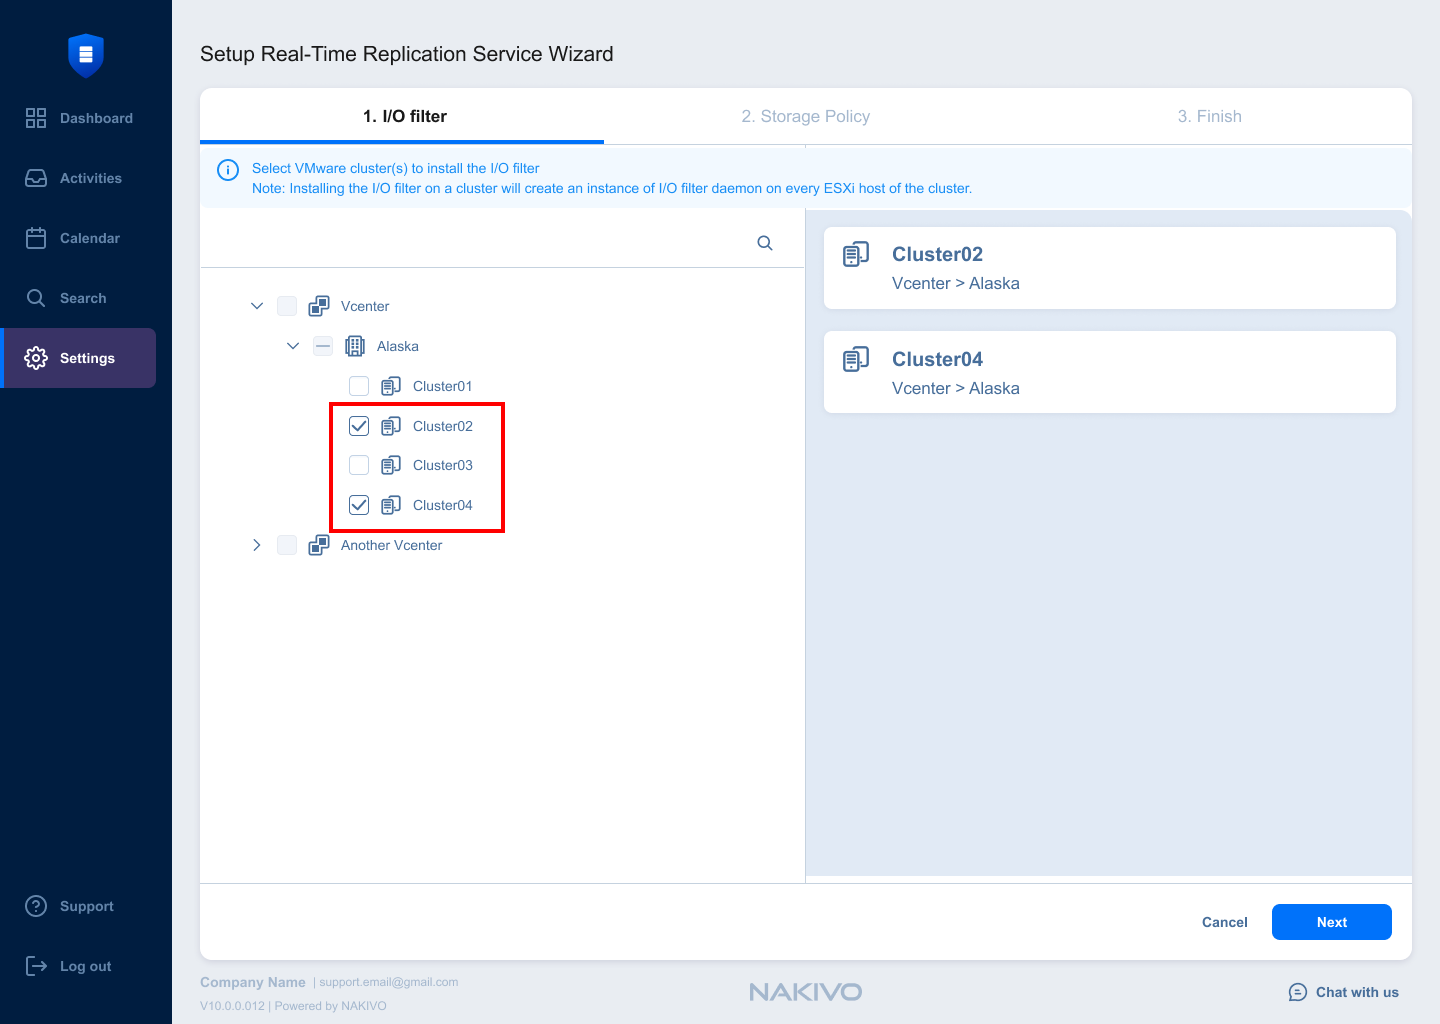
This opens the Setup Real-Time Replication Service Wizard, showing a list of discovered VMware hosts and clusters.
-
Choose the VMware clusters where the I/O Filter package will be deployed. If a cluster has an I/O Filter installed, the VMware cluster is selected by default.
-
Click Next to proceed to the Storage Policy configuration step.
-
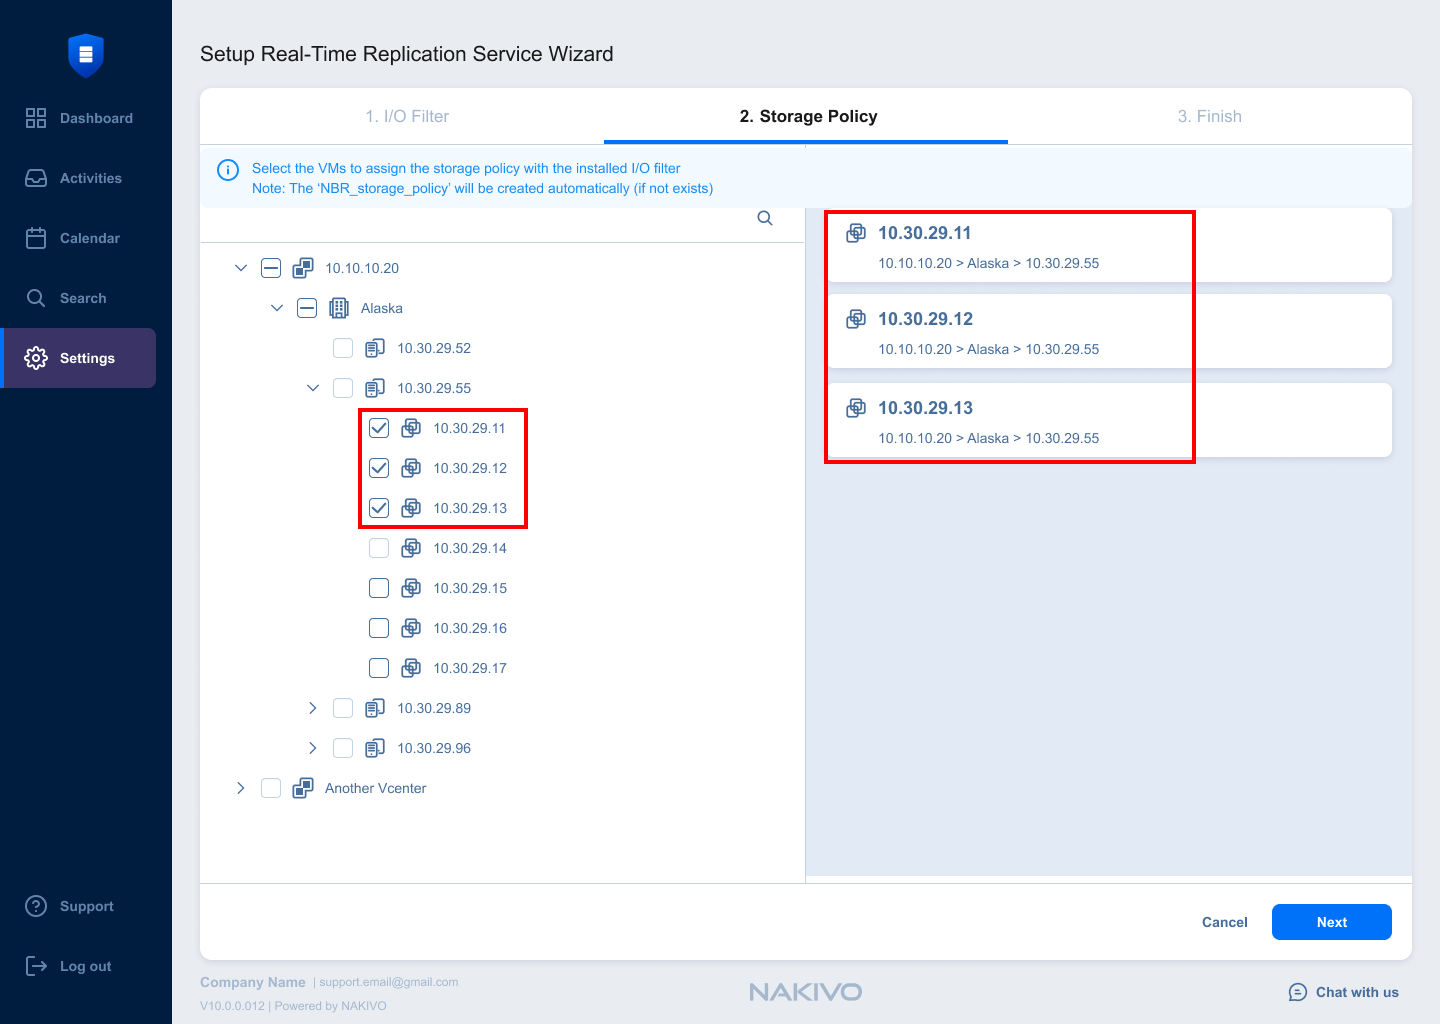
Select VMware VMs from the list on the left to assign a storage policy that uses the installed I/O Filter. The default storage policy will automatically be assigned to the selected VM.
-
If the selected VM already has the default storage policy assigned, a dialog window will appear, prompting you to remove the policy from the VM. Click Continue to proceed, and the VM will be deselected. Otherwise, click Cancel to dismiss the window and keep the policy assigned.
-
Click Next to proceed to the Finish step.
-
Click Close to exit the wizard. The I/O Filter will be automatically installed on the selected cluster(s).


Notes:
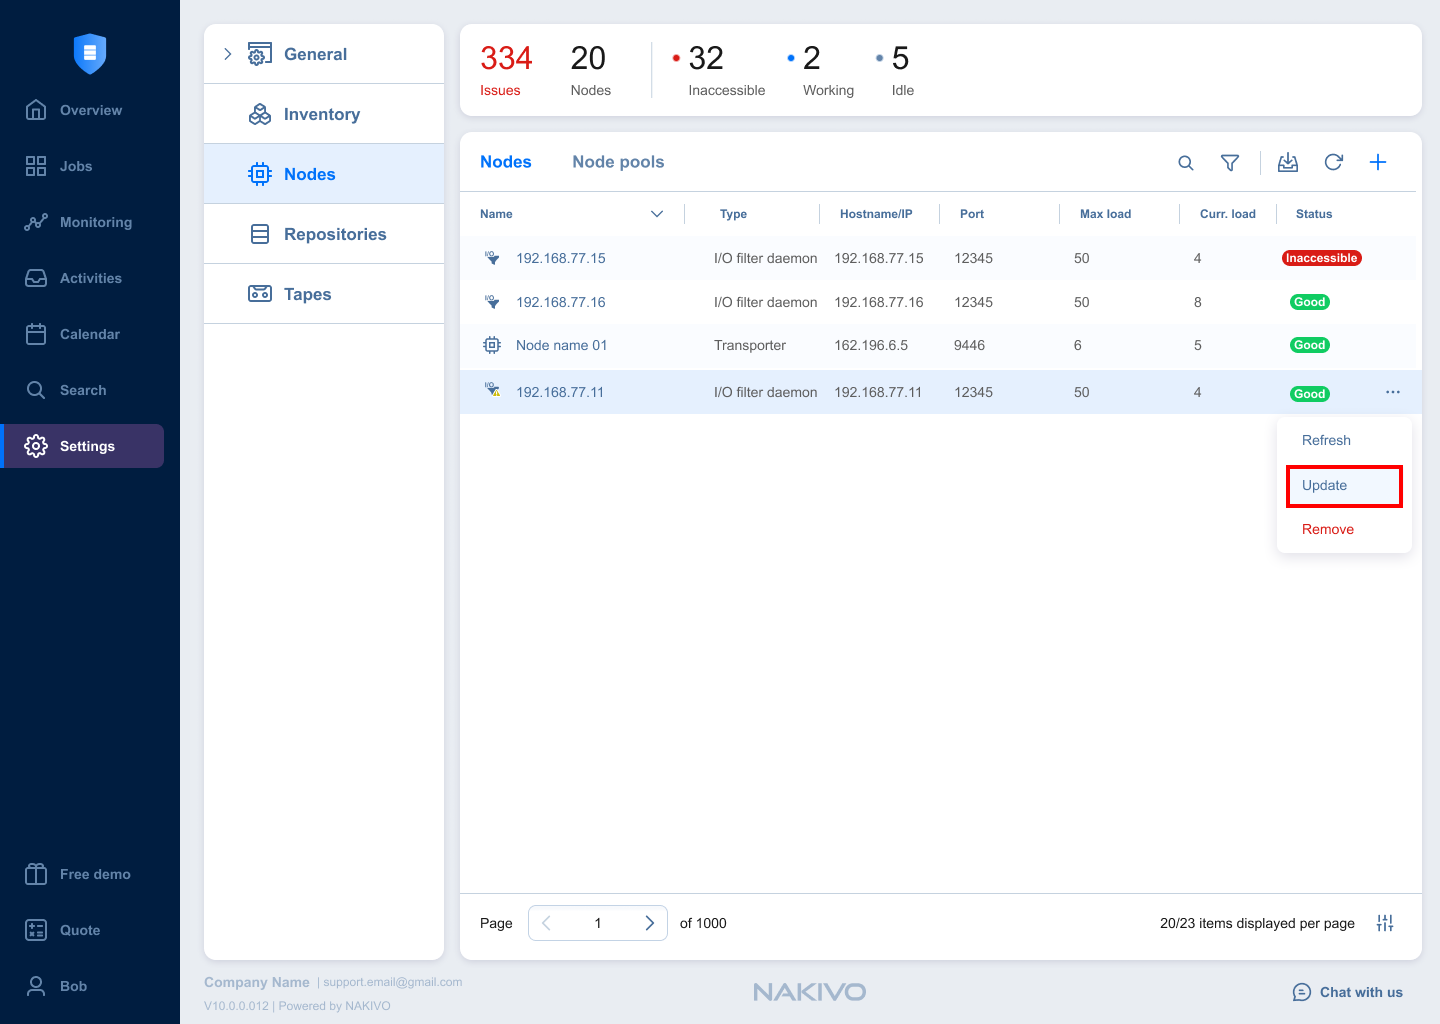
The list of installed I/O filters is displayed in the Nodes UI. Click on the desired I/O Filter Daemon to view its details.
I/O filters can be installed on up to 10 clusters simultaneously.
If the installation fails, it will be retried 3 times with 1-minute intervals between attempts.
If a cluster has an older version of the I/O Filter installed, the I/O Filter will be updated to the latest version.
Clusters with the latest version will skip the installation process.
In multi-tenant mode, if vCenter was added to the Inventory from the tenant, the tenant can install/uninstall I/O Filter and assign/unassign VM Storage Policy. In case the Master tenant has assigned resources to the tenant, the local tenant user can not install/uninstall them, only refresh action is available.
Update
Notes
If VMware vSphere Distributed Resource Schedule (DRS) is disabled, manually place cluster hosts in maintenance mode before proceeding. If DRS is enabled, hosts are placed in maintenance mode automatically.
The ESXi host's acceptance level must be set to Community level. Therefore, only clusters using baselines are supported (no clusters using a single image are supported).
To check a host's acceptance level, select the host and navigate to Configure > System > Security Profile. The acceptance level is displayed under Host Image Profile Acceptance Level.
If an I/O Filter is not the latest version, a warning sign is displayed. To update an existing I/O Filter, do the following:
-
Navigate to the main menu and select the Settings > Nodes tab.
-
Hover the I/O Filter Daemon that requires updating from the list, click ellipses and select the Update option. Setup Real-Time Replication Service wizard opens.
-
On the I/O Filter step of the Setup Real-Time Replication Service wizard leave the Cluster selected and click Next.
-
On the Storage Policy step you may select/unselect the VMs if needed or leave them as is. Click Next to proceed.
-
On the Finish step you may click the Activities link to see the update result or click Close to exit the Wizard and stay on the Nodes tab. The I/O Filter update will be initiated.

Note
During the I/O Filter Update the old I/O Filter is removed and a new I/O Filter is installed.
Removal
To remove the I/O Filter:
-
Navigate to the main menu and select the Settings > Nodes tab.
-
Select the I/O Filter Daemon from the list, click ellipses and select Remove. The Setup Real-Time Replication Service wizard opens.
-
On the I/O Filter step of the Setup Real-Time Replication Service wizard, deselect the cluster and click Next.
-
On the Storage Policy step click Next.
-
On the Finish step, click the Activities link to see the result or click Close to exit the wizard and stay on the Nodes tab. The I/O Filter will be removed automatically.
Notes
If Real-Time Replication jobs or Real-Time Replication Failover jobs are using a specified I/O filter, setting up the real-time replication service will fail. You can view the list of jobs using the specified I/O Filter by navigating to the Activities tab and clicking the Details link.
VM storage policies will be unassigned if the cluster is deselected during the I/O Filter step of the Setup Real-Time Replication Service wizard.
When removing an I/O filter, NAKIVO Backup & Replication verifies whether any VMs or jobs across the entire vCenter are using it. The uninstallation will be blocked if the I/O filter is still in use.
If VMware vSphere Distributed Resource Schedule (DRS) is disabled, manually place cluster hosts in maintenance mode before proceeding. If DRS is enabled, hosts are placed in maintenance mode automatically.
If the I/O filter is removed from the cluster (vSphere Client: Cluster > Configure > I/O Filters) but remains on the individual hosts (vSphere Client: Host > Configure > I/O Filters), run the following command on the host to remove it manually: esxcli software vib remove -n nakfilter --maintenance-mode

Security
Communication between the Director and the I/O Filter is encrypted. Each I/O Filter instance has a certificate of the parent ESXi host and pre-shared key. The certificate and pre-shared key ensure trusted communication between the Director and I/O Filter.
To view the certificate details (including the certificate fingerprint and validity period), go to Settings > Nodes and select the desired I/O Filter Daemon.
Note
When encryption is enabled in the Real-Time Replication job settings, the I/O Filter Daemon sends data to Journal Service via port 33092. Otherwise, port 33090 is used.