Backup Repository in Amazon EC2
Choose this option if you want to create a Backup Repository in Amazon EC2. The Backup Repository will be created in the same region where the assigned Transporter is located.
Important
To avoid disrupting NAKIVO Backup & Replication processes and data corruption, add NAKIVO Backup & Replication to the white/exclusions list of antivirus software running on the machine on which the NAKIVO Backup Repository is set up.
You may be additionally charged for using a third-party resource. Refer to the third-party resource provider documentation for details.
To create a repository in Amazon EC2, proceed as described in the following sections:
- Create Backup Repository: Type
- Create Backup Repository: Vendor
- Create Backup Repository: Name & Location
- Create Backup Repository: Options
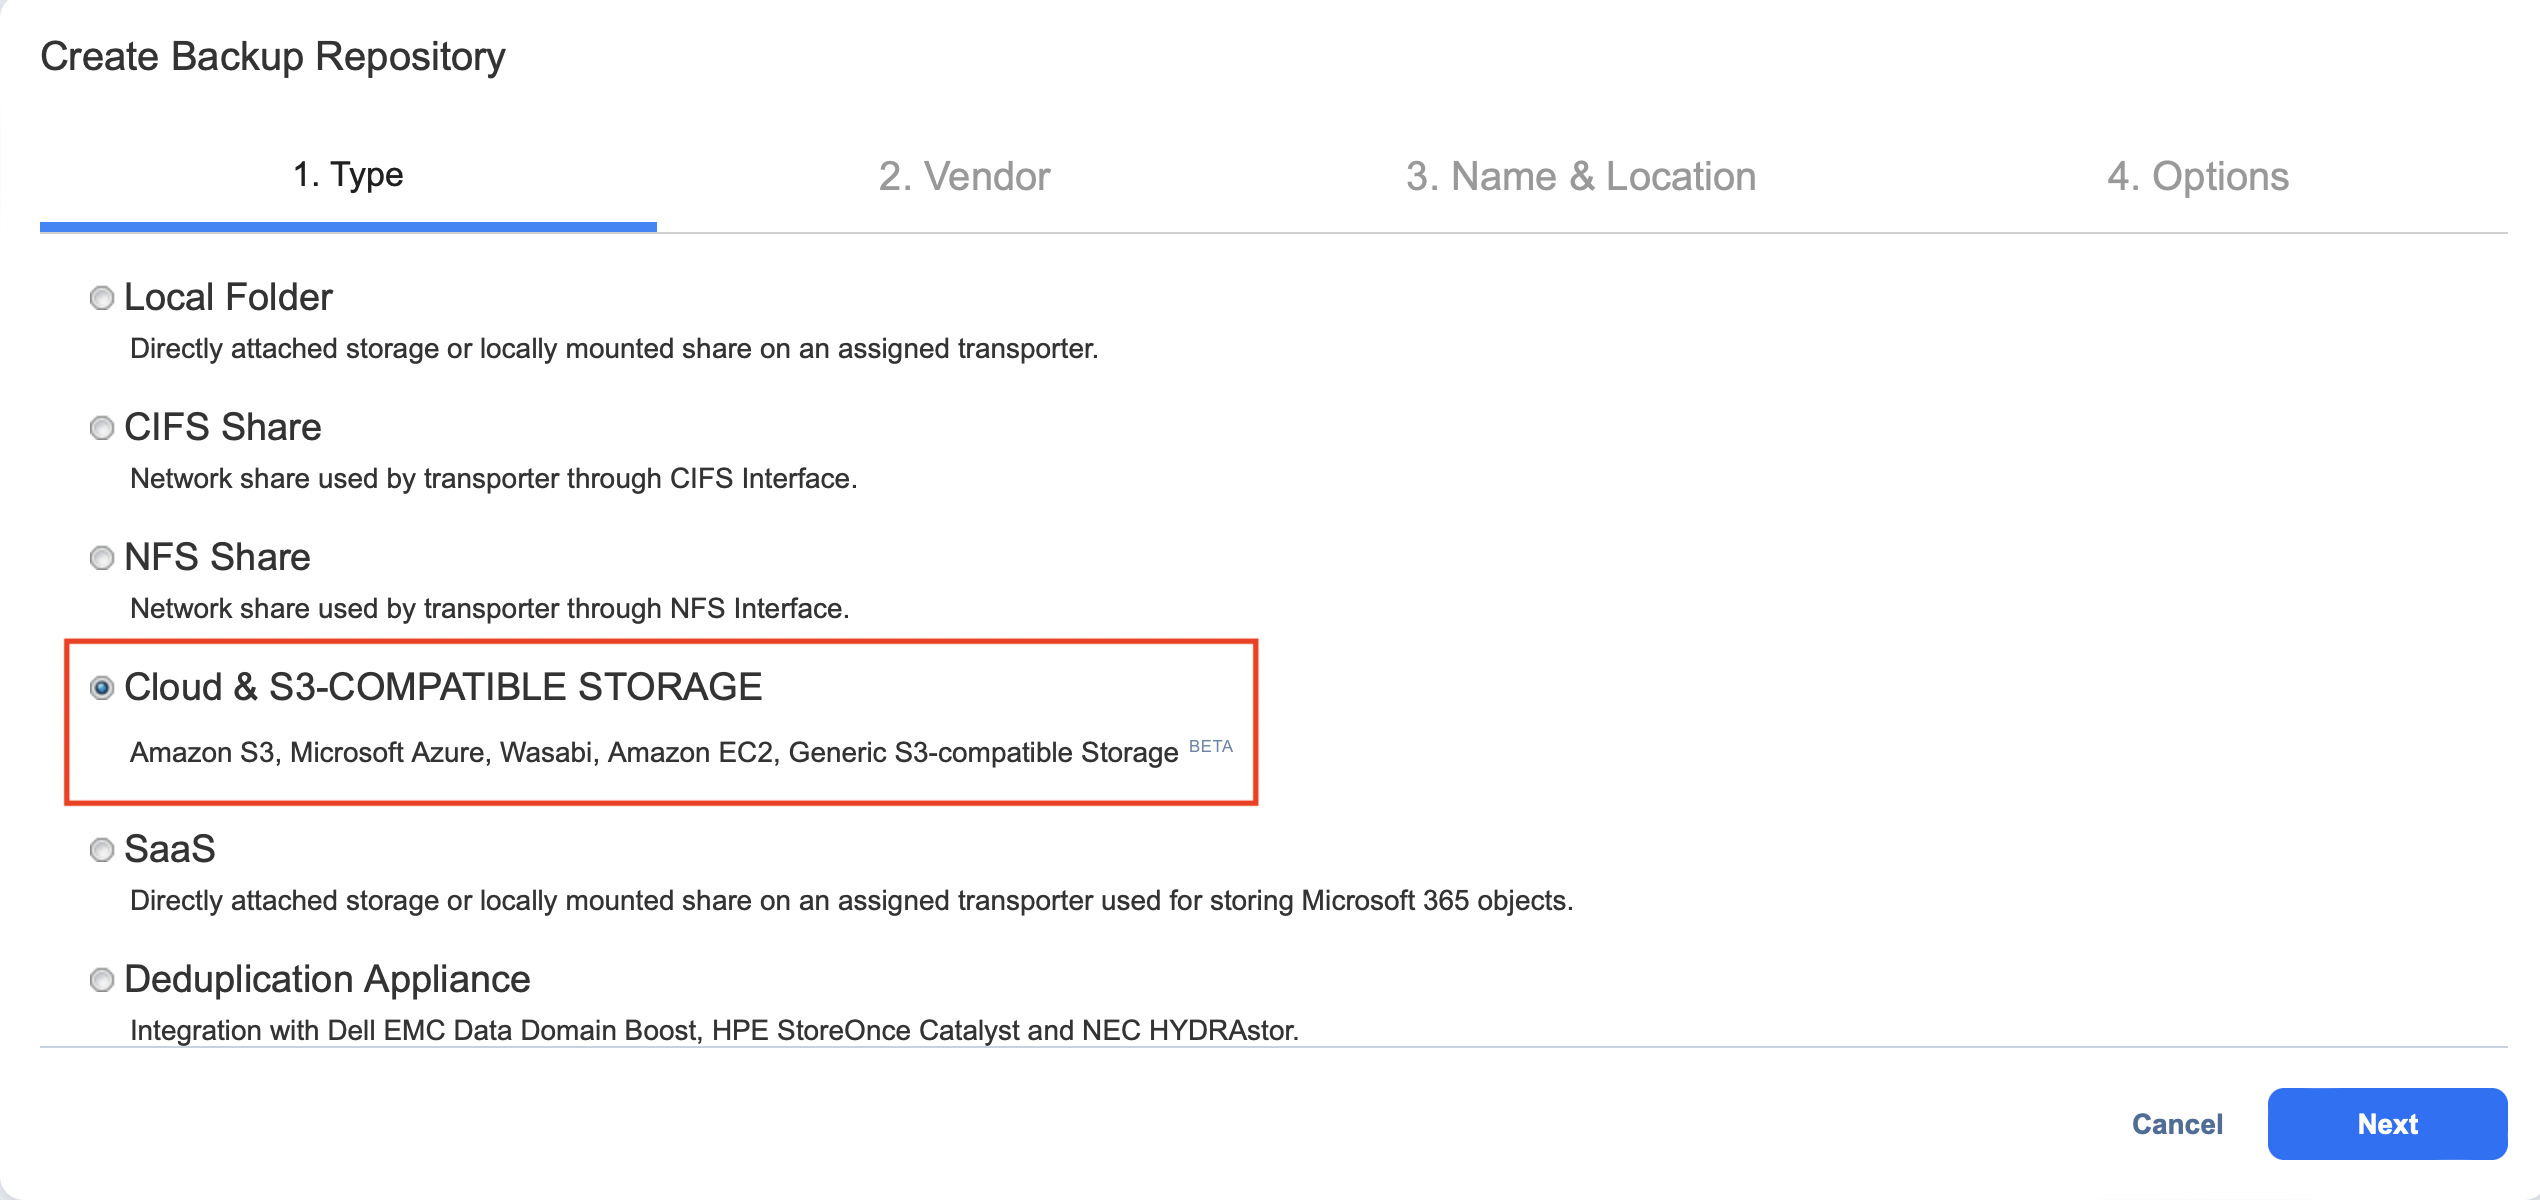
Create Backup Repository: Type
On the Type page of the Create Backup Repository wizard, select Cloud & S3-compatible Storage and click Next to move to the next page of the wizard.
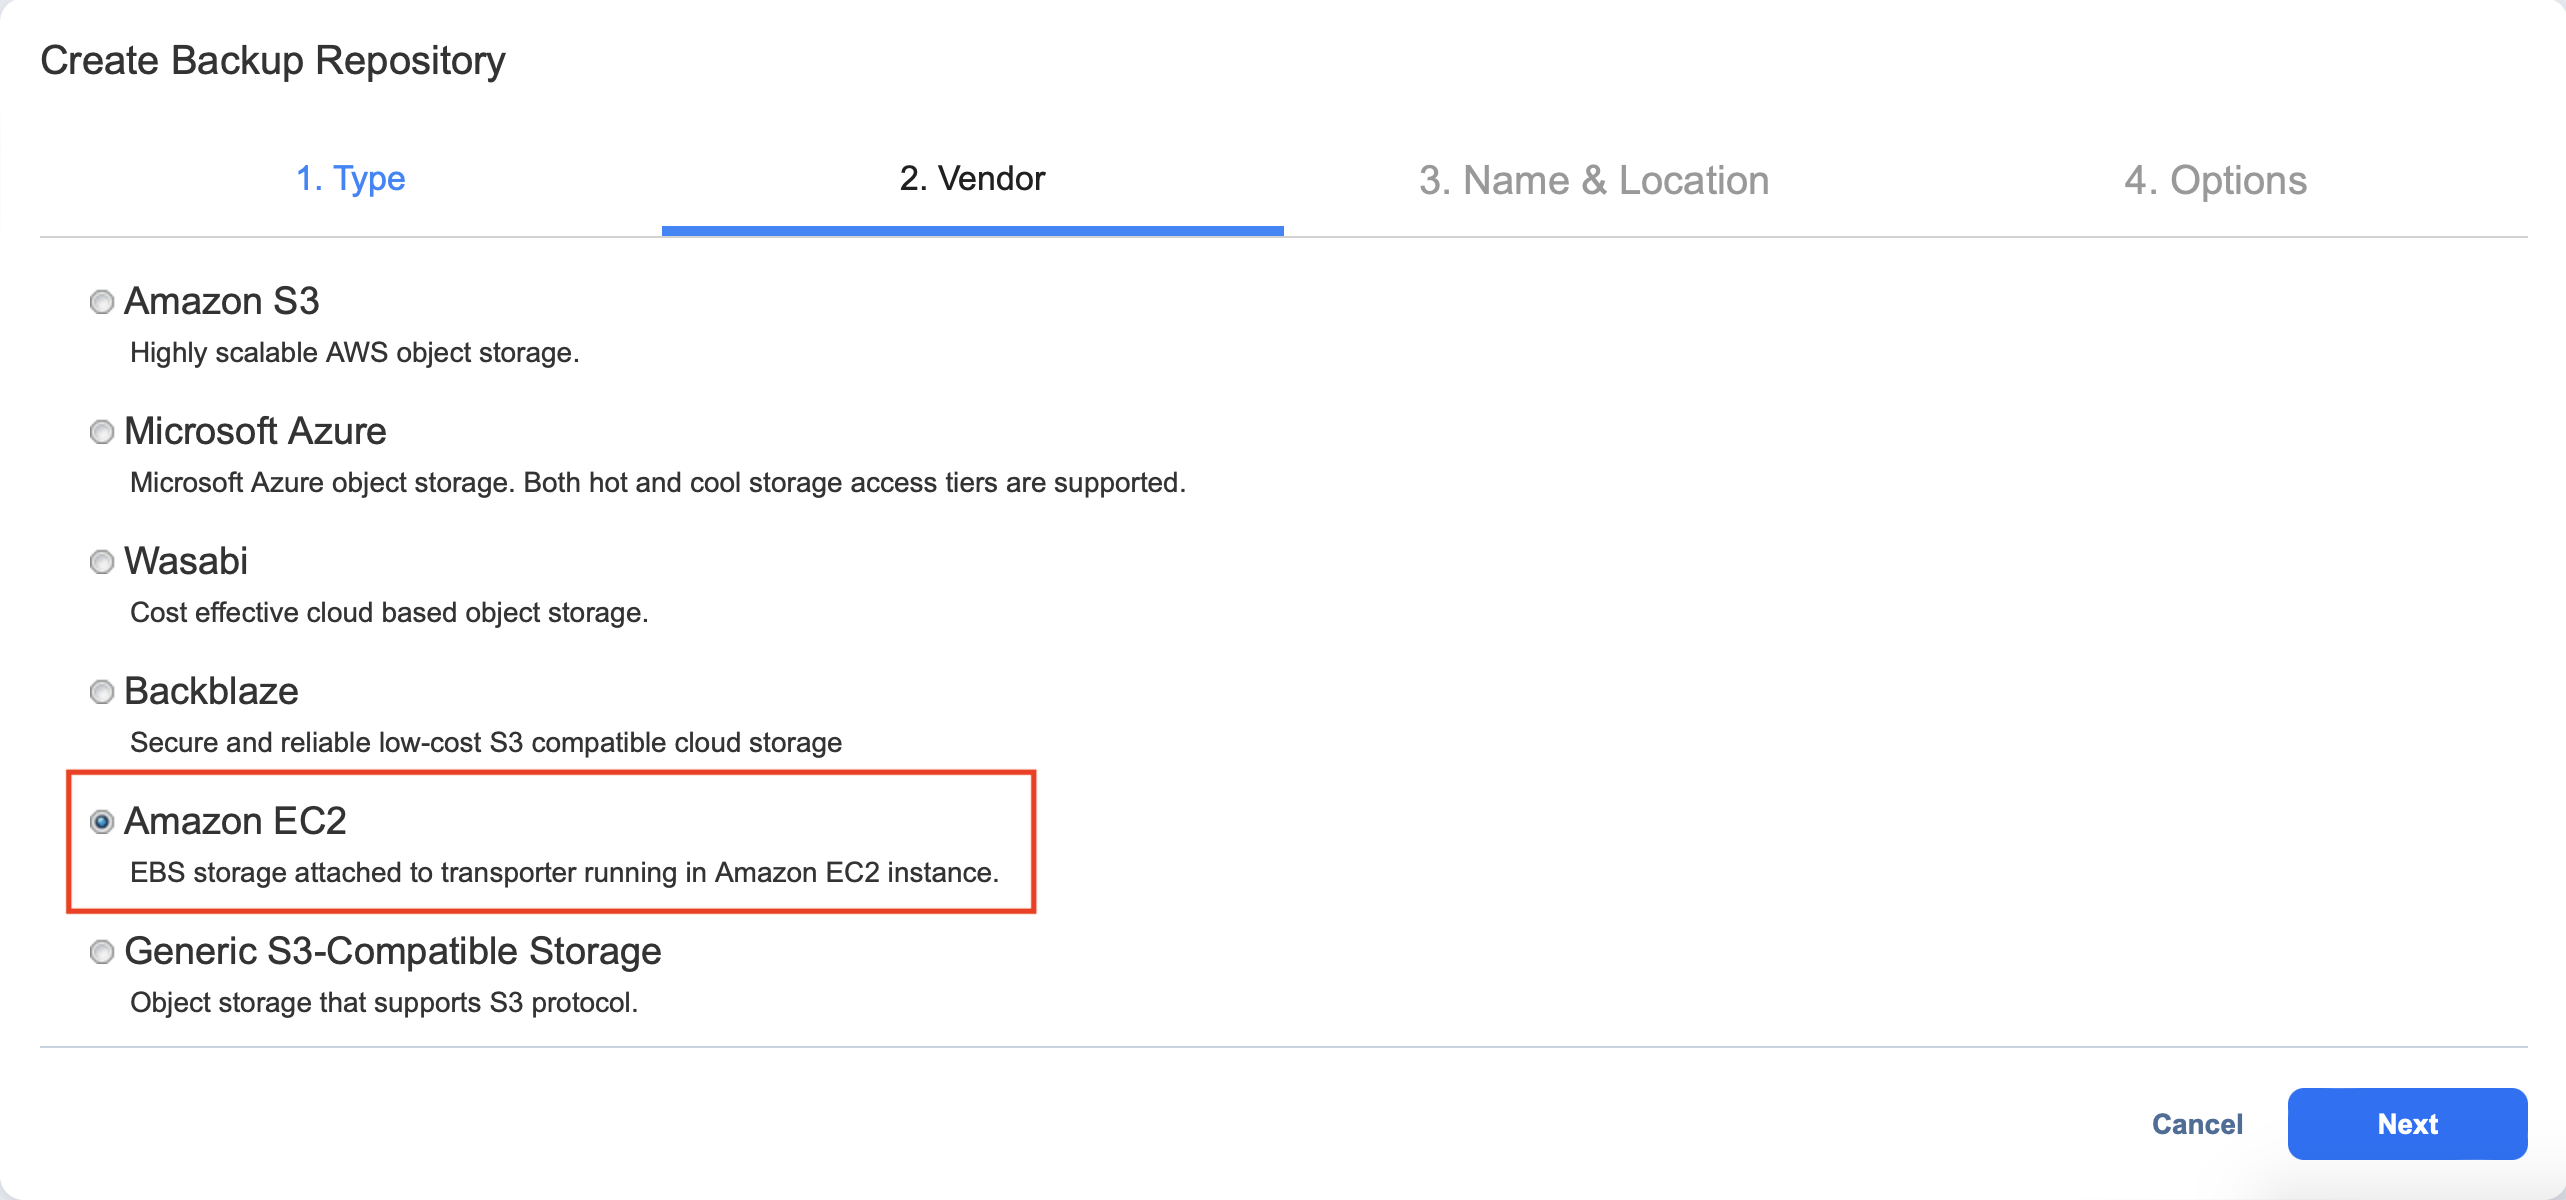
Create Backup Repository: Vendor
On the Vendor page of the wizard, select Amazon EC2. Click Next to proceed to the next step.
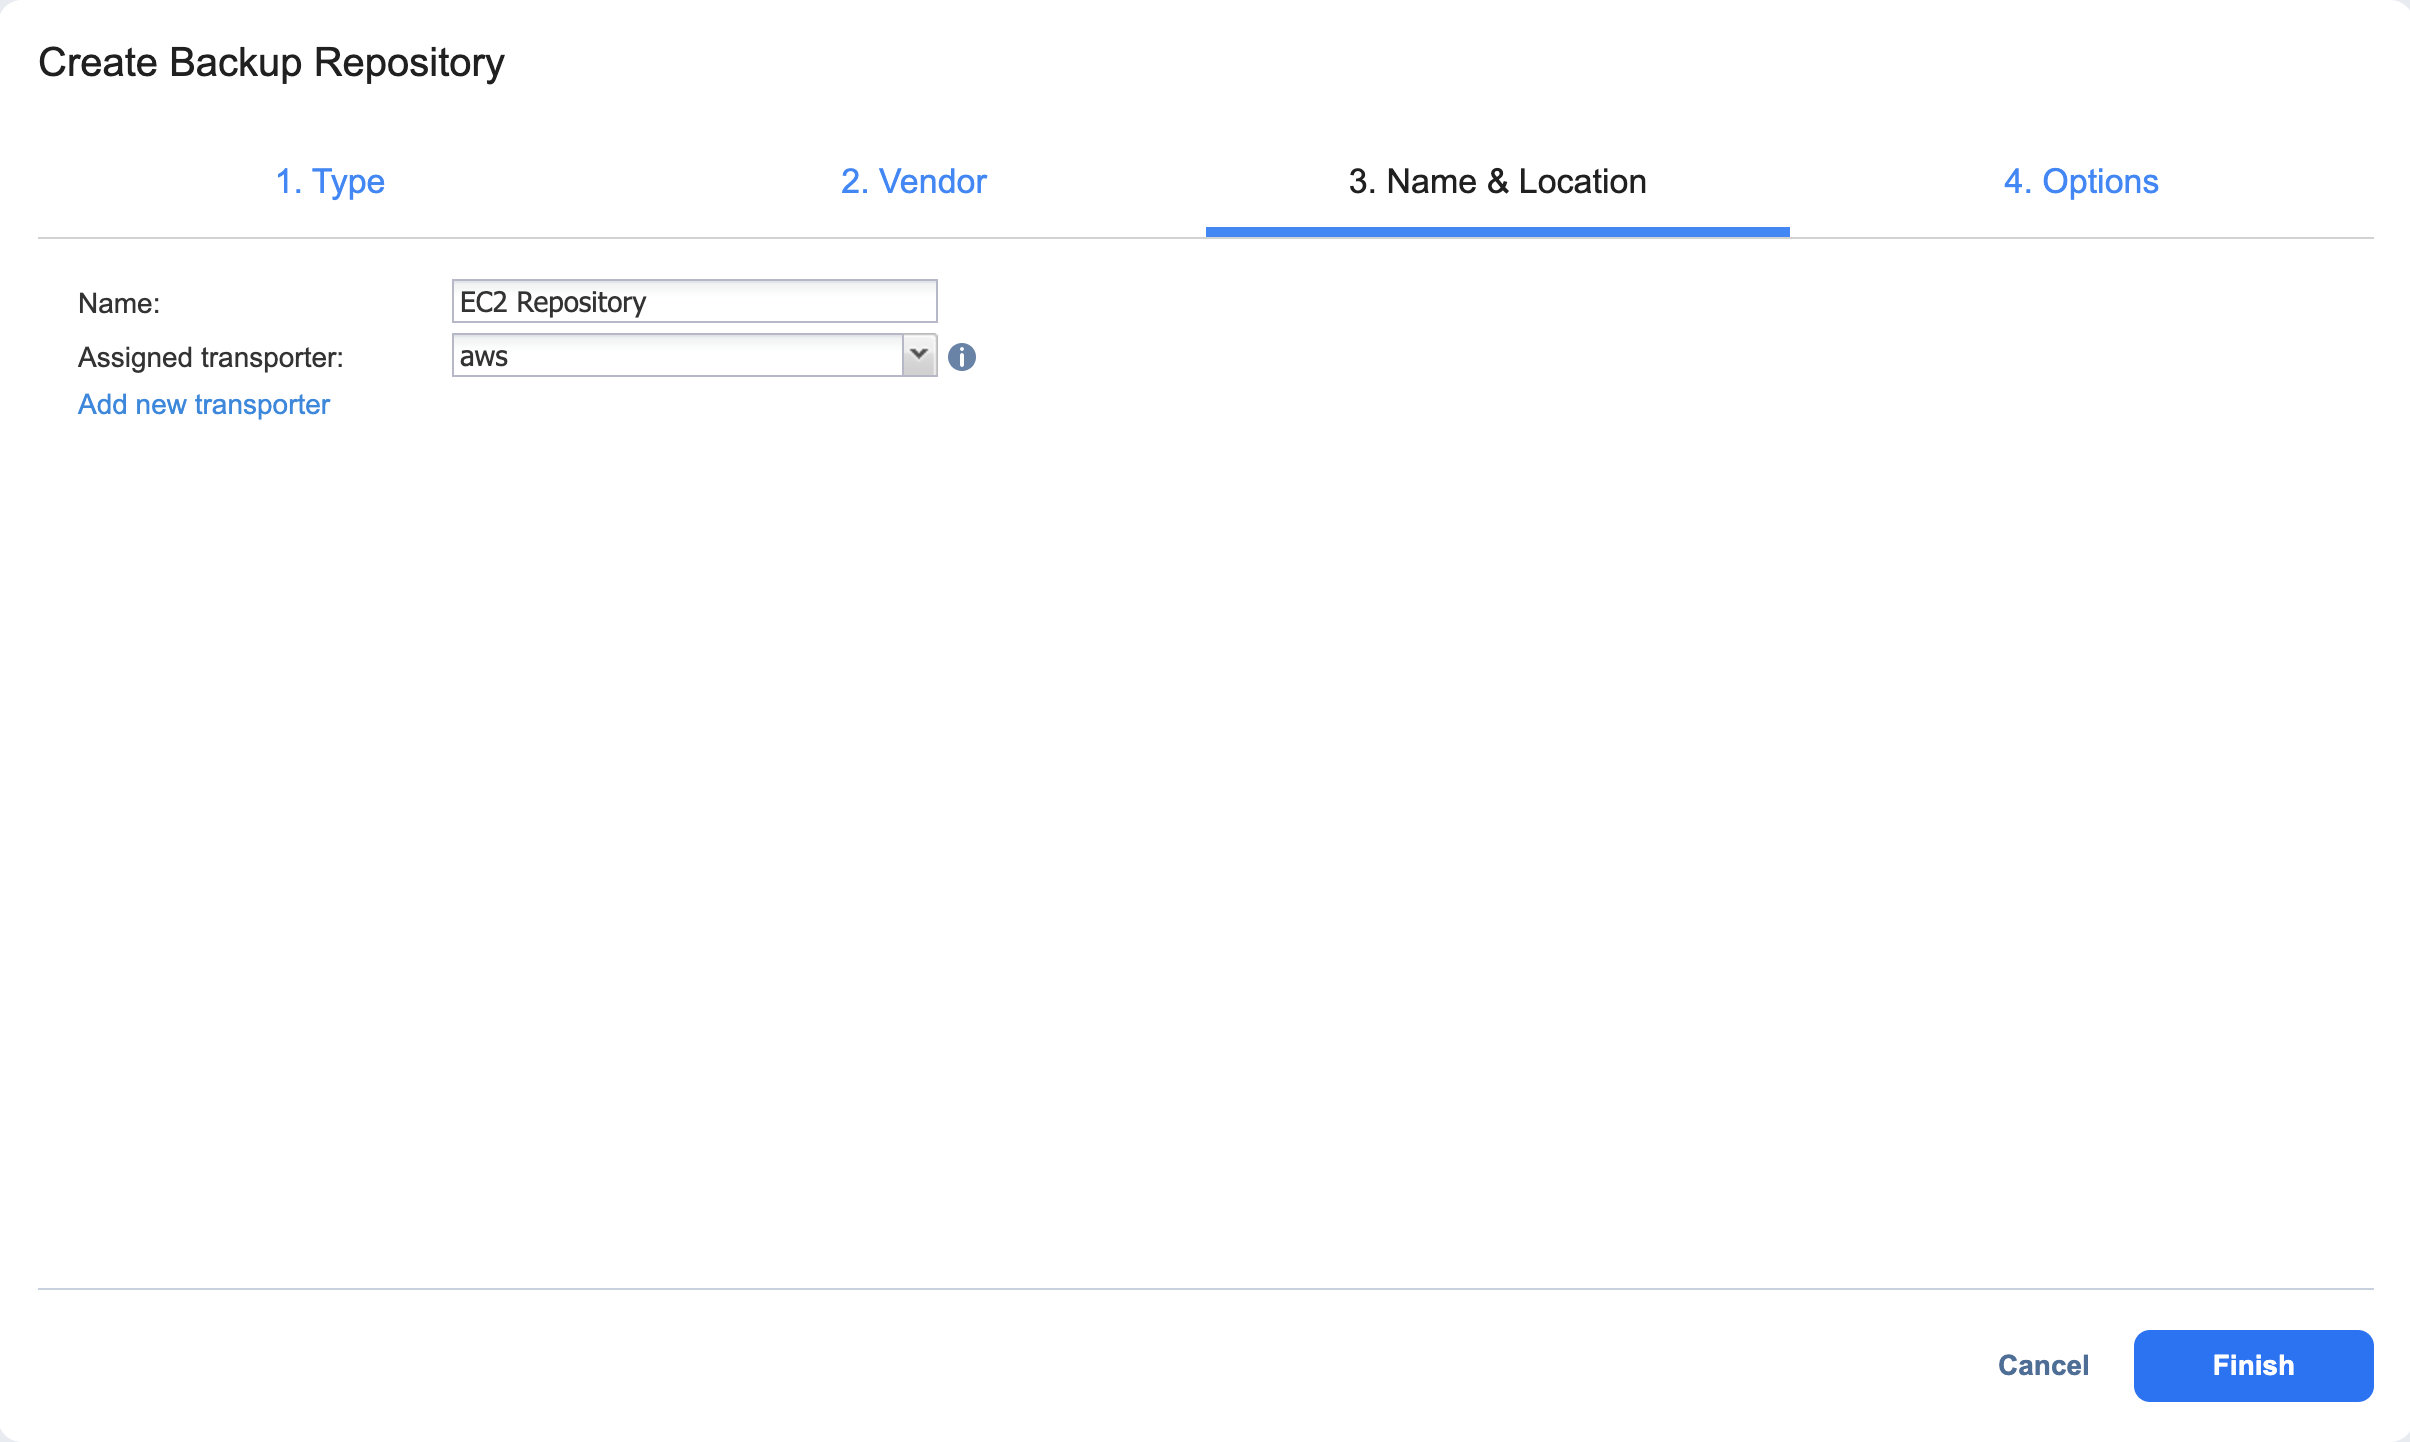
Create Backup Repository: Name & Location
On the Name & Location page of the wizard, do the following:
-
Enter the name of the Backup Repository in the Name box.
-
Select the Transporter from the Assigned transporter drop-down list. To add a new Transporter, click Add new transporter and configure a new Transporter in the Transporters tab. Once the new Transporter is successfully added, it appears in the Assigned transporter drop-down list.
-
Click Next to go to the next page of the wizard.

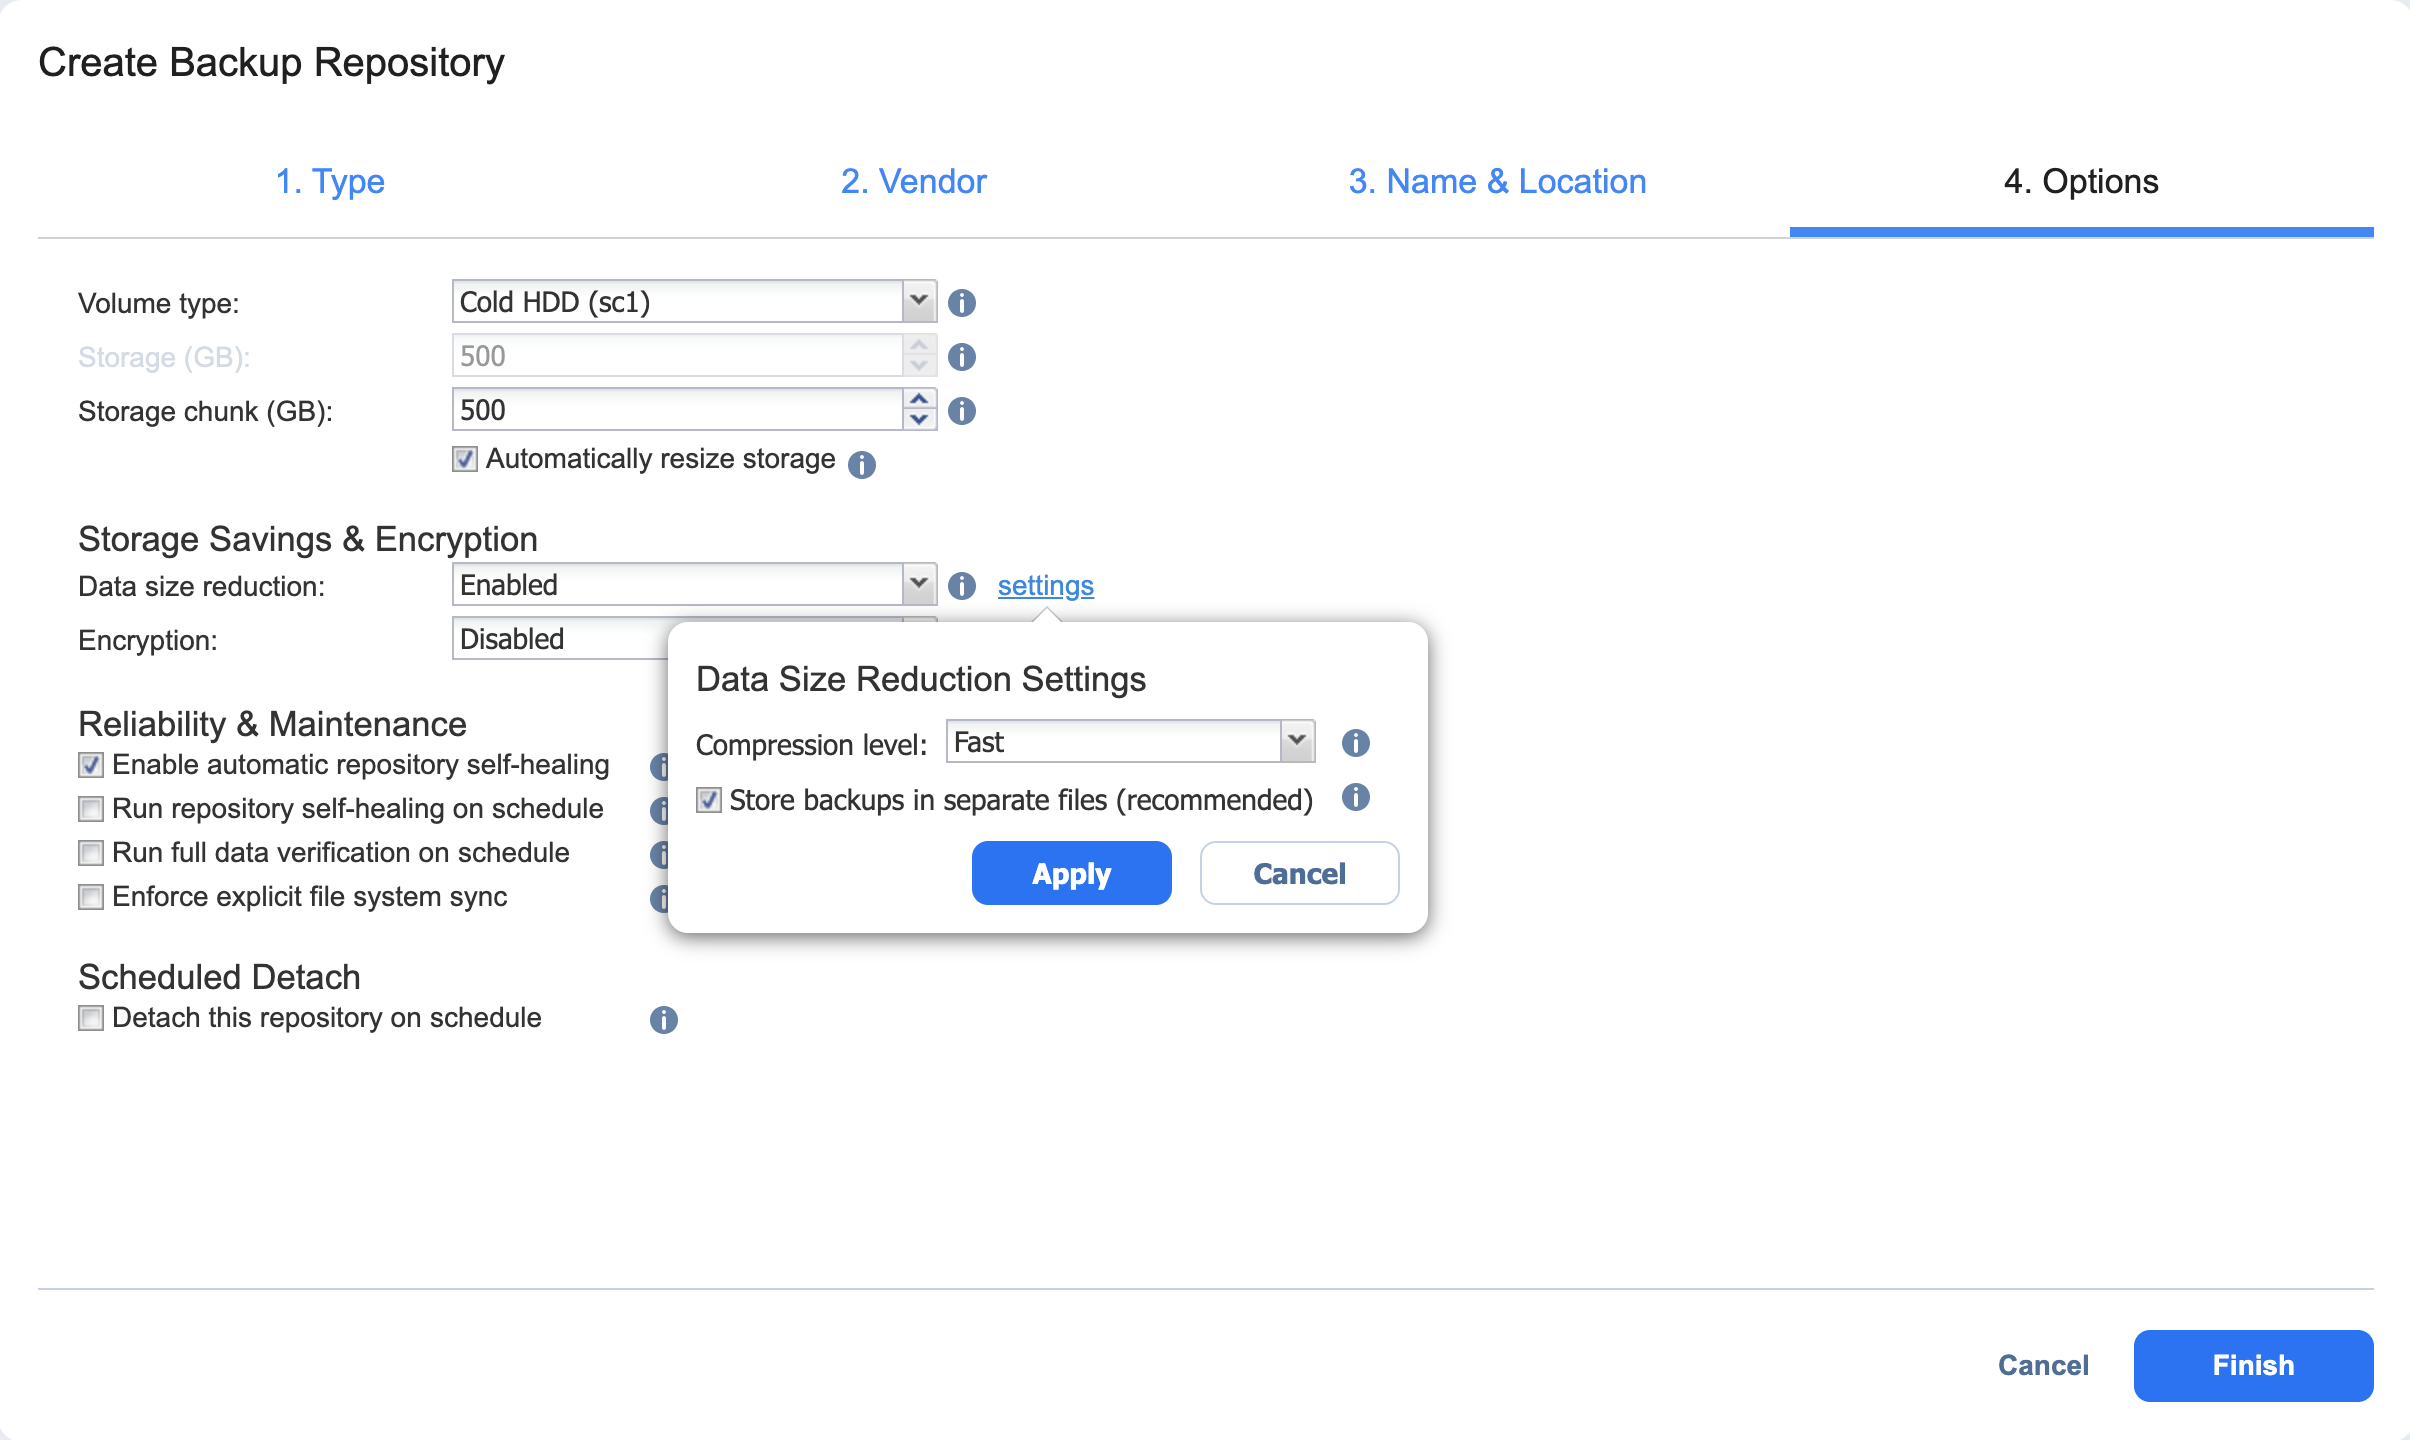
Create Backup Repository: Options
On the Options page, do the following:
Configure data storage options:
-
Volume type: Choose one of the following EBS volumes that will be used for creating the Backup Repository:
-
Cold HDD (sc1)
-
Throughput Optimized HDD (st1)
-
General Purpose SDD (gp2)
-
General Purpose SDD (gp3)
-
Magnetic Standard
-
-
Storage: Specify a size for the Backup Repository that will be allocated in Amazon EC2 using EBS Volumes. The volumes will be attached to the selected Amazon EC2 Transporter.
-
Storage chunk (GB): A Backup Repository in Amazon EC2 is created by using multiple EBS Volumes (chunks). The maximum size of the Backup Repository is limited to 50 EBS Volumes (chunks) or 16 TB (whichever occurs first). The size of a storage chunk defines the size of each individual EBS volume. Also, the storage will be resized (either manually or automatically) with the minimal step of the storage chunk specified here. To scale up to 16,000 GB, it is recommended that you have 400 GB storage chunk or bigger. Storage chunk cannot be changed later.
-
Automatically resize storage: When this option is selected, the cloud storage is automatically increased and reduced as required.
Set up Storage Savings & Encryption options:
-
Data size reduction: When this option is enabled, NAKIVO Backup & Replication enables the use of data size reduction for this repository to save disk space. Note that this may put additional load on the CPU. Disabling data size reduction is required if the target is a deduplication storage appliance. Click Settings to configure the settings. A popup window appears. Set the following:
-
Compression: Select a compression level to be used to reduce the data size in the Backup Repository. Note that higher compression levels consume considerably more CPU and may slow down VM backup speed. The following options are available:
-
Disabled: No compression.
-
Fast: Lowest compression level.
-
Medium: Medium compression level.
-
Best: Maximum compression level.
Note
This option cannot be configured after creating the Backup Repository. -
-
Store backups in separate files: Select this option to enable this Backup Repository to store data of every machine in separate backup files. Enabling this option is highly recommended to ensure better reliability and performance. Leave this option unselected if you wish to enable deduplication on a Backup Repository.
-
Deduplication: Select this option to enable the backup deduplication method to reduce the backup size by excluding duplicate data blocks from the backup.
Note
This option is not available if the Store backups in separate files checkbox has been selected.
-
-
Encryption: This option is available only if the Backup Repository is created locally on the machine on which the Assigned Transporter is installed, and the machine is running a Linux OS. Select Enabled from the drop-down list and specify an encryption password (the password is required for importing the Backup Repository to a new instance of the product). The product will encrypt the repository destination using
ecryptfsfor folders andcryptsetup (crypt-md)in LUKS mode for devices/partitions before creating the Backup Repository.Notes
-
To avoid
ecryptfserrors, make sure that there are no other folders and files except the NakivoBackup folder in the repository location. -
Backup Repository encryption can significantly affect backup speed.
-
Set up Reliability & Maintenance options:
-
Enable automatic repository self-healing: Leave this option selected to automatically trigger repository self-healing in case the product detects symptoms of problems in the backup infrastructure (such as incorrect timestamps on metadata and data files). You can deselect this option and run self-healing manually.
-
Run repository self-healing on schedule: You can select this checkbox to run repository self-healing based on a schedule. You can configure the schedule by clicking the schedule link when the option is selected. The default schedule is set to run every day at 11 AM.
When Stop backup and recovery to run self-healing is selected, any jobs or recoveries that use this repository are stopped to run scheduled self-healing. Otherwise, scheduled self-healing is skipped if there are running jobs or recoveries on this repository.
-
Run full data verification on schedule: When this option is selected, NAKIVO Backup & Replication runs full verification of all data available in the Backup Repository based on the specified schedule. The product reads each block of data to ensure that it is identical to the data block that was read on the source VM during the backup. This way, the product verifies each recovery point in the Backup Repository.
When Stop backup and recovery to run backup verification is selected, any running jobs which use this Backup Repository are stopped to run scheduled data verification. Otherwise, scheduled data verification is skipped if there are running jobs on this Backup Repository.Note
Backup verification is a time-consuming process and consumes CPU of the Transporter assigned to the Backup Repository. It is recommended that you schedule backup verification during non-working hours.
-
- Reclaim unused space on schedule: You can select this option to run the Backup Repository space reclaim process based on a schedule. Space reclaim compacts the data. Unused space is reclaimed. Keep in mind that this process can be time-consuming.
Note
This option is available only when Store backups in separate files is not enabled.When Stop backup and recovery to run space reclaim is selected, any running jobs that use this Backup Repository are stopped to run scheduled space reclaiming. Otherwise, scheduled space reclaiming is skipped if there are running jobs on this Backup Repository.
Important
Do not reboot/disconnect the "null" Transporter and storage device while space reclaim is in progress to avoid Backup Repository corruption. Enforce explicit file system sync: When this option is selected, explicit sync with the file system is enforced during all backup operations to this repository. This setting is considered more reliable but may lead to lower performance on certain storage devices. By default, the option is disabled.
Schedule detaching of the Backup Repository:
-
Detach this repository on schedule: Select this option if you want to detach and then attach the Backup Repository based on a schedule. Detaching a Backup Repository saves its data and metadata in a consistent state and then stops the product’s interaction with the Backup Repository (so that it can be copied or moved). You can use this feature, for example, for the disk-to-disk-to-tape (D2D2T) data protection approach: backups are stored on a disk for fast operational recovery and copied to a tape (while the repository is detached) for archiving and long-term storage.
-
Delete and re-create the repository on attach: When this option is selected, all data in the Backup Repository is erased prior to attaching it to the product. As a result, jobs that write to this Backup Repository create full VM backups. You can use this option, for example, to create full daily, weekly, or monthly VM backups and write them to tape or removable media.
Click Finish to finish creating the Backup Repository.