Deploying Nutanix AHV Virtual Appliance
- Deploying Nutanix AHV Virtual Appliance
- Virtual Appliance OS, Credentials, and Security
- Web Interface Login
Deploying Nutanix AHV Virtual Appliance
The NAKIVO Backup & Replication instance must be deployed in a Nutanix AHV cluster in order to enable backup and recovery functions.
NAKIVO Backup & Replication offers the following solutions:
-
Full Solution (Single Tenant) - requires a 100 GB thin provisioned disk
-
Transporter-only - requires a 20 GB thin provisioned disk
To deploy a virtual appliance via the Nutanix Prism application, follow the steps below:
-
Download the
.VMDKfile with a full or transporter-only image from the Nakivo website and store it locally. -
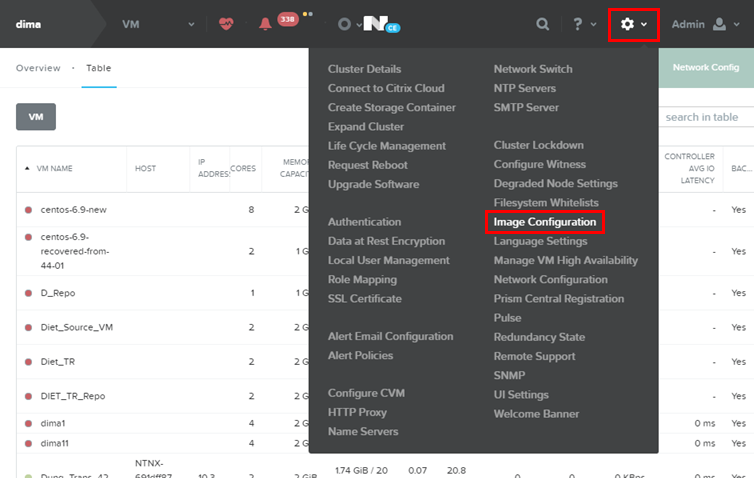
Log in to the Prism console.
-
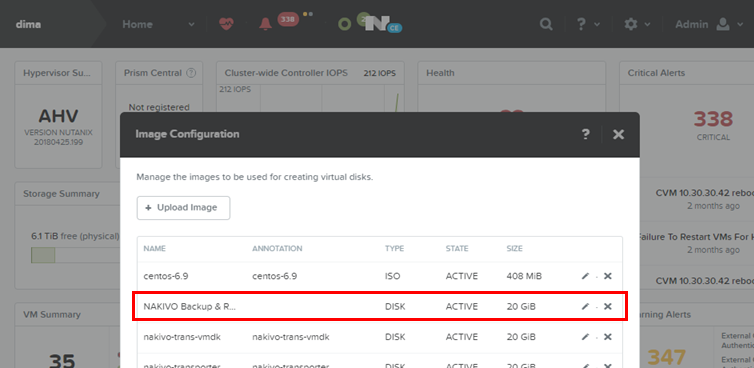
From the Configurations menu, select Image Configuration.
-
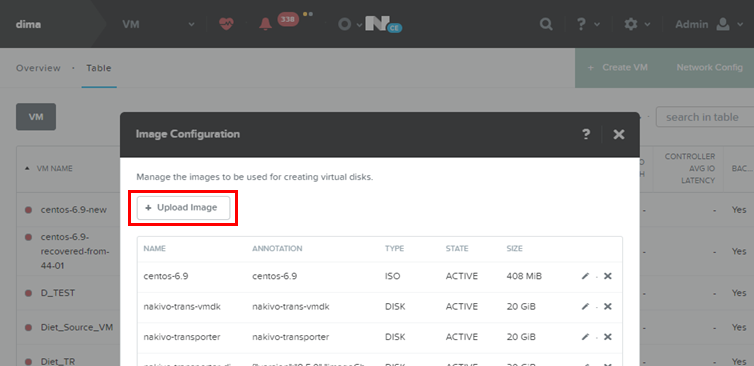
In the Image Configuration dialog, click Upload Image.
-
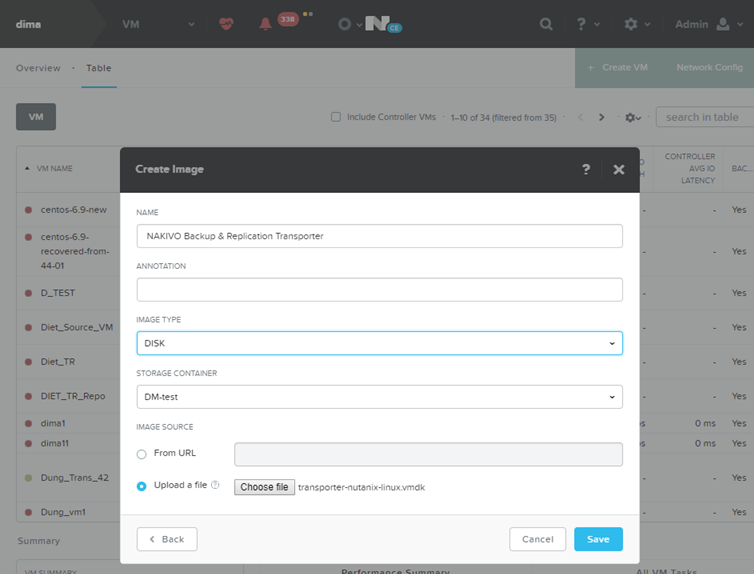
In the Create Image dialog, fill in the following options:
-
Name: Enter a name for the new image.
-
Image Type: From the drop-down list, select DISK.
-
Storage Container: Select the storage container you wish to use from the drop-down list. The list includes all storage containers created for this cluster. If there are no storage containers currently available, a Create Storage Container link is displayed.
-
Image Source: Click the Upload a file radio button to upload a file from your workstation. Click the Choose File button and then select the file to upload from the file search window.

-
-
When all fields are correct, click the Save button.
After the file uploading completes, the Create Image window closes and the Image Configuration window reappears with the new image present in the list.
Note
Make sure the status of the disk is Active before proceeding to the next step. -
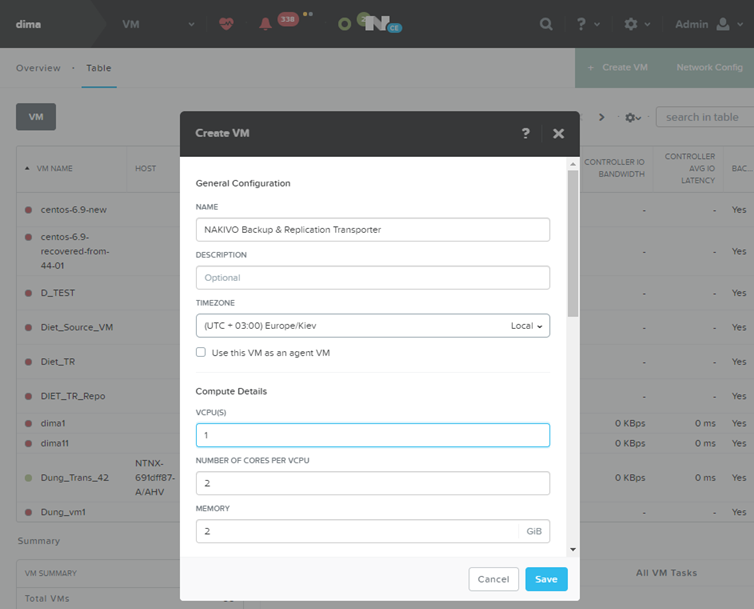
Close the Image Configuration window, go to the VM view and click Create VM.

-
In the Create VM dialog, fill in the following options:
-
Name: Enter a name for the VM.
-
vCPU(s): Enter the number of virtual CPUs to allocate to this VM (minimum 1).
-
Number of Cores per vCPU: Enter the number of cores assigned to each virtual CPU (minimum 2).
-
Memory: Enter the amount of memory (in GBs) to allocate to this VM (minimum 4 GB + 250 MB for each concurrent job for full solution/minimum 2 GB + 250 MB for each concurrent job Transporter-only solution).
-
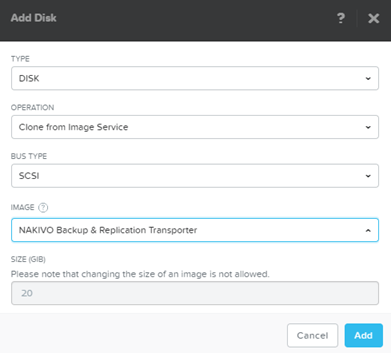
In the Disk section, click Add New Disk, and specify the following settings in the Add Disk dialog:
-
Type: Select Disk.
-
Operation: Select Clone from Image Service.
-
Bus Type: Select SCSI.
-
Image: Select your uploaded image from the list.
-
-
In the Network Adapters (NIC) section, click Add New NIC and select an available VLAN from the list.
-
-
Click Save.

-
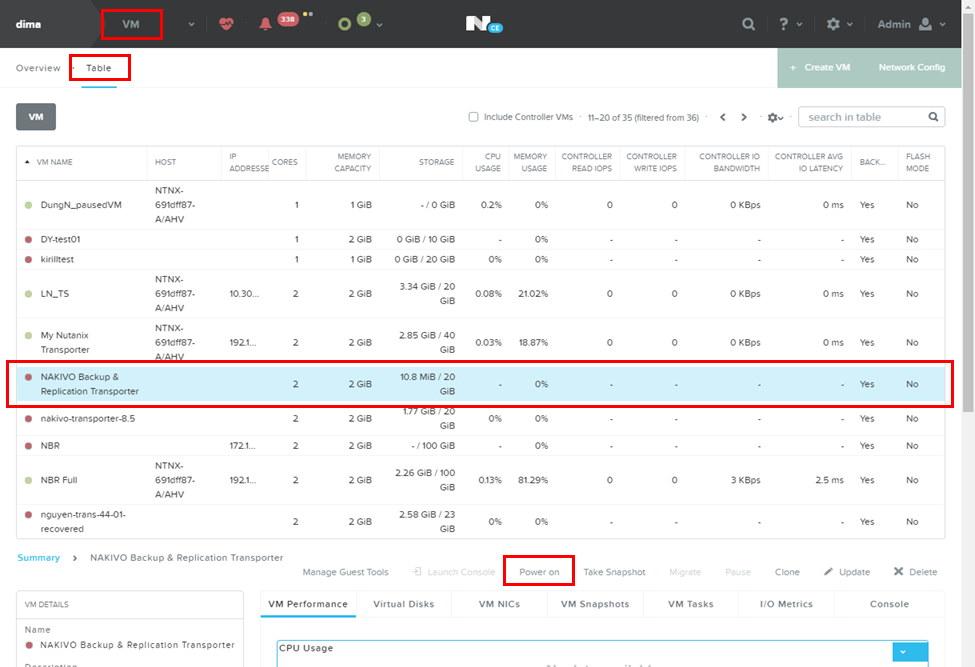
Wait until the process of VM creation is complete and locate your newly-created VM on the list.
-
Select your VM and click Power On.

-
After the Virtual Appliance is deployed and powered on, you may need to configure it.


Virtual Appliance OS, Credentials, and Security
The appliance runs Ubuntu 24.04, 64-bit. Use the following credentials to log in to the appliance:
-
Username: nkvuser
-
Password: QExS-6b%3D
For the versions of NAKIVO Backup & Replication older than 7.2, the password is root.
Important
If you plan to expose the Virtual Appliance to the Internet, change the default VA credentials and set up a login and password for the Web interface.
It is recommended to run an update on all packages in your Virtual Appliance at least once a month.
To enable Backup Immutability for Amazon S3, Wasabi, Azure Blob Storage, Backblaze B2 Cloud Storage, or Local Folder types of Backup Repository deployed as part of virtual appliance, NAKIVO Backup & Replication does the following:
-
Creates a new user for all administrative needs and adds it to the sudo group
-
Disables root user
-
Changes default SSH port to 2221
-
Configure the following kernel parameters via sysctl.conf:
-
Limits network-transmitted configuration for IPv4/IPv6
-
Prevents the common 'syn flood attack'
-
Turns on source IP address verification
-
Prevents a cracker from using a spoofing attack against the IP address of the server
-
Logs several types of suspicious packets, such as spoofed packets, source-routed packets, and redirects
-
Configures swap. Sets vm.swappiness to 15
-
Sets kernel.unprivileged_bpf_disabled to 1
-
Sets kernel.core_pattern to /tmp/%e.%p.core
-
Sets kernel.core_uses_pid to 1
-
Sets kernel.dmesg_restrict to 1
-
Sets kernel.kptr_restrict to 2
-
Sets kernel.sysrq to 0
-
-
Secures /tmp and /var/tmp
-
Secures Shared Memory
-
Installs and configures fail2ban
Notes
After fail2ban is installed on the hardened VA, the user IP may be banned for 10 minutes if mistakes have been made during the login procedure.
Any additional packages installed manually on the system may cause a security breach.
Web Interface Login
Open your browser and go to the VA web interface. Refer to Getting Started to better understand how to continue working with NAKIVO Backup & Replication.