Transporter Deployment for SAN Access
If your infrastructure uses the SAN storage for storing VMs, consider the requirements and suggestions below.
Transporter Deployment Requirements for SAN
To use the Direct SAN Access mode, make sure the following requirements are met:
-
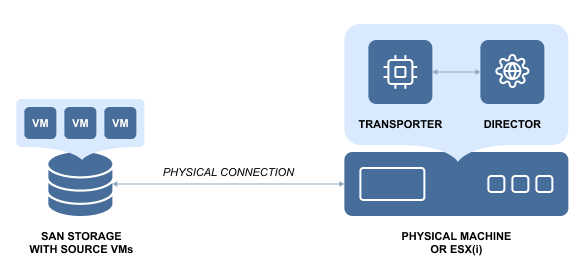
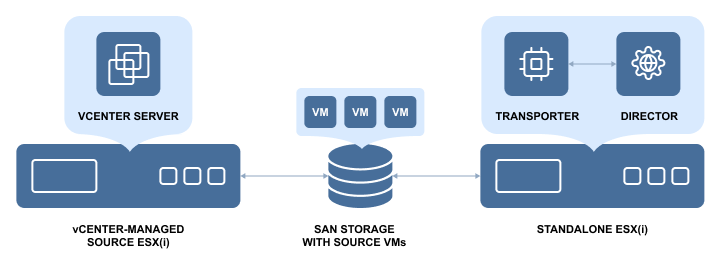
The source Transporter (which will read VM data from your SAN storage) must be installed on either the physical machine connected to your SAN storage device or the virtual machine running on an ESXi host that is physically connected to your SAN storage device.
-
If you plan to install the source Direct SAN Access for VMware on a Windows-based VM, make sure that the ESXi host running the VM with the source Transporter is not located or managed by the vCenter which you plan to back up or replicate.
-
If a Transporter is installed on a Microsoft Windows, Red Hat Enterprise Linux, or SUSE Linux Enterprise Server-based VM, and the source VM is located in the same vCenter, the Transporter will not be able to establish a connection to the source VM in the Direct San Access mode.
-
If you are using an iSCSI SAN, you need to configure the iSCSI initiator on the machine where you plan to install the source Transporter. For detailed information, refer to the corresponding Configuring iSCSI Initiator on Windows section below.
Setting Up SAN Access on Windows
Warning
If Windows mounts and initializes (re-signatures) the SAN volume with VMFS (where your VMs are located), the volume may become corrupted and unreadable by VMware vSphere. To avoid this problem, follow the instructions in this section.
In Windows 7, Windows 8, and Windows Server 2008 and 2012, the SAN Policy setting manages the system behavior when a SAN device is connected. If the SAN Policy is set to “Offline Shared”, new volumes and LUNs will not be automatically initialized even if the system AutoMount is enabled.
Prior to connecting your SAN device to the machine on which the source Transporter is installed, check and set a proper SAN Policy as described below:
-
Open Command Prompt as an administrator.
-
Open the diskpart shell by typing diskpart and pressing Enter.
-
Set the SAN Policy to “Offline Shared” by typing san policy=offlineshared and pressing Enter.
-
Check that the setting has been applied by typing san and pressing Enter.
-
Reboot the machine for the changes to take effect.
Configuring iSCSI Initiator on Windows
To configure the iSCSI initiator on the Windows machine on which you plan to install the source Transporter:
-
Click Start > Control Panel. In the search field type iSCSI. In Administrative Tools, click iSCSI Initiator.
-
On the User Account Control page, click Continue.
-
If this is the first time that Microsoft iSCSI Initiator is launched, a message will appear that the Microsoft iSCSI service is not running. You must start the service for Microsoft iSCSI Initiator to run correctly. Click Yes to start the service.
-
On the Targets tab, type the name or the IP address of the target SAN device in the Quick Connect text box, and click Quick Connect.
-
Click the desired target and then click Connect.
-
Click Done.
Once connected, VMFS LUNs appear in Windows Disk Management snap-in.
Warning
Do not initialize (mount) SAN volumes with VMFS, as they may become corrupted and unreadable by VMware vSphere. The volumes should be non-initialized without drive letters as Windows is not compatible with the VMFS file system.
Setting Up SAN Access on Linux
Note
If you are installing NAKIVO Backup & Replication on Ubuntu 16.04 or Ubuntu 18.04, you need to install AppArmor first because it is no longer included in the Ubuntu distribution package.
If you are using iSCSI SAN, configure the iSCSI initiator on the machine on which you plan to install the source Transporter:
-
Discover your portal by running the following command:
iscsiadm -m discovery -t st -p PORTAL_IP
-
Log in by running the following command:
iscsiadm -m node -l
-
Make sure the initiator iqn of the NAKIVO Backup & Replication VM is added to the access list on your storage.
-
Modify the following line of the /etc/iscsi/iscsid.conf to specify either manual or automatic:
node.startup = manual
or
node.startup = automatic
-
Rediscover the iSCSI target.
-
Restart the iSCSI service.
Mounting iSCSI LUN for Discovering VMDK Files
If you need to mount an iSCSI LUN to access or download .vmdk files of the VM that has issues, follow the steps below:
-
On the machine where the Transporter is installed, make sure that you logged in to the LUN where the VM is located:
iscsiadm -m sessions
-
On the Transporter machine, install the vmfs-tools package:
apt install vmfs-tools
Note
If you are usingvmfs6(vSphere v6.5 and above), you need to installvmfs6-toolsinstead ofvmfs-tools. -
Check if the block devices are connected to the Transporter machine: lsblk. In the example of the lsblk command output below, the /dev/sdb1 is the LUN volume where the discovered VM is located.
root@va:/opt/nakivo/transporter/bh-mount# lsblk
NAME MAJ:MIN RM SIZE RO TYPE MOUNTPOINT
fd0 2:0 1 4K 0 disk
sda 8:0 0 20G 0 disk
├─sda1 8:1 0 7.5G 0 part [SWAP]
└─sda2 8:2 0 12.6G 0 part /
sdb 8:16 0 50G 0 disk
└─sdb1 8:17 0 50G 0 part <<<<<<<<<<<<
-
Mount the LUN volume to the Transporter machine:
vmfs-fuse /dev/sdb1 /lun
-
Go to the folder of the discovered VM and check if you can access or download its .vmdk files.

