NAKIVO Backup & Replication Components: Transporter
NAKIVO Backup & Replication is a data protection and disaster recovery solution for virtual, physical, cloud and SaaS environments, including VMware vSphere, Microsoft Hyper-V, Amazon EC2 instances, Windows/Linux physical machines, NAS, Microsoft 365, and others.
The solution consists of 3 core components: Director, Transporter (one of the Nodes), and Backup Repository. These components can be installed together on a virtual machine (VM), a physical machine, or a network attached storage (NAS) device.
This blog post covers Transporters, explains what Transporters can do, and how to install a Transporter in different scenarios.

What Is a Transporter?
The Transporter is an installed service that performs all of the data protection and recovery tasks for NAKIVO Backup & Replication. This includes data reading, compression, deduplication, encryption, transfer, writing, verification, granular and full VM recovery, etc. The Transporter is also responsible for backup repository management.
One Transporter, known as the Onboard Transporter, is installed by default with a full solution deployment (automatically with the Director) to enable backup, replication, and recovery out of the box. After installation, the Transporter runs as a service and is automatically launched if you restart the OS.
Additional Transporters can also be separately installed on all the supported platforms when needed to improve performance and increase efficiency: on Linux and Windows machines (since the solution is written in cross-platform Java), as a VMware vSphere/Nutanix AHV virtual appliance (VA), as an Amazon Machine Image, and on NAS devices.
For the sake of performance, NAKIVO has designed the Transporter to maximize the speed of VM backup, replication, and recovery by using all available resources. In other words, the Transporter is a service that should be installed on a dedicated physical or virtual machine in order not to interfere with the performance of other applications. This does not mean, however, that the Transporter always uses 100% of the available CPU and RAM. The speed of the source datastore, the network, or the target datastore can be a bottleneck (limiting factor) for performance.
How Many Transporters Are Needed
Single Transporter
In small and medium environments of 100 machines/instances or less, a single Transporter can be enough per site. A single Transporter can back up, replicate, and recover multiple VMs from multiple vCenters or standalone ESXi hosts (when used in a VMware vSphere environment). In other words, you don’t need to install the Transporter on each VM or ESXi host that you want to protect. As long as the Transporter is deployed somewhere in your infrastructure, access to your hosts and backup repositories is possible.

One Transporter can simultaneously process multiple VM disks by default (up to 6), and you can change this number in the configuration. If your jobs contain more VM disks than the Transporter is set to process simultaneously, the disks are placed in a queue and processed as soon as the Transporter is freed up.
Multiple Transporters
To achieve scalability and high availability in larger environments, multiple Transporters can be deployed on a single site or across multiple sites. If you plan on transferring data over WAN without a VPN connection from a source site to a target site, make sure the source and target are included in the solution configuration. They can be added using external IP addresses or using DNS names that can be properly resolved in WAN (to enable them to connect to each other).
If you have more than one Transporter, you must determine which one should be used for reading data from the source host and which one should be used for writing data to the target host. By default, NAKIVO Backup & Replication determines the Transporter to be used based on host proximity (measured with ping round trip time), as shown in the image below. For this reason, the ICMP protocol must be allowed in the firewall to send ping request/response messages.
Round-trip time (RTT) is the amount of time it takes for a ping request to be sent plus the amount of time it takes for acknowledgement of that ping having been received (response).
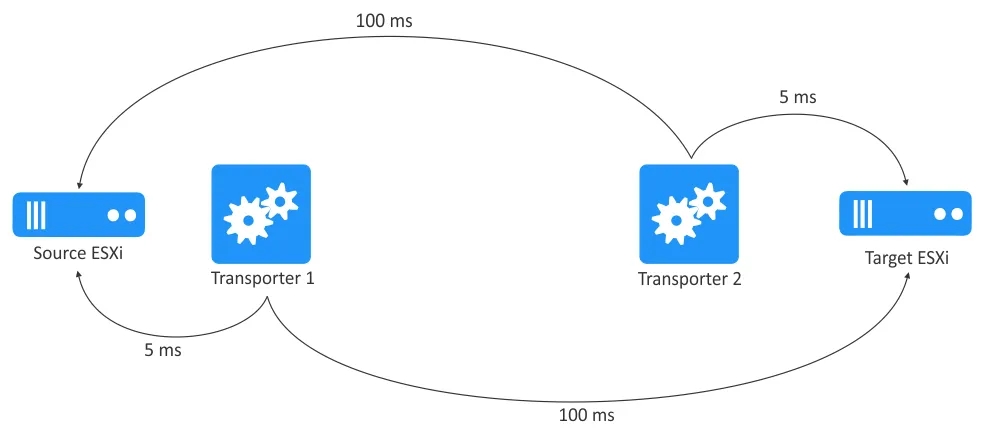
In the example above, Transporter1 is selected for reading data from the Source ESXi, and Transporter2 is selected for writing data to the Target ESXi. The Transporter selection can also be configured manually during job creation.
Deploying multiple Transporters also allows you to use the Network Acceleration feature (that is, compress the transferred data before sending it to target) and AES 256 encryption of traffic in flight between a pair of Transporters. For example, suppose two VMs are backed up over WAN to an offsite location. The Transporter installed at the source site can compress and encrypt VM data before transferring the data over WAN. Then, the Transporter installed at the target site can then perform decryption before writing the data to the Backup Repository.
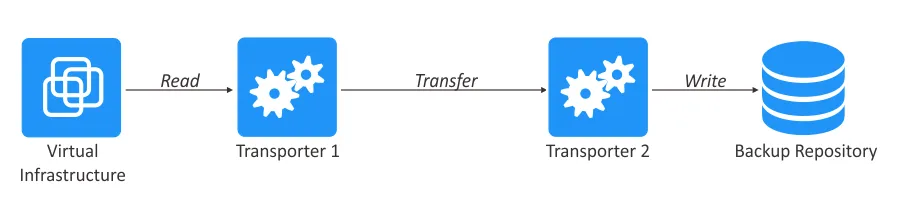
In this case:
- Source Transporter reads and transmits data.
- Target Transporter receives and writes data.
Deploying multiple Transporters can also be useful for load balancing to distribute the load among available Transporters when performing data replication, backup, and recovery jobs. Using multiple Transporters allows you to process more backup/replication/recovery workloads simultaneously.
Note: By default, Transporters use port TCP 9446 for communication with the Director and port range 9448-10000 for data transfers between Transporters.
Multiple Transporters in other scenarios
- Microsoft Hyper-V environments: When you add a Hyper-V host to the NAKIVO solution inventory, a Transporter is deployed on this Hyper-V host automatically (not on Hyper-V virtual machines). You don’t need to install an additional Hyper-V Transporter manually.
- VMware vSphere environments:
- To add a Transporter for VMware vSphere, a virtual machine with the Transporter must be deployed on an ESXi host (see instructions below). VMware VDDK is used by this Transporter.
- If you installed a full NAKIVO solution with a Director and Onboard Transporter on a device with an ARM processor (for example, a NAS device), you need to install an additional Transporter in VMware vSphere. This is because the VMware VDDK library doesn’t support the ARM architecture.
- Linux/Windows machines: A physical machine agent, another type of node in NAKIVO Backup & Replication, is deployed on a physical Linux or Windows machine when this machine is added to the NAKIVO inventory. In this case, the Transporter acts as a backup agent on the physical machine. Note that backup, replication, and recovery operations in VMware vSphere, Microsoft Hyper-V, and Amazon EC2 VMs/instances are agentless.
- Backup to tape: When tape backup is configured, a Transporter is installed on the server to which tape devices (tape drive or tape library) are connected.
Installing a Transporter on Linux
Let’s go over the steps to install a Transporter on Linux machines:
- Download the installation package for Linux from this NAKIVO website page.
- Select Linux Installer and copy the generated download link.
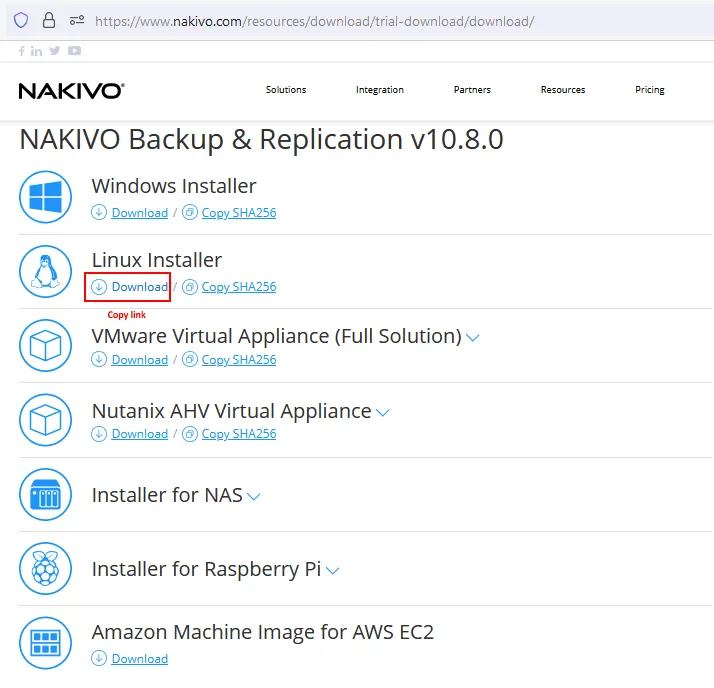
The download link should look like this:
https://d00i00q000b00.cloudfront.net/res/product/NAKIVO_Backup_Replication_v10.8.0.71845_Installer-TRIAL.sh
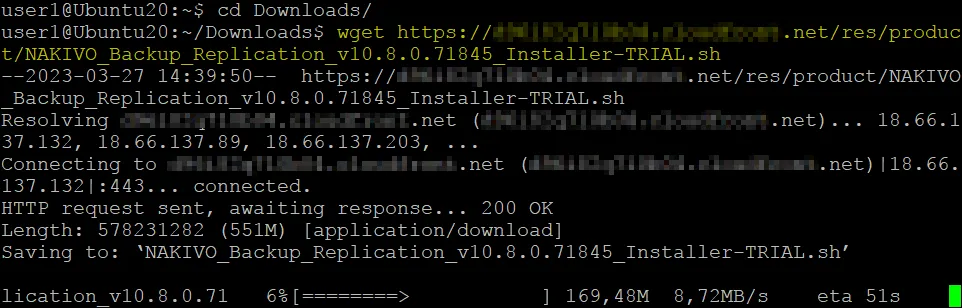
- Insert the copied link into the command to download the Transporter installer with wget directly on the Linux machine where you want to install the Transporter.
wget

https://d00i00q000b00.cloudfront.net/res/product/NAKIVO_Backup_Replication_v10.8.0.71845_Installer-TRIAL.sh
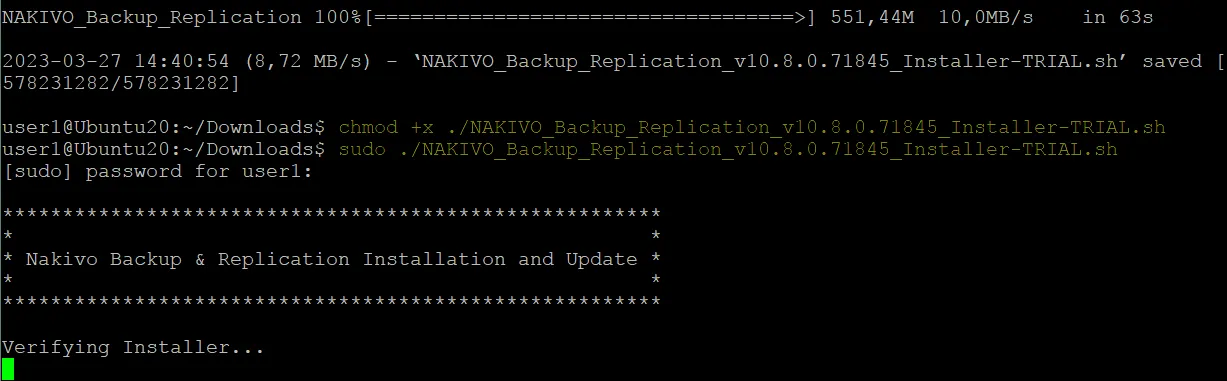
Note: In this walkthrough, we are installing the Transporter on Ubuntu Linux.
- Add the permissions to execute the Transporter installer file:
chmod +x ./NAKIVO_Backup_Replication_v10.8.0.71845_Installer-TRIAL.sh
- Run the Transporter installer as root by using sudo
sudo ./NAKIVO_Backup_Replication_v10.8.0.71845_Installer-TRIAL.sh
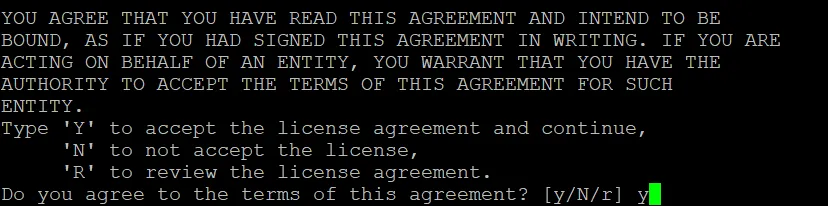
- The installer opens. You must read and accept the license agreement to continue.
Press Enter to scroll down. Make sure to read to the end of the agreement to avoid restarting the installer once again.
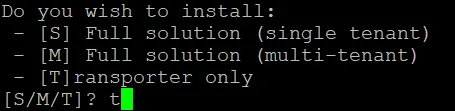
- Type y and press Enter to accept and continue.
- Type t and press Enter to install Transporter only.
- Press Enter to use the default install location or type a custom location and press Enter.
- Enter the master password (highly recommended for security purposes). Later you can change the master password in the command line with the command:
/opt/nakivo/transporter/bhsvc -b NewPassword

- Enter a path to a valid CA-signed certificate for the Transporter or leave the field empty if you don’t want to select a certificate. At this step, you can see the following message:
Using a certificate improves security. If you don’t select a custom certificate, a self-signed certificate will be used and the appropriate message is displayed.
No transporter certificate has been specified. Self-signed transporter certificate will be generated. To make the transporter secure it is recommended to set up custom CA-signed certificate. Are you sure you want to continue without specifying transporter certificate? (Y/n)
Type y and press Enter to continue.
- Transporter port. Press Enter to use the default port TCP 9446 or type a custom port before you press Enter.

- Wait until the Transporter is installed on Linux.
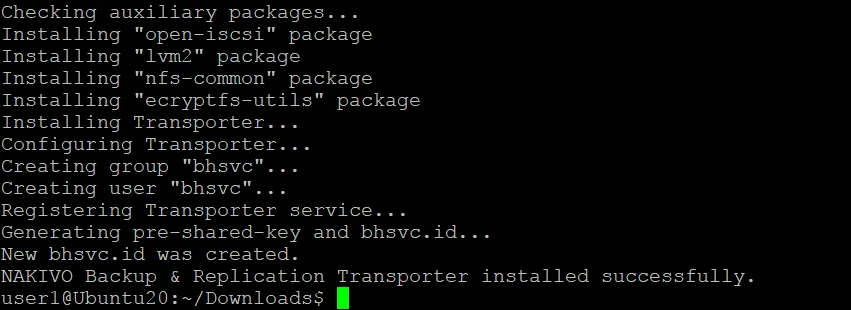
- Once the Transporter (with the name is nkv-bhsvc) is installed, you can check the Transporter service status with the command (in Ubuntu):
systemctl status nkv-bhsvc
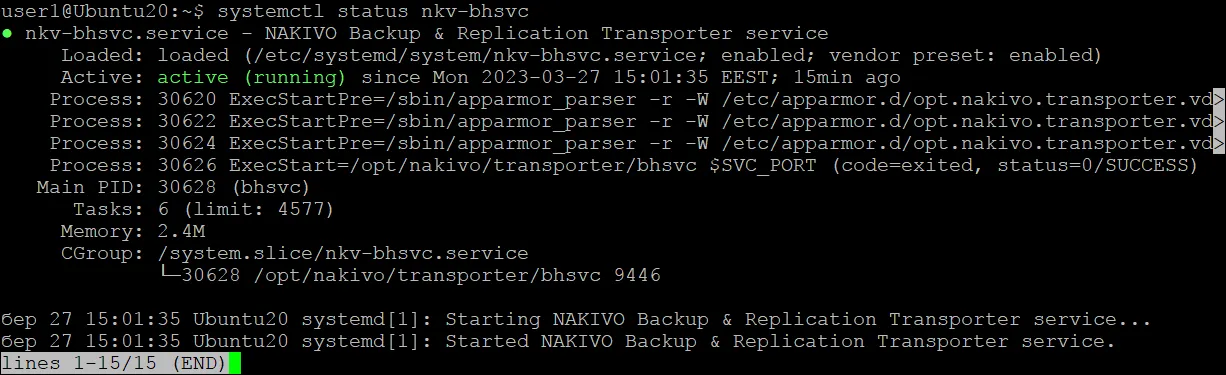
The Transporter has been installed successfully and is running on Linux.
Installing a Transporter on Windows
Follow the steps below to install a Transporter in Windows:
- Download the installer for Windows.
- Run the NAKIVO installer in Windows:
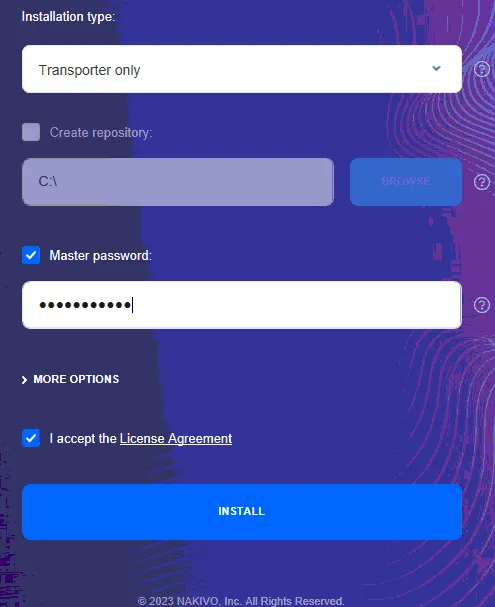
- Select Transporter only as the installation type.
- Enter a strong master password. This is highly recommended for data security and to avoid unauthorized access.
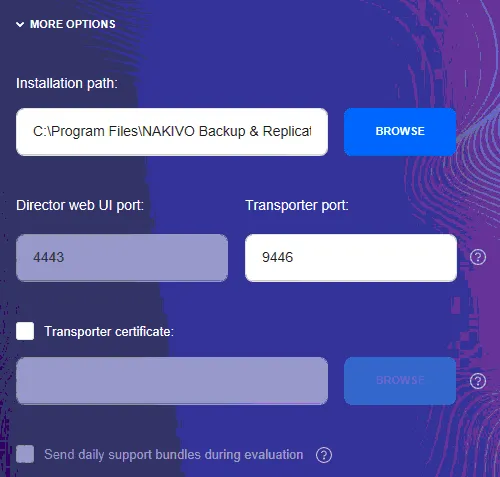
- You can expand More Options to define a custom installation path, set custom ports, and Transporter certificate.
- Read the agreement and select I accept the License Agreement. Click Install to start the Transporter installation.
- Wait until the installation process is completed.

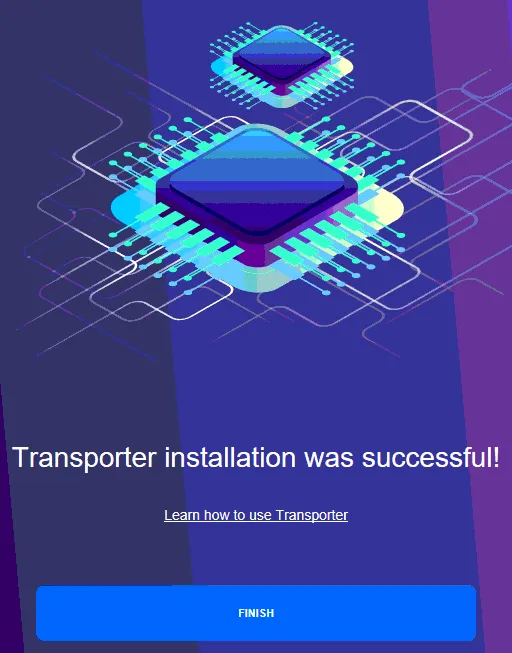
- You should see the message: Transporter installation was successful!
Now you can click Finish and close the installer window.
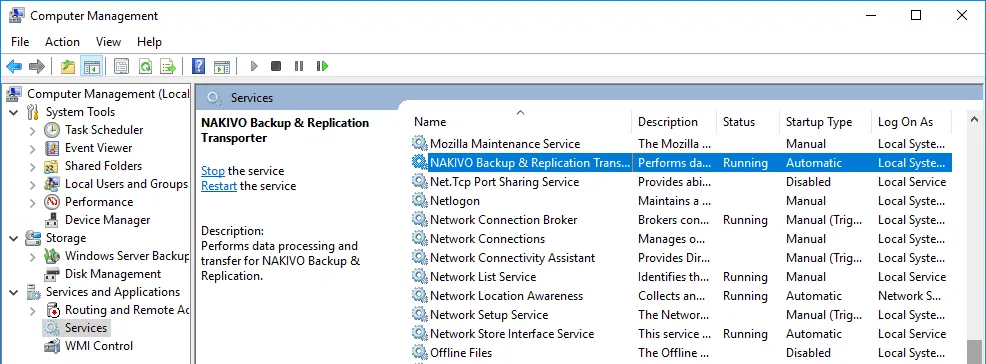
To ensure that the Transporter is running, you can check the Transporter service (NAKIVO Backup & Replication Transporter) in the services snap-in (services.msc) in Computer Management > Services and Applications > Services.
Installing a Transporter as a VMware VA
To install a Transporter in VMware vSphere on an ESXi host, you have two options:
- Deploy a pre-configured VMware vSphere virtual appliance (VM template) with the Transporter pre-installed (with Ubuntu Server as the OS installed on this VM), or
- Manually install the Transporter on Linux or Windows VMs.
To use the pre-configured virtual appliance approach:
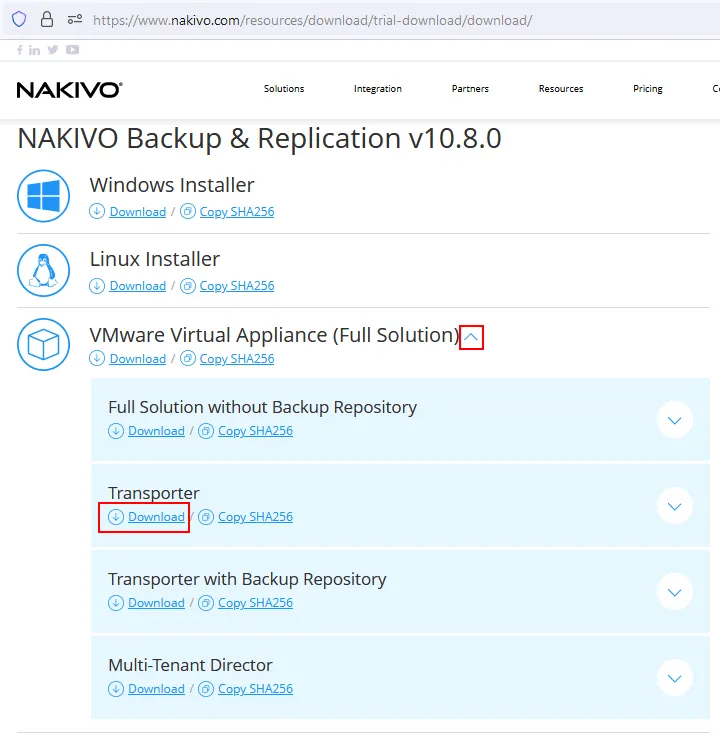
- Go to the download page on the NAKIVO website.
- Expand the download options of the VMware Virtual Appliance (Full Solution). You can select Transporter or Transporter with Backup Repository, depending on your needs. Let’s select Transporter in this example and click the download link.
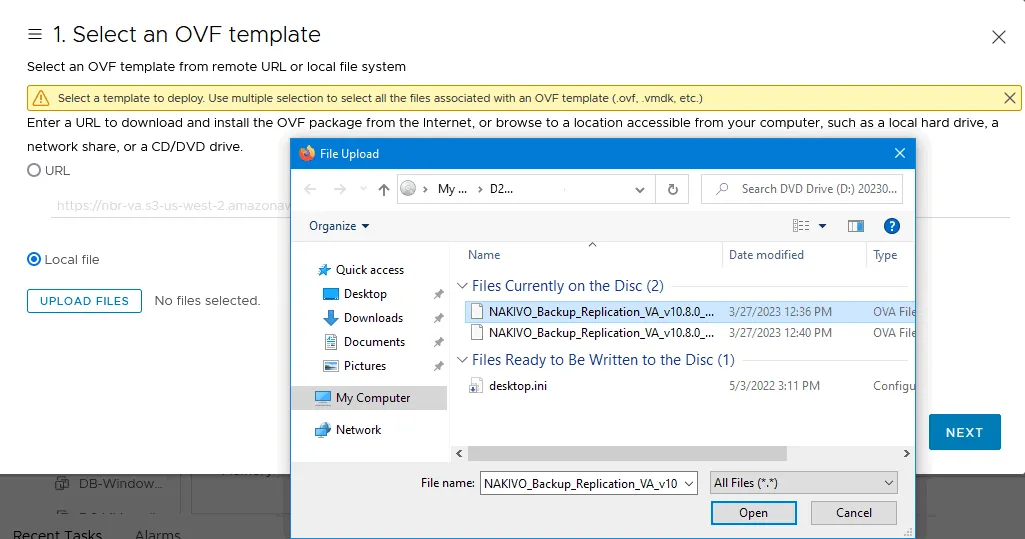
- Once downloading is done, you can deploy a VM from the OVA template on the ESXi host. We explain how to deploy the Transporter from the OVA template in VMware Host Client.
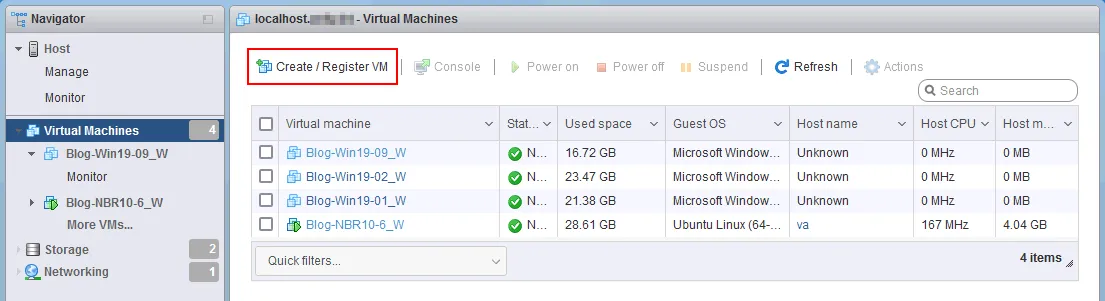
- Click Virtual Machines in the Navigator pane and click Create/Register VM.
The new virtual machine wizard opens.
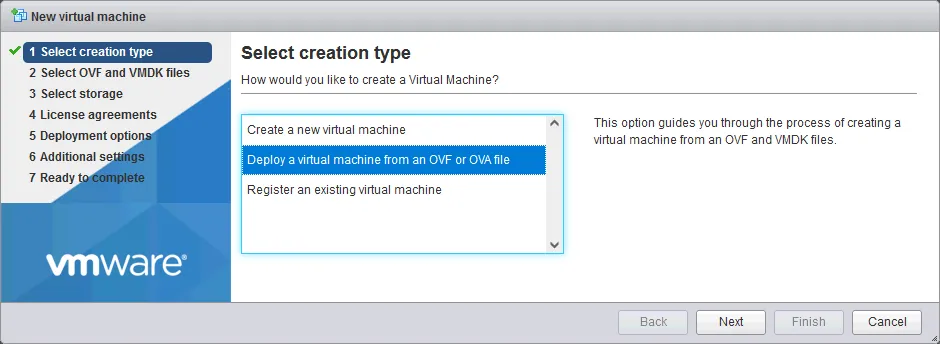
- Select creation type. Choose Deploy a virtual machine from an OVF or OVA file. Click Next at each step of the wizard to continue.
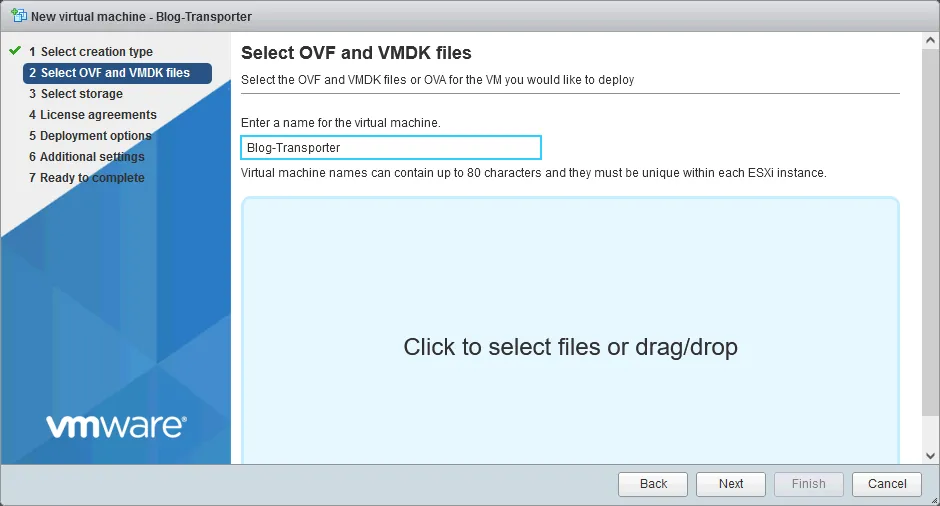
- Select OVF and VMDK files. Enter a name for the virtual machine, for example, Blog Transporter. Click the big button to select the OVA file with the Transporter and select this file from your local machine (not on an ESXi datastore).
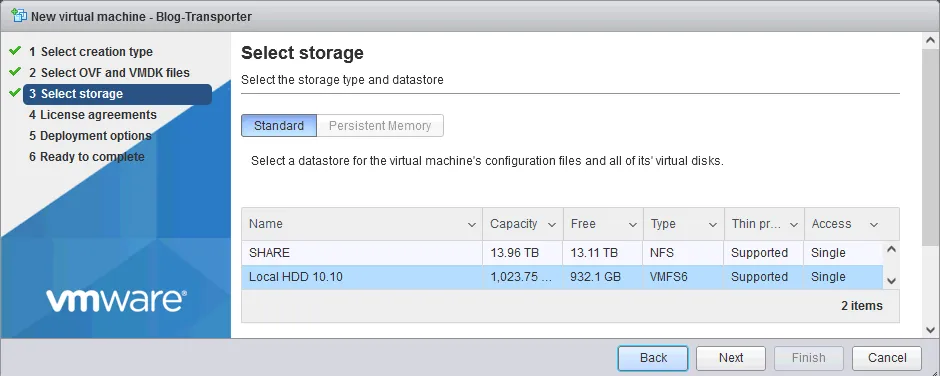
- Select storage. Select a datastore on the ESXi host where to deploy the Transporter.
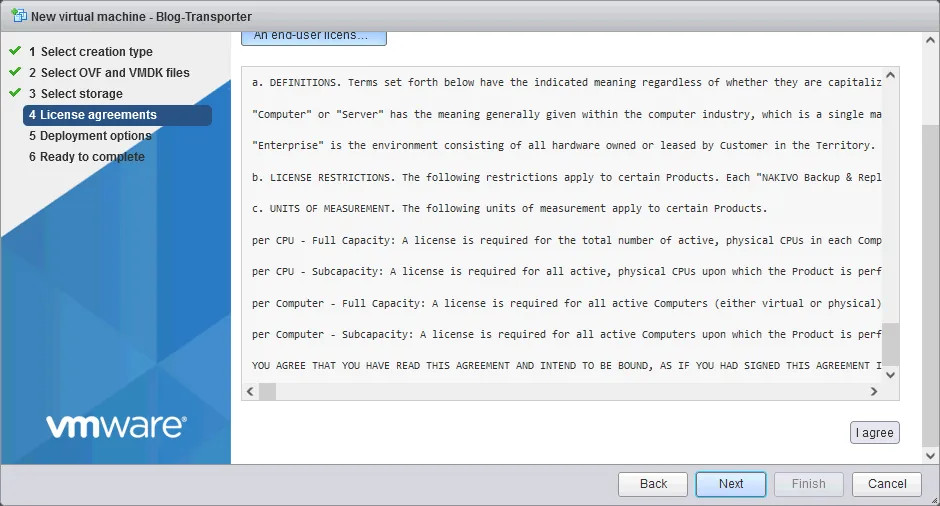
- Read and accept the license agreement.
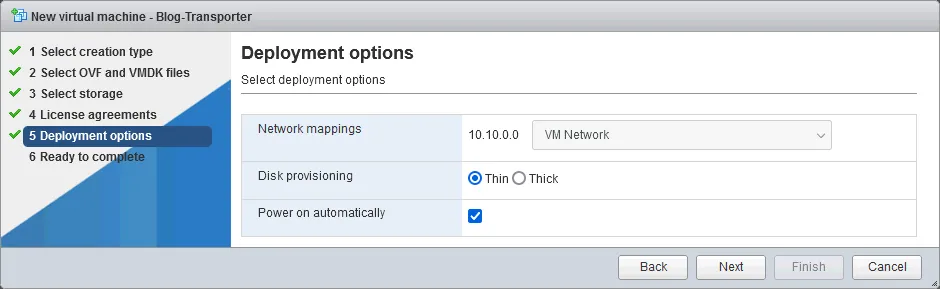
- Deployment Options. Select a network to which to connect the Transporter VM, select the virtual disk provisioning type, and select whether to power on the VM automatically after completing the installation.
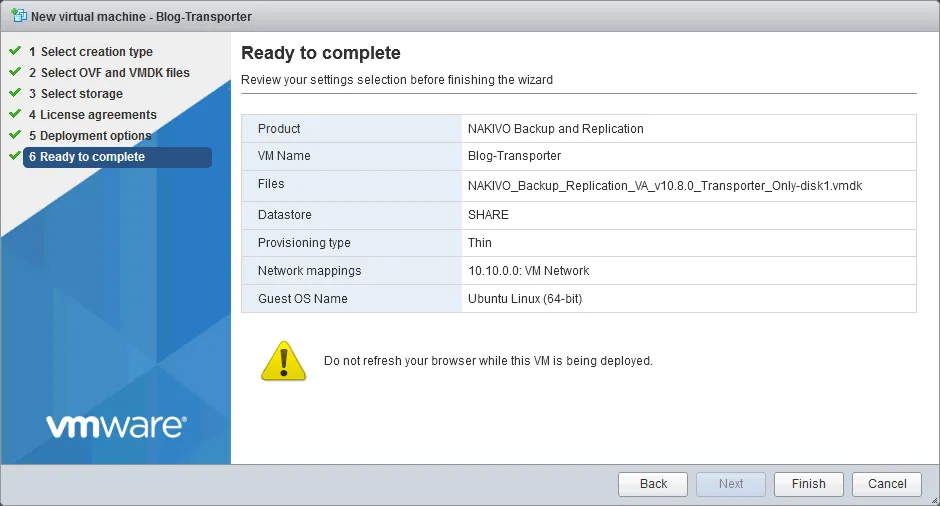
- Ready to complete. Check whether your settings are correct and then click Finish. Don’t refresh your browser while this VM is being deployed.
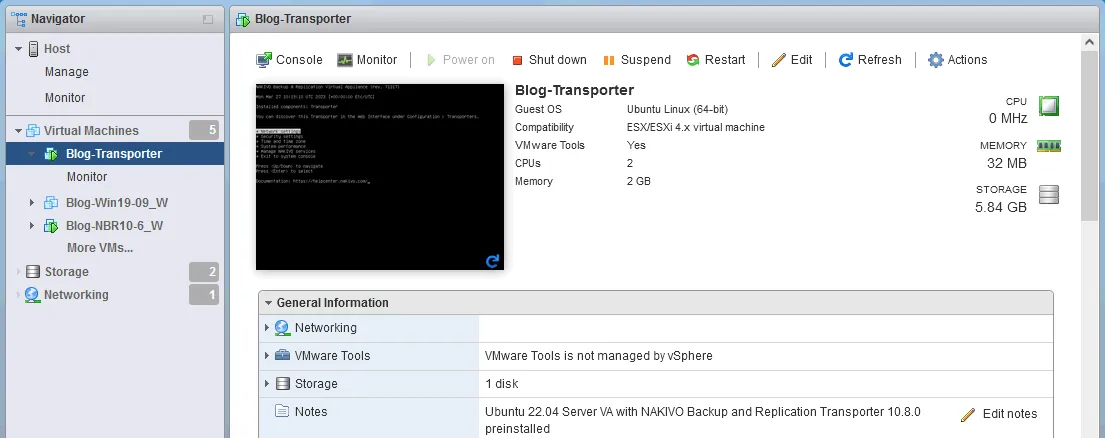
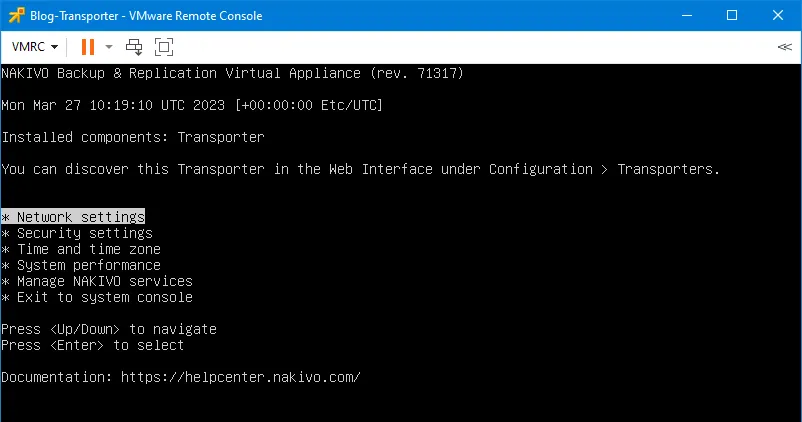
After completing the installation, you can see the console interface of the Transporter VM running on Linux.
You can use VMware Remote Console to manage the operating system and edit the settings of the Transporter VM.
The principle of deploying a virtual appliance with the Transporter using VMware vSphere Client and vCenter is identical.
- Right-click an ESXi host managed by vCenter and in the context menu click Deploy OVF Template.
- Select an OVA template with the Transporter and follow the steps of the wizard to finish.
You can read the step-by-step instructions about deploying the NAKIVO solution from the VMware Template in vSphere Client in the help center.
Installing a Transporter on NAS
It is also possible to install a Transporter on NAS devices.
Select Installer for NAS in the NAKIVO download page to expand the download options. Select your NAS vendor, expand the downloading options, select the Transporter, and click the appropriate download link.
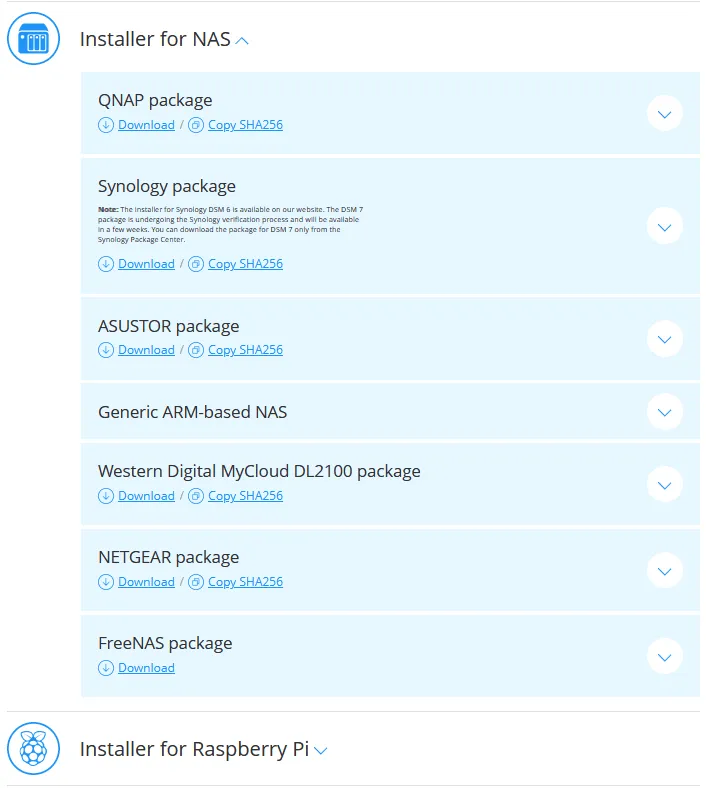
The installation process of the Transporter on NAS devices can differ from one NAS vendor to another.
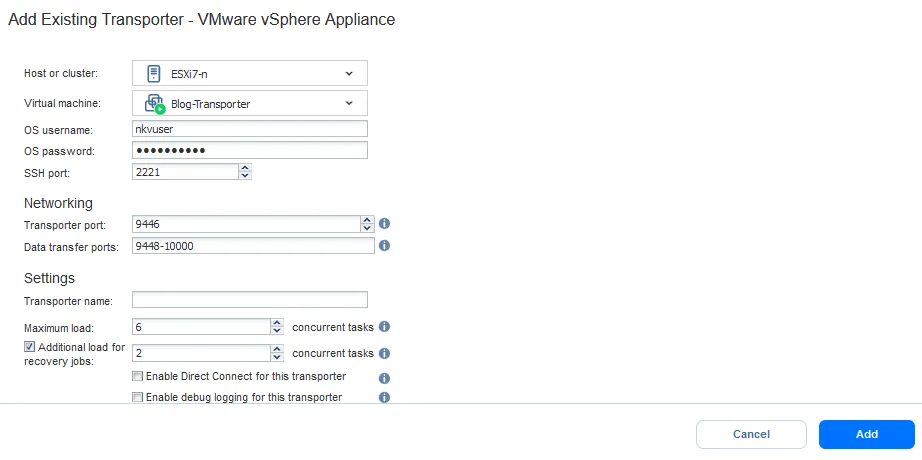
Connecting a Transporter to Director
Once a Transporter is installed, it should be connected to the NAKIVO Backup & Replication Director. We must add the installed Transporter to the list of connected nodes. We can do this in the web interface of the NAKIVO solution, which is available on the machine with the full solution installed and running.
- Go to Settings > Nodes.
- Click + > Add Existing Node > VMware vSphere Appliance to add the Transporter deployed as VMware virtual appliance. With a Transporter installed on Linux, Windows, or NAS, select the Installed service option. If you deployed the Transporter as an AWS AMI, select Amazon EC2 instance.
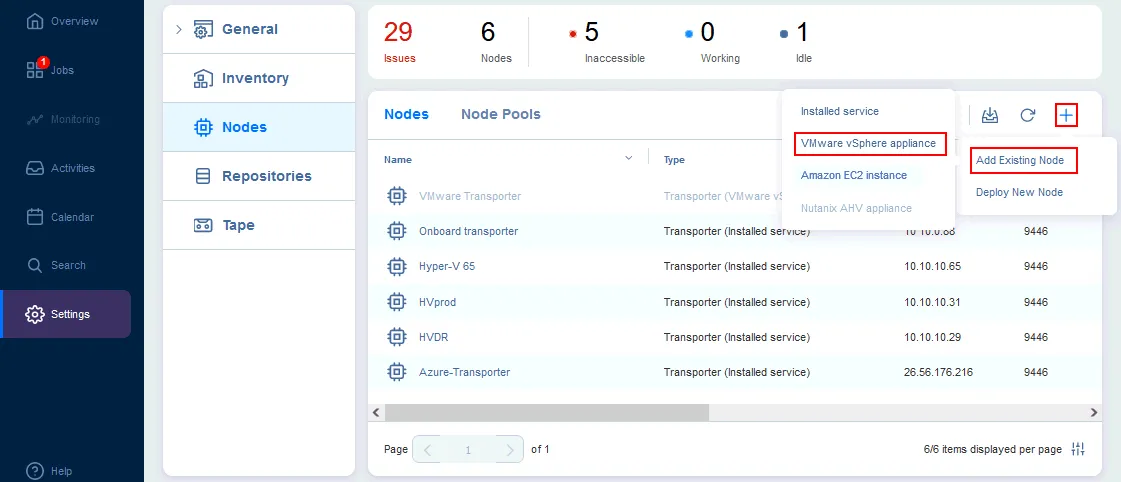
- Enter the needed parameters to connect the Director to the Transporter and add the Transporter to the node list.
You can find additional information on how to add nodes in the help center.
Deploying a Transporter from the NAKIVO Solution Interface
The latest version of NAKIVO Backup & Replication supports Automatic transporter injection. This allows you to deploy a Transporter on the selected resource directly from the web interface of the NAKIVO solution. This method is a convenient alternative to the other deployment methods explained above.
The appropriate items, such as ESXi hosts, vCenter servers, or Amazon accounts, must be added to the Inventory to use this method.
Let’s look at an example and deploy a new Transporter in VMware vSphere.
- Go to Settings > Nodes.
- Click + > Deploy New Node > VMware vSphere Appliance.
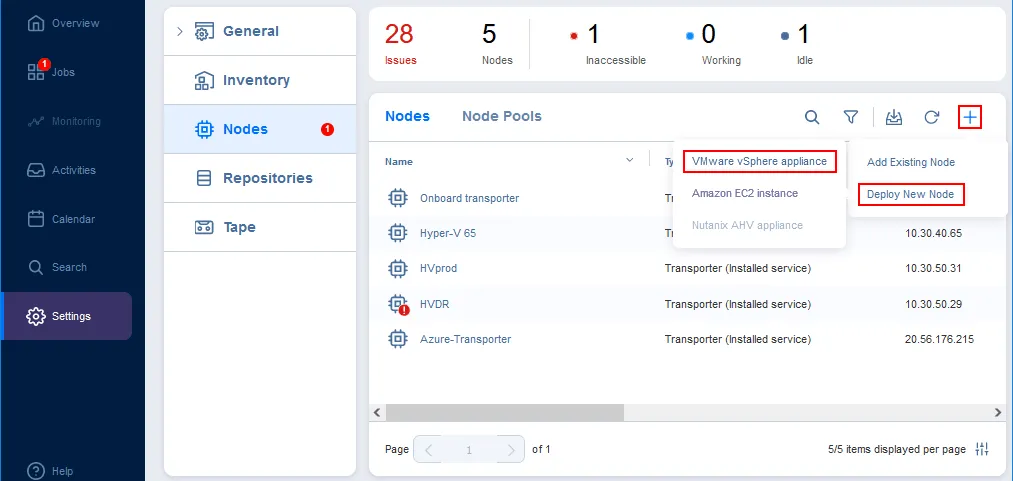
You must have enough permissions in VMware vSphere or AWS accordingly to deploy the Transporter using this method.
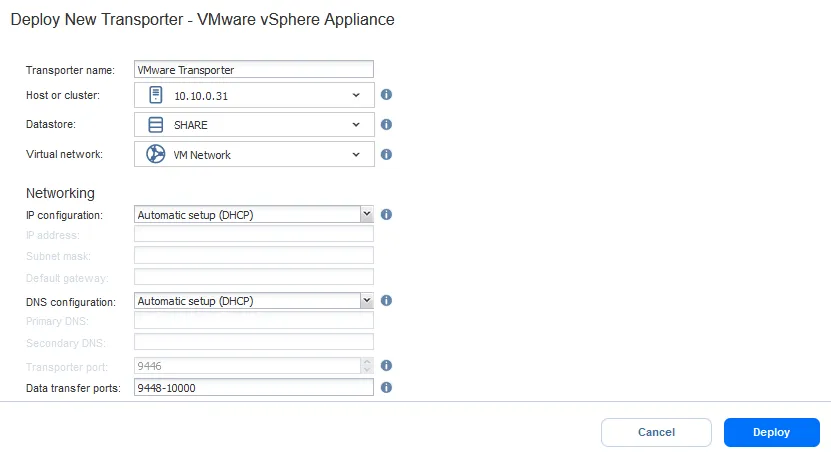
- Define the required parameters:
- Transporter name. Enter a name that will be displayed in the node list of NAKIVO Backup & Replication.
- ESXi host or cluster. Select the computing resource on which to deploy the Transporter in vSphere.
- Datastore. Choose a datastore connected to the selected ESXi host or cluster where to store VM files of the virtual appliance.
- Virtual network. Select a virtual switch/network to which a VM’s virtual network adapter will be connected.
You can set the automatic IP networking configuration via DHCP or set IP and DNS connection parameters manually. You can also select the data transfer ports if needed.
Click Deploy.
- Wait until the Transporter is deployed on the selected remote host. You can see the node status and deployment progress as shown in the image below.
The Transporter status can be:
- Inaccessible
- Good (OK)
- Unverified
- Out of date
- Refreshing
- Adding
- Deploying

There is no need to add the Transporter deployed with the Automatic transporter injection feature to the node list manually after deployment.
You can find more information about deploying nodes in the help center.