Backup Job Wizard for VMware vSphere: Options
On the Options page of the wizard, you can set up job options. Proceed as described in the sections below:
- Job Options
- Full Backup Settings
- Pre and Post Job Actions
- Data Transfer
- Completing the New Backup Job Wizard for VMware
Job Options
In this section, you can specify a name and a priority level for the backup job and enable/disable app-aware mode, change tracking, network acceleration, encryption, VM Verification, and other options. Proceed as described below.
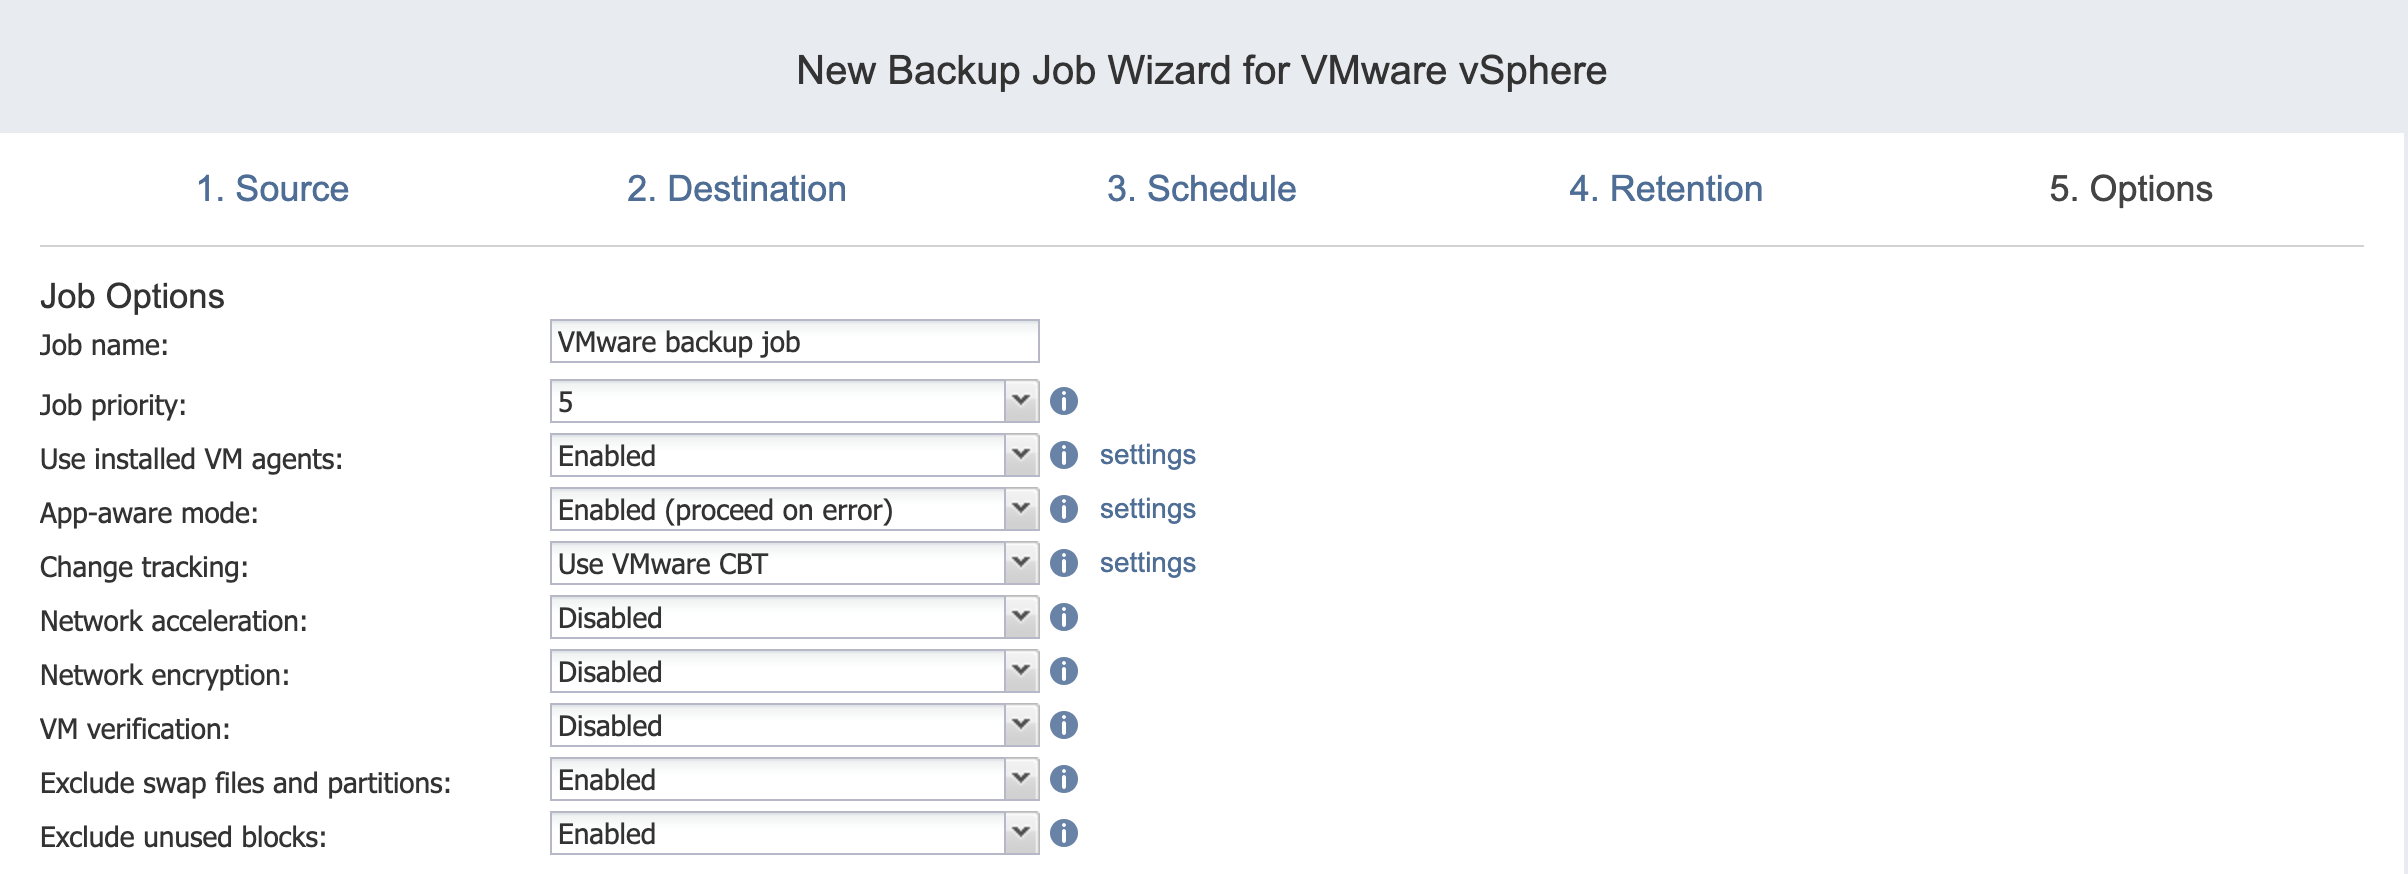
Job Name
Enter a name for the backup job in the appropriate box.
Job Priority
Select a job priority level between 1 and 5, with 1 being the highest priority. Jobs with higher priority levels are prioritized by Transporters during job processing.
Note
This option is only available in the Enterprise, Enterprise Essentials, Enterprise Plus, MSP Enterprise, and MSP Enterprise Plus editions.
Use Installed VM Agents
Enable this option if you wish to use installed VM agents for this job. Proceed as follows:
-
With the option enabled, click settings to open the Manage VM Agents pop-up menu.
-
Click Scan All to scan each VM in the job for installed VM agents.
-
Once the scan is complete, select the master password you wish to use for the discovered VM agents from the Select credentials drop-down list.
-
In the Certificate column, click Verify to verify the validity of a VM agent’s certificate.
For more information on setting up VM agents, see Using a VM Agent. For more information on setting up master passwords, see Managing Credentials.
App-Aware Mode
When the app-aware mode option is enabled, VM backup is performed using VMware Guest OS quiescing, which relies on Microsoft VSS to ensure that application data is consistent.
Change Tracking
Select one of the options from the Change tracking drop-down list:
-
Use VMware CBT: When selected, NAKIVO Backup & Replication enables the VMware Changed Block Tracking feature for source VMs. This feature enables the product to quickly identify the data blocks that have changed since the last job run, which significantly increases the job speed. Click the error handling link to specify the following options:
-
On error: Choose one of the following job behaviors in relation to CBT error:
-
switch to proprietary method: If VMware CBT fails to provide data on changed blocks for a VM and this option is selected, NAKIVO Backup & Replication performs an incremental backup of the VM using the NAKIVO proprietary change tracking technology.
-
reset CBT: If VMware CBT fails to provide data on changed blocks for a VM and this option is selected, NAKIVO Backup & Replication resets VMware CBT for the VM.
-
fail VM processing: If VMware CBT fails to provide data on changed blocks for a VM and this option is selected, NAKIVO Backup & Replication does not process the VM and states job failure (other VMs in the job will be processed).
-
-
Double-check changed blocks provided by CBT: When selected, NAKIVO Backup & Replication runs a check on data blocks provided by VMware CBT to ensure that VMware CBT does not overstate the amount of changed data.
-
Use proprietary method: When selected, NAKIVO Backup & Replication performs incremental backups using the NAKIVO proprietary change tracking technology. This feature requires reading the contents of all VM disks to determine which data blocks have changed since the last job run.
-
No change tracking (always full): When selected, NAKIVO Backup & Replication always performs a full VM backup of all source VMs.
Network Acceleration
When enabled, NAKIVO Backup & Replication uses compression and traffic reduction techniques to speed up data transfer. Select this option if you plan to back up over WAN or slow LAN links.
Encryption
When enabled, VM data is protected with AES 256 encryption while traveling over the network.
-
Data encryption increases the backup time and CPU load on machines running Transporters. Select this option if you back up over WAN without a VPN connection.
-
You need at least one Transporter at source and target sites to enable encryption.
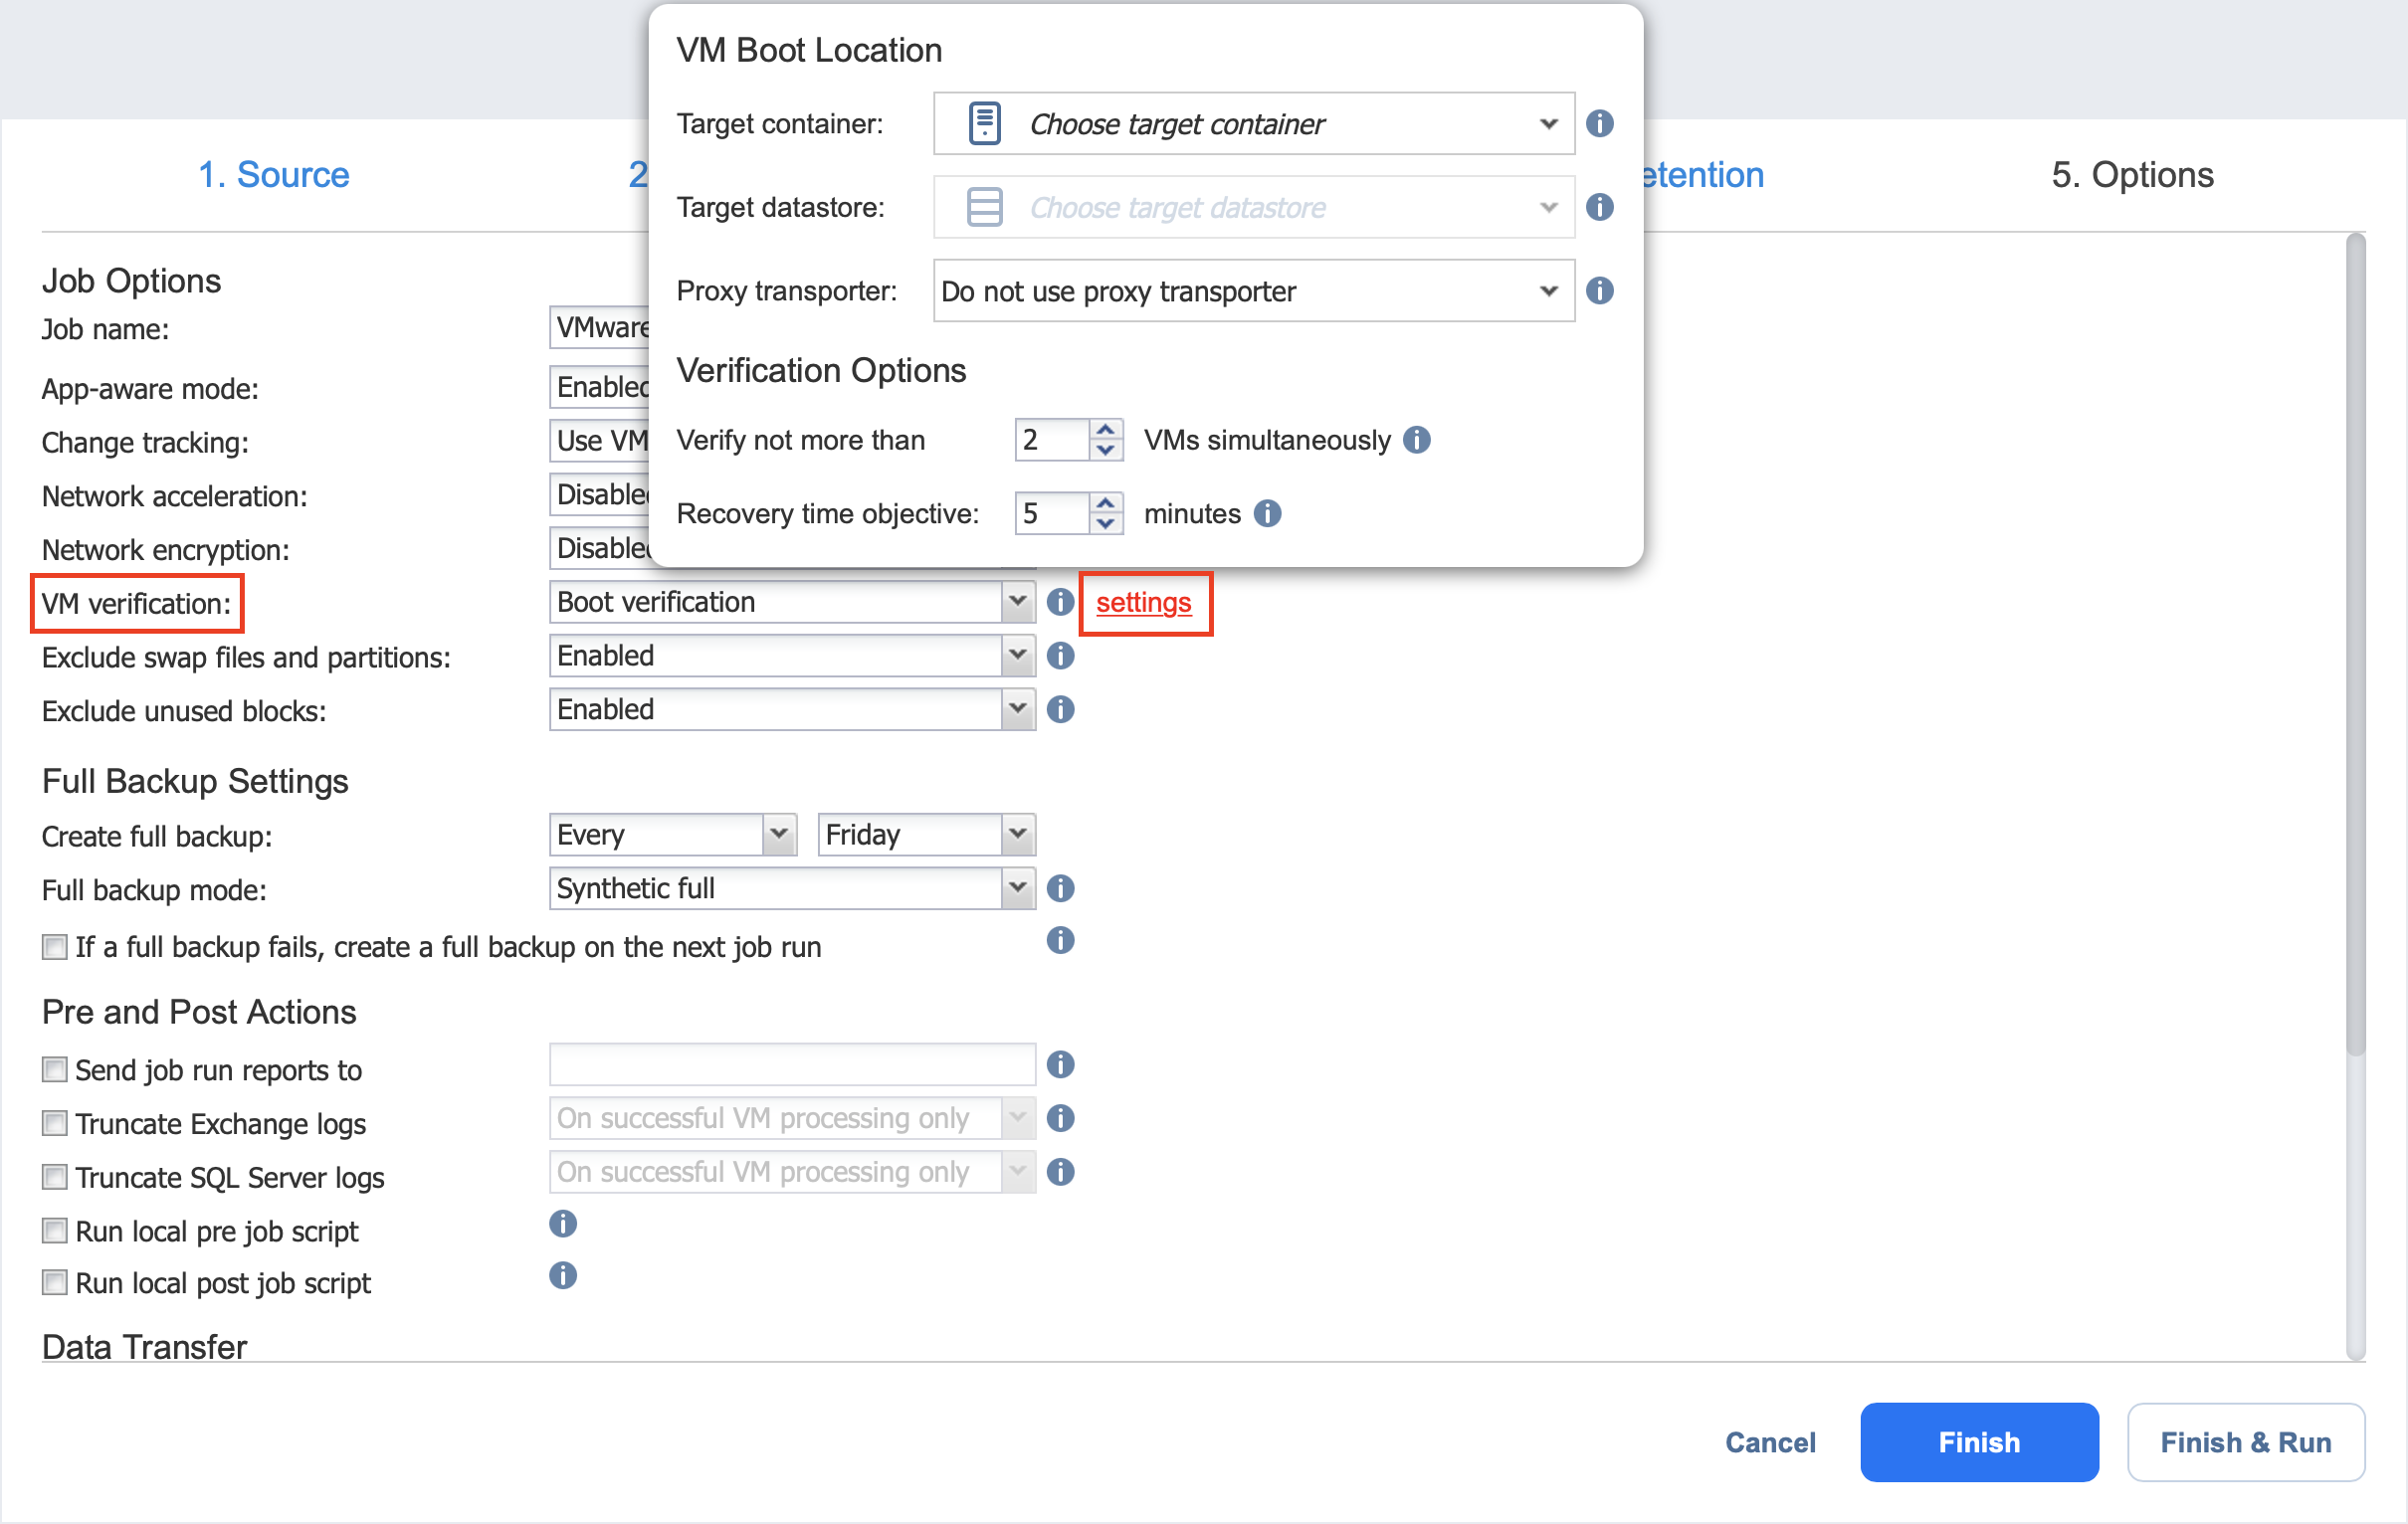
VM Verification
When VM verification is enabled, the NAKIVO Backup & Replication checks the integrity of the backup by starting it and interacting with it. You can choose one of the following VM verification options:
-
Disabled: VM Verification is disabled.
-
Screenshot verification: When enabled, all VM backups created by the job are verified: After a backup of a VM is completed, the VM is recovered from the backup using Flash VM Boot (and is disconnected from networks) and a screenshot of the recovered VM is taken once the VM OS has booted, after which the VM is discarded. VM screenshots are included in email notifications (if they have been configured) and displayed on the Dashboard.
-
Boot verification: When enabled, all VM backups created by the job are verified as follows. After a VM backup is completed, NAKIVO Backup & Replication recovers the VM using Flash VM Boot, disables networking to prevent network connections, and verifies that system start is successful.
Important
VM verification requires VMware Tools to be installed on all VMs.
After choosing Screenshot verification, do the following in the dialog box that opens:
-
Provide a location of the VMs to be booted:
-
Target Container: Choose a target container (cluster, host, or resource pool) where VMs will be run using Flash VM Boot.
-
Target Datastore: Choose a datastore that will host changes to the recovered VMs.
-
Proxy transporter: Choose a proxy Transporter from the list of available Transporters.
Note
NAKIVO Backup & Replication will use a proxy Transporter in the following cases:-
The Transporter assigned to the Backup Repository cannot use iSCSI port 3260 because it is occupied by other services.
-
iSCSI packages are missing on the Transporter assigned to the Backup Repository.
-
-
-
Set verification options:
-
Verify not more than x VMs simultaneously: Specify the maximum number of VMs that can be started on the target container simultaneously.
-
Recovery time objective: Specify the amount of time allocated for verification of each VM backup. If a VM OS does not start within the specified amount of time, verification will be considered failed.
-
Screenshot delay: The amount of time that the product should wait after the guest OS start before making a screenshot.The specified time must be sufficient to fully start the VM OS. Try increasing this amount if the default amount is insufficient.

-
After choosing Boot verification, do the following in the dialog box that opens:
-
Provide a location of the VMs to be booted as described for the Screenshot verification option.
-
Set verification options:
-
Verify not more than x VMs simultaneously: Specify the maximum number of VMs that can be started on the target container simultaneously.
-
Recovery time objective: Specify the amount of time allocated for the verification of each VM backup. If a VM OS does not start within the specified amount of time, verification is considered failed.
-
Exclude Swap Files and Partitions
With this option enabled, NAKIVO Backup & Replication automatically excludes swap files and partitions during the backup process.
Exclude Unused Blocks
With this option enabled, NAKIVO Backup & Replication automatically excludes unused disk blocks and blocks occupied by deleted files during processing of source objects running Windows OS. This feature allows for reducing backup storage space and object processing time.
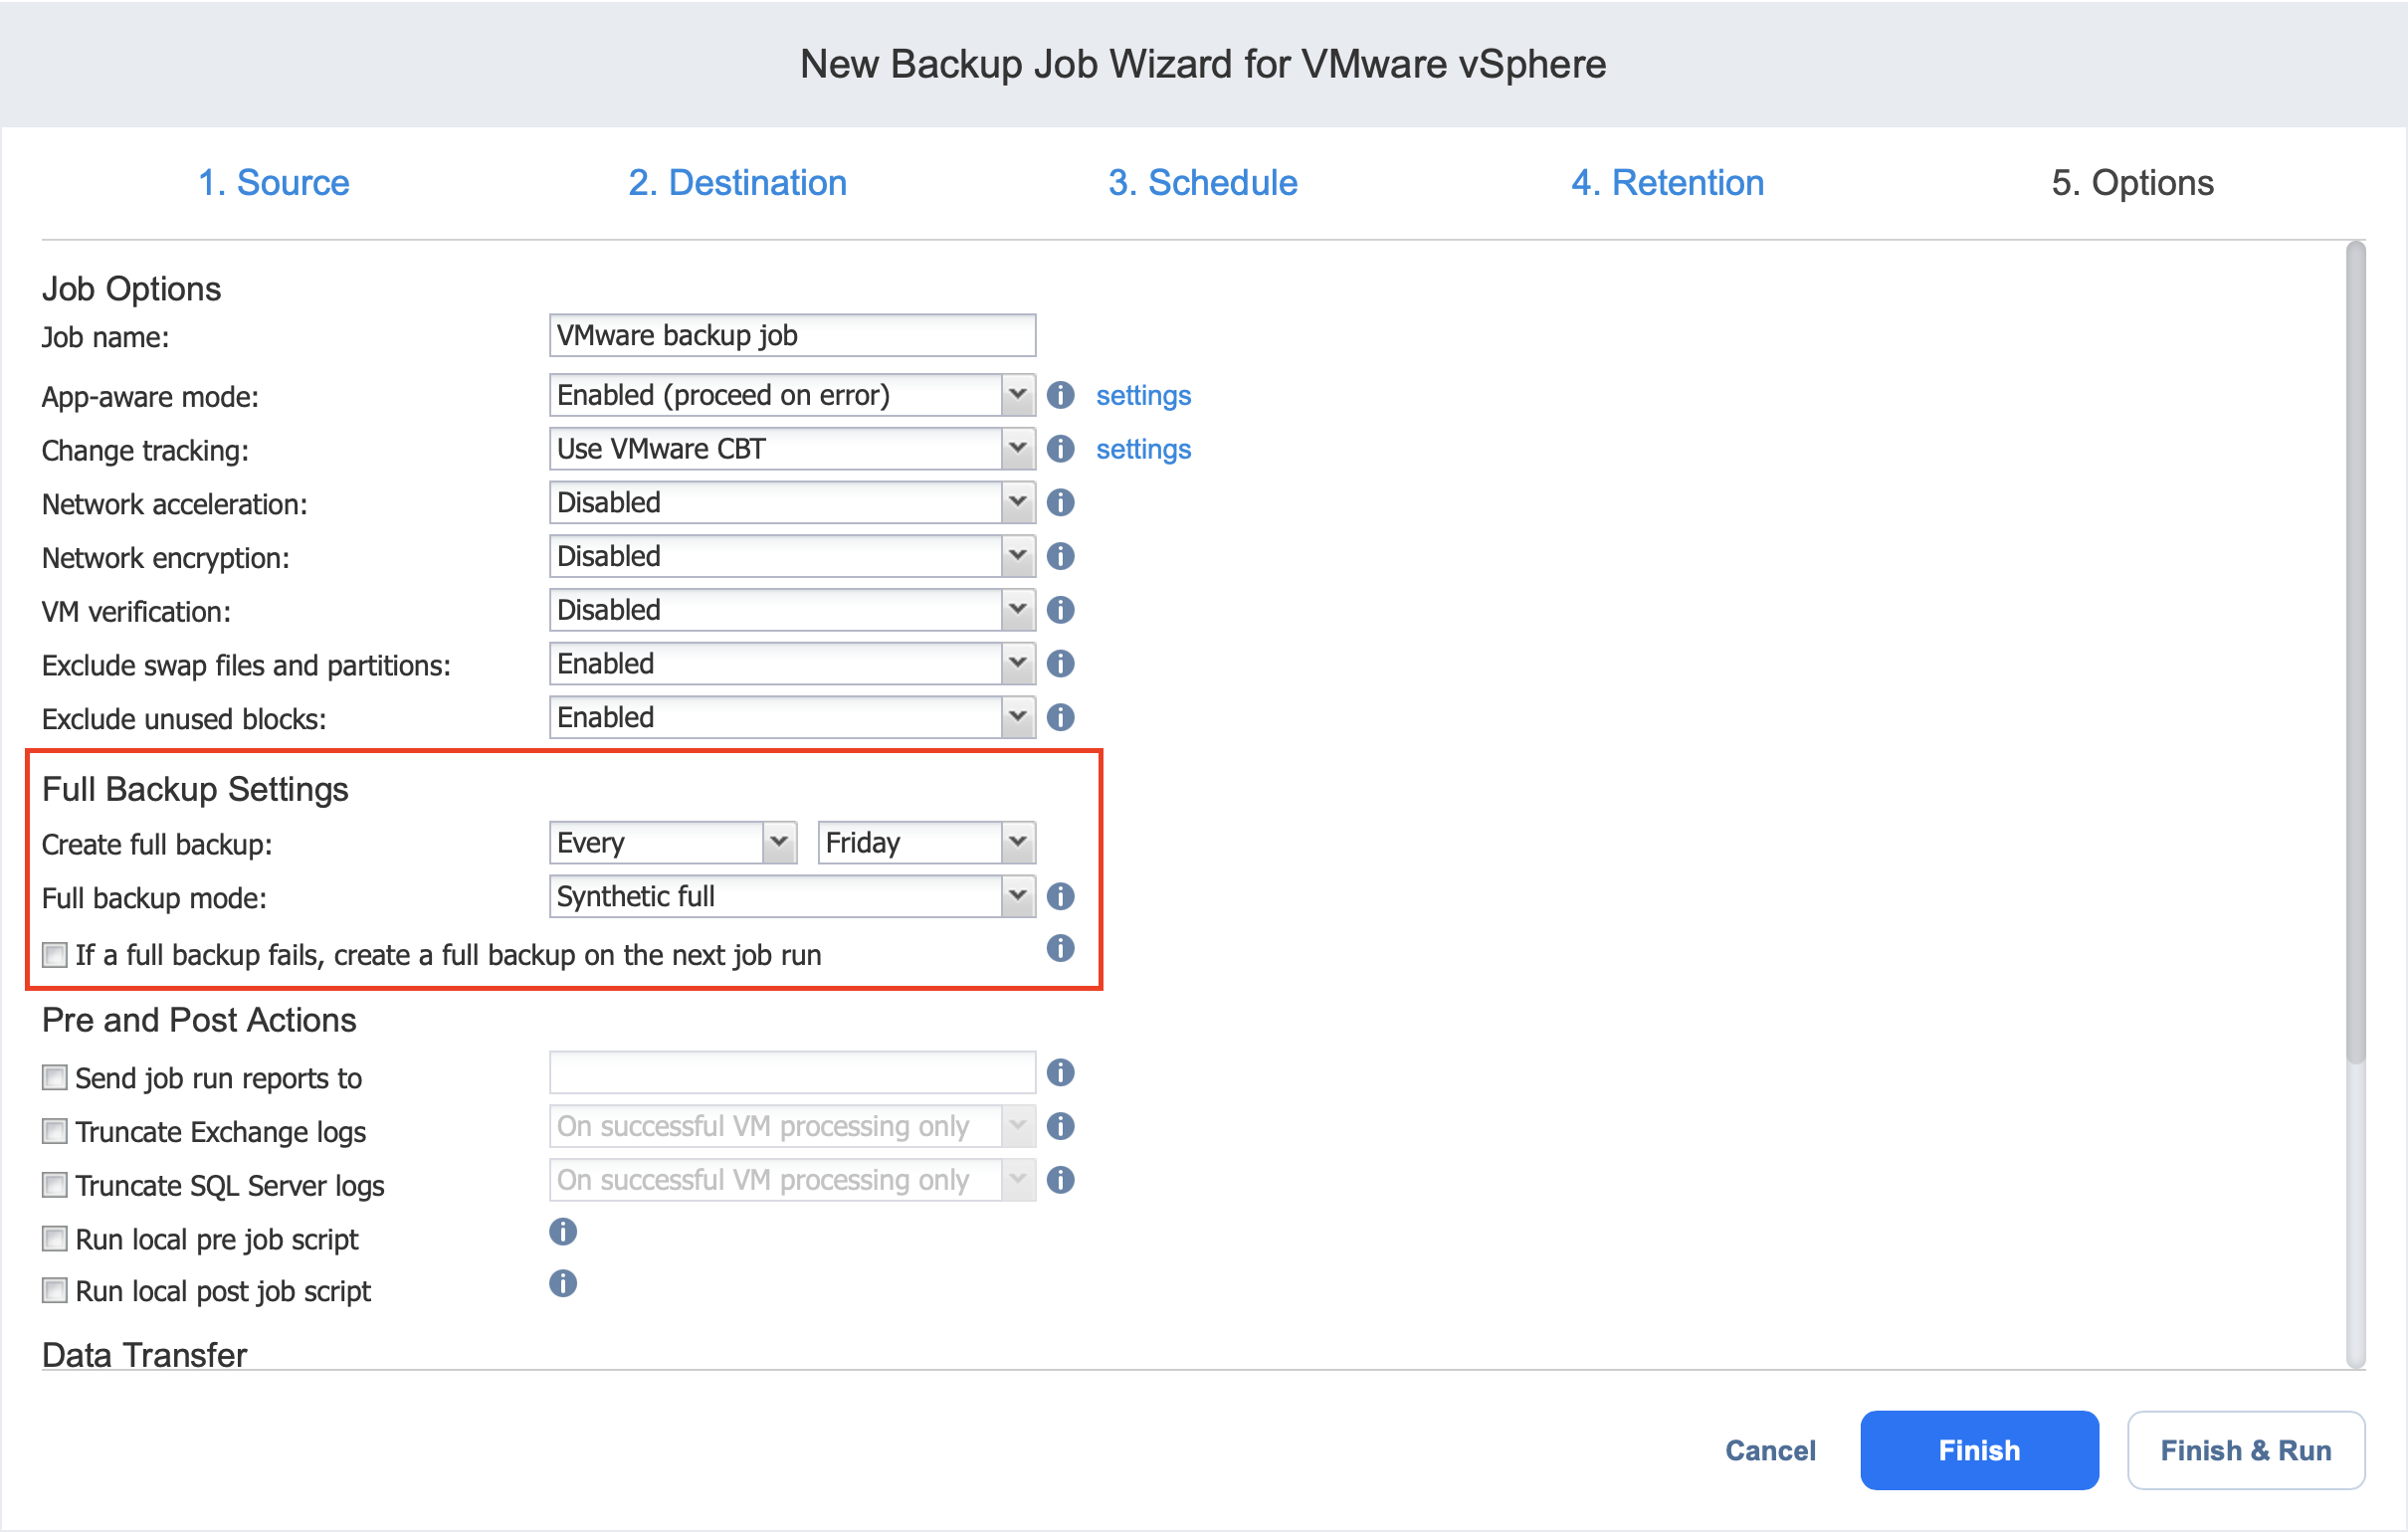
Full Backup Settings
If the type of the Backup Repository that you've selected on the Destination page of the wizard is set to Incremental with full backups (Store backups in separate files option is selected), you can specify the following options:
-
Create full backup: Specify how often full backups should be created.
-
Full backup mode: Specify how the full backup should be created. You can choose one of the following options:
-
Synthetic Full: When this option is selected, NAKIVO Backup & Replication first performs an incremental backup (that is, transfers only the data that has changed since the last backup) and then transforms the available data into a full backup file. The benefits of this approach are:
-
The Synthetic Full backup is usually faster than the Active Full backup.
-
The load on the network is lower as less data is transferred.
-
The load on the source datastores running your production VMs is lower.
-
-
Active Full: When this option is selected, NAKIVO Backup & Replication reads all VM data from the source datastore and transfers it to the Backup Repository.
-
-
If a full backup fails, create a full backup on the next job run: With this option selected, the next job run creates a full backup if the current job run fails to do so.
Pre and Post Job Actions
NAKIVO Backup & Replication allows you to enable certain actions before a backup job begins and after it has completed. You can choose to send job run reports, truncate Microsoft Exchange and Microsoft SQL Server logs on specified VMs, and run local pre- and post- job scripts.
Email Notifications
NAKIVO Backup & Replication can send email notifications about job completion status to specified recipients. This feature complements global notifications and allows you to configure notifications on a per-job level.
To enable this option, configure your Email settings. To send email notifications, select Send job run reports to and specify one or more email addresses in the text box. Use semicolons to separate multiple email addresses.
Truncation of Microsoft Exchange Server Transaction Logs
Microsoft Exchange Server database transaction logs record all changes to an Exchange Server database. Over time, these log files accumulate and can consume all of the available disk space if not periodically removed. NAKIVO Backup & Replication provides an option to delete (aka truncate) Microsoft Exchange Server logs on the source VMs after job completion.
The transaction logs are deleted after the job is completed so that the log files are available in the VM backup. Note that the product deletes only those transaction logs which are already committed to (available in) the Microsoft Exchange database.
To set up Microsoft Exchange log truncation, do the following:
-
Select the Truncate Exchange logs option.
-
In the dialog box that opens, select the checkboxes next to the VMs running Microsoft Exchange and then select the credentials next to each VM. These credentials will be used to log in to the VMs that you have selected.
Truncation of Microsoft SQL Server Transaction Logs
Microsoft SQL Server database transaction logs record all changes to an SQL Server database. Over time, these logs accumulate and can consume all of the available disk space if not periodically removed. NAKIVO Backup & Replication provides the option to delete (or truncate) Microsoft SQL Server logs on the source VMs after job completion.
The transaction logs are deleted after the job is completed so that the original log records are available in the VM backup. Note that the product deletes only those transaction logs that are already committed to (available in) the Microsoft SQL Server database.
To set up Microsoft SQL Server log truncation, do the following:
-
Select the Truncate SQL Server logs option.
-
In the dialog box that opens, select the checkboxes next to the VMs running Microsoft SQL Server and then select credentials next to each VM. These credentials will be used to log in to the VMs that you have selected.
Pre Job Script
To run a script before the product begins backing up VMs, do the following:
-
Place a script file on the machine on which the Director is installed.
-
Select the Run local pre job script option.
-
Specify the following options in the dialog box that opens:
-
Script path: Specify a local path to the script on the machine on which the Director is installed. A script interpreter should be specified.
Example (Windows): cmd.exe /c D:\script.batExample (Linux): bash /root/script.sh
-
Job behavior: Choose one of the following job behaviors in relation to script completion:
-
Wait for the script to finish: When this option is selected, VM backup is only started after the script is completed.
-
Do not wait for the script to finish: When this option is selected, the product runs the script and starts backing up VMs at the same time.
-
-
Error handling: Choose one of the following job behaviors in relation to script failure:
-
Continue the job on script failure: When this option is selected, the job performs VM backup even if the script has failed.
-
Fail the job on script failure: When this option is selected and the script fails, the job is failed and VM backup is not performed.
-
-
Post Job Script
To run a script after the product has finished backing up all VMs, do the following:
-
Place a script file on the machine on which the Director is installed.
-
Select the Run local post job script option.
-
Specify the following options in the dialog box that opens:
-
Script path: Specify a local path to the script on the machine on which the Director is installed. A script interpreter should be specified.
Example (Windows): cmd.exe /c D:\script.batExample (Linux): bash /root/script.sh
-
Job behavior: Choose one of the following job behaviors in relation to script completion:
-
Wait for the script to finish: When this option is selected, the job is in the “running” state until the script is completed.
-
Do not wait for the script to finish: When this option is selected, the job is completed even if the script execution is still in progress.
-
-
Error handling: Choose one of the following job behaviors in relation to script failure:
-
Continue the job on script failure: When this option is selected, script failure does not influence the status of the job.
-
Fail the job on script failure: When this option is selected and the script fails, the job status is set to “failed” even if VM backup is successful.
-
-
Important
Pre- and post-job scripts can be executed only on the machine on which the Director is installed. 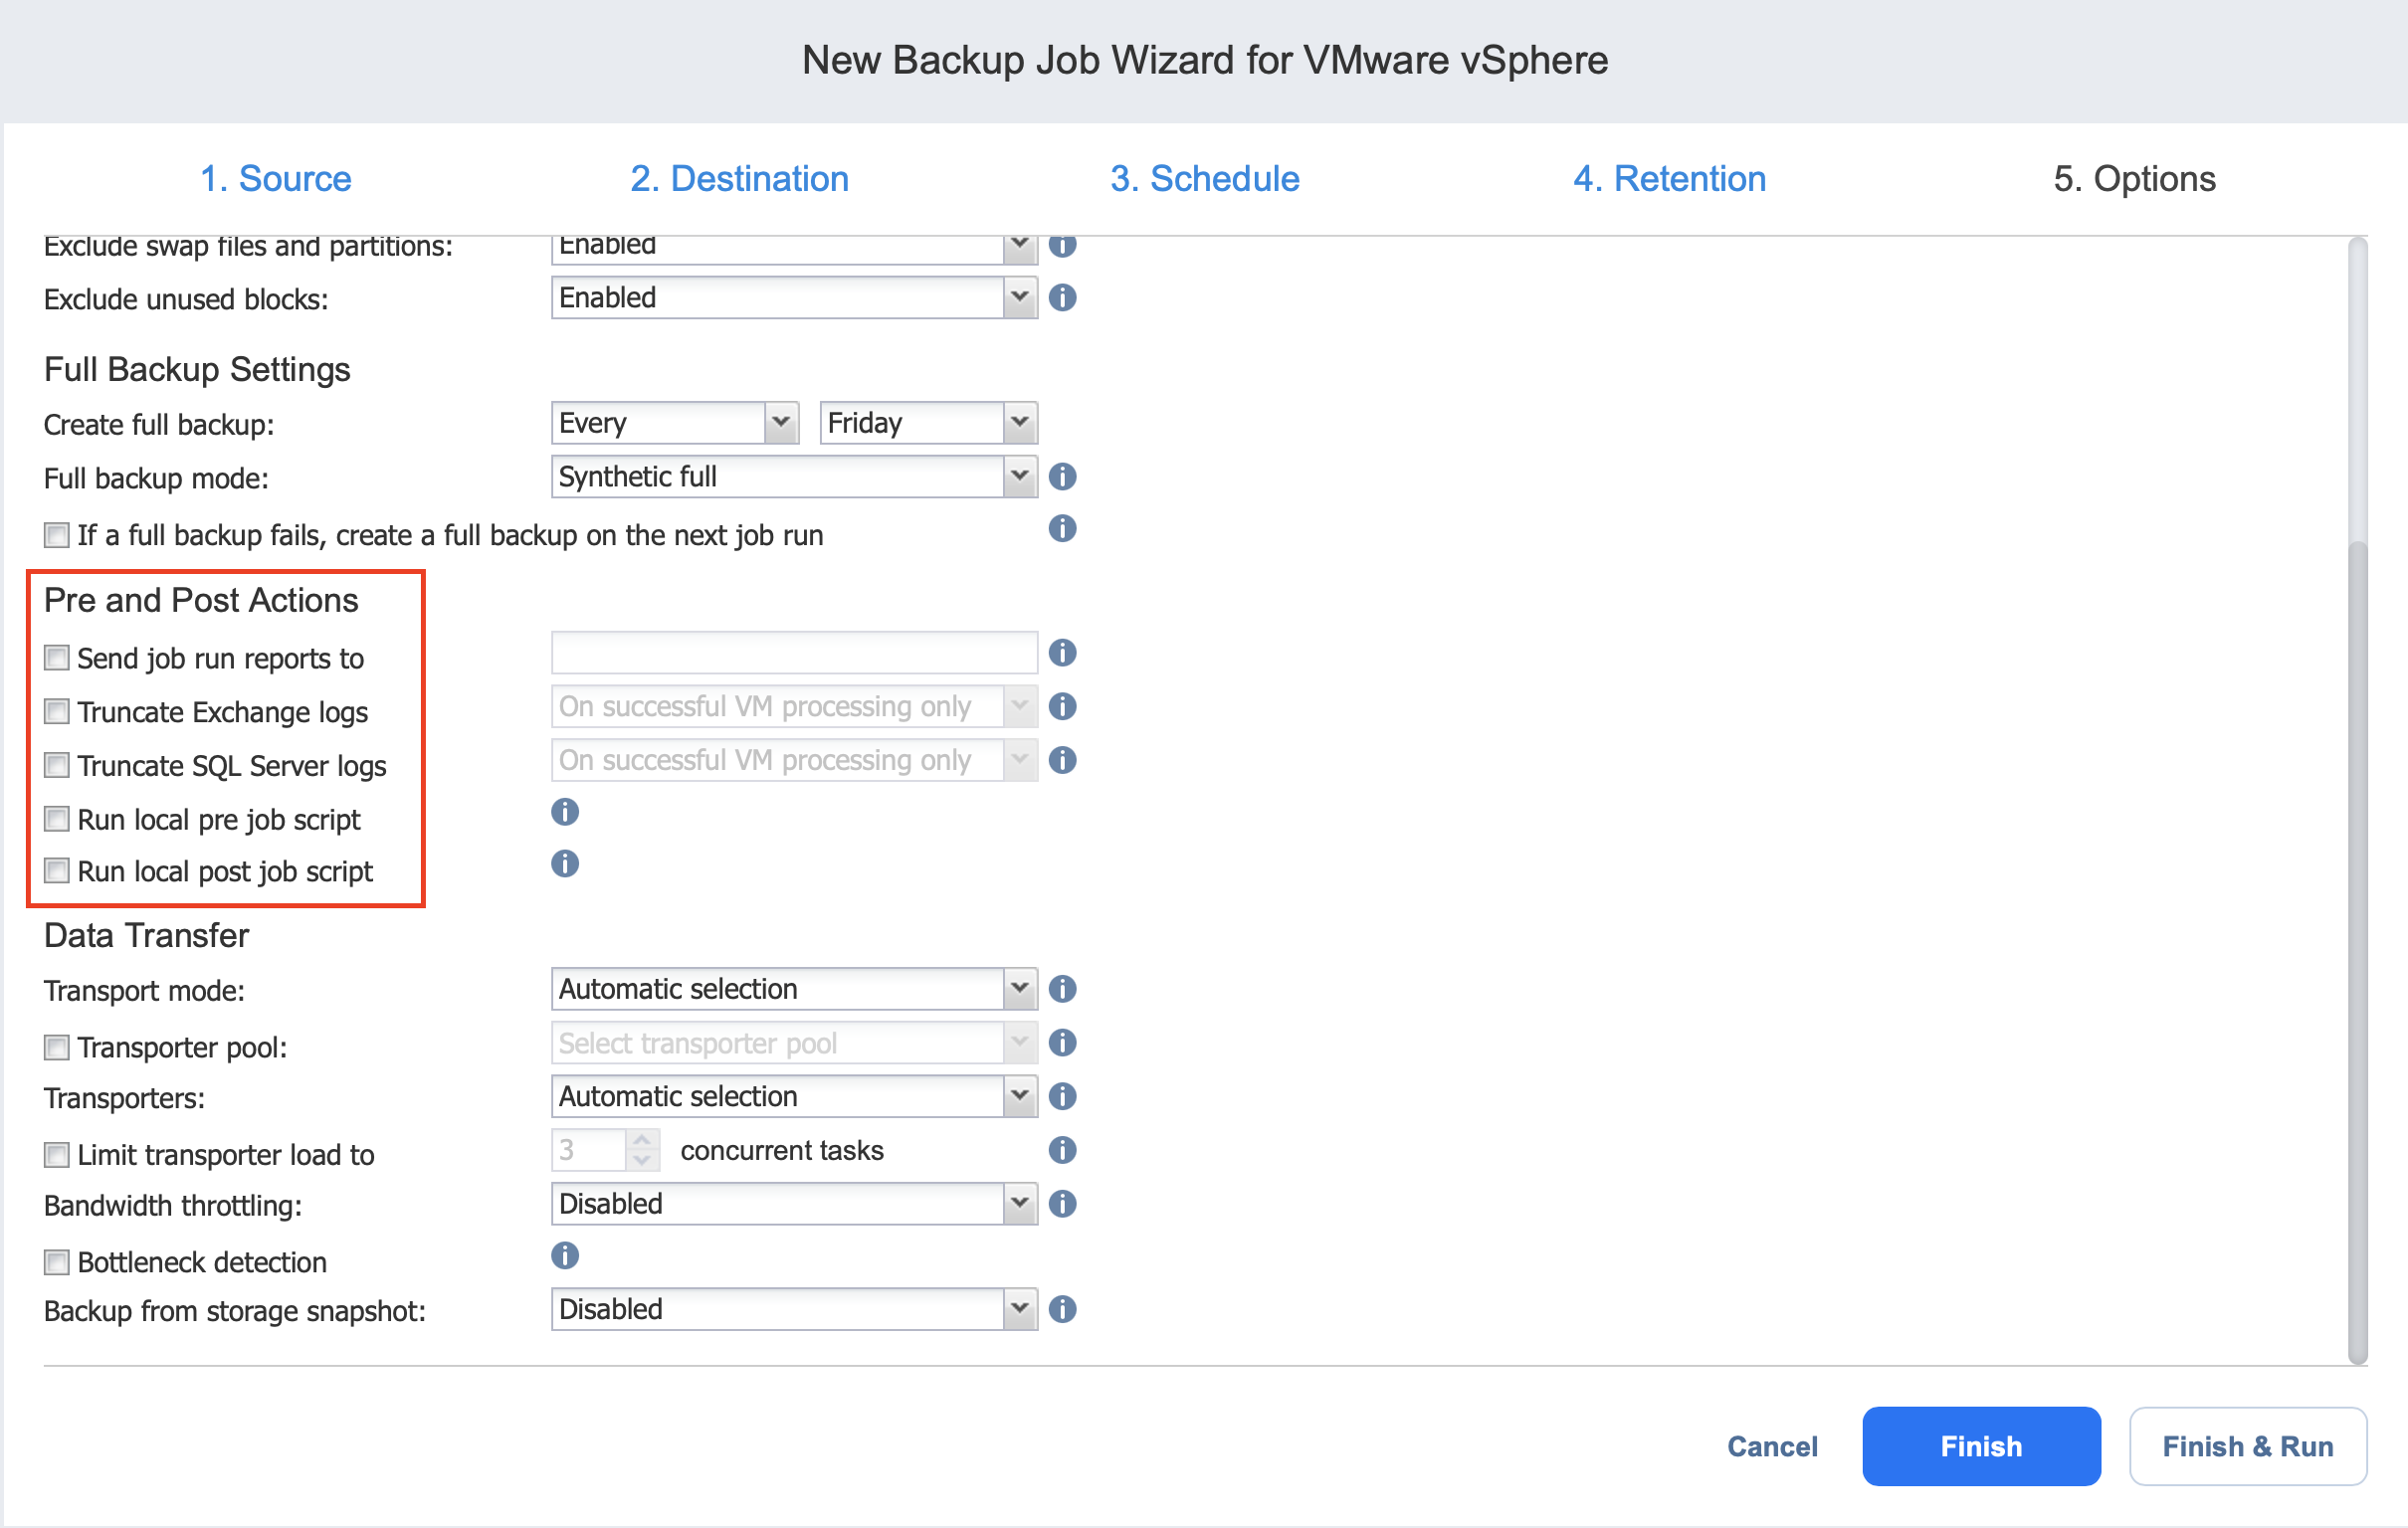
Data Transfer
In the Data Transfer section of the Options page, you can choose a transport mode, select a Transporter to be used for reading data from source VMs, specify a Transporter load, and configure bandwidth throttling.
Transport Mode
In the Data Transfer section, choose a transport mode for retrieving VM data: