Adding Microsoft 365 Accounts
Before you start backing up items from your organization’s Microsoft 365 account, you need to add the Microsoft 365 account to Inventory in NAKIVO Backup & Replication.
Adding Microsoft 365 Account to Inventory
To add a Microsoft 365 account to Inventory, do the following:
-
Check if you meet Microsoft 365 requirements.
-
Click Settings in the left pane.
-
Go to the Inventory tab and click Add New.
-
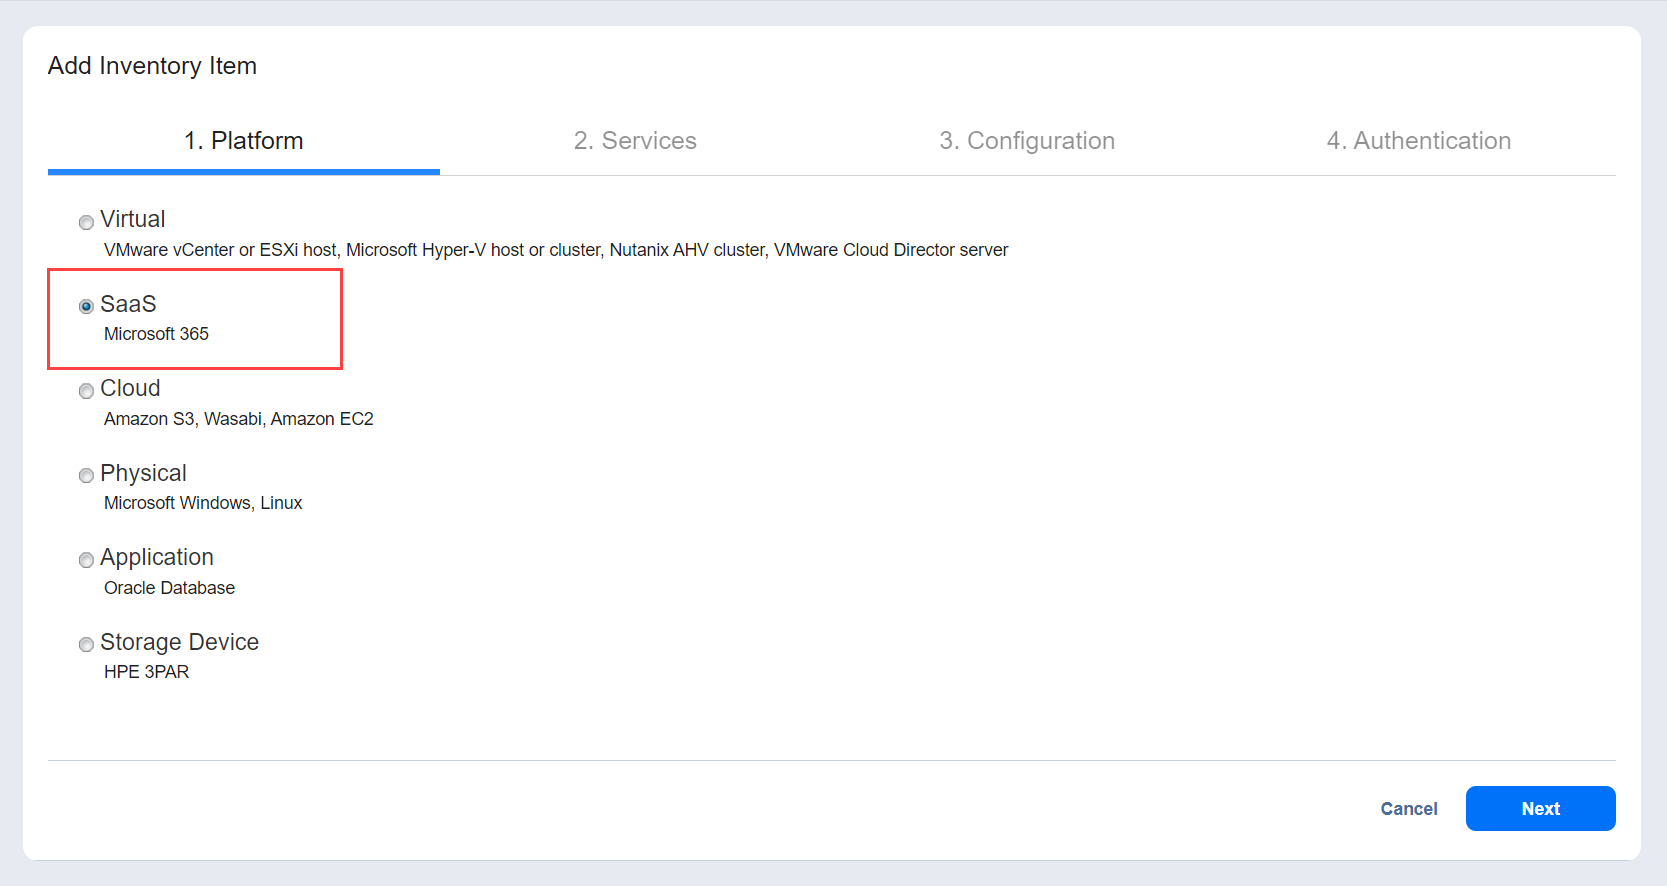
On the Platform page of the wizard, select SaaS. Click Next to proceed.
-
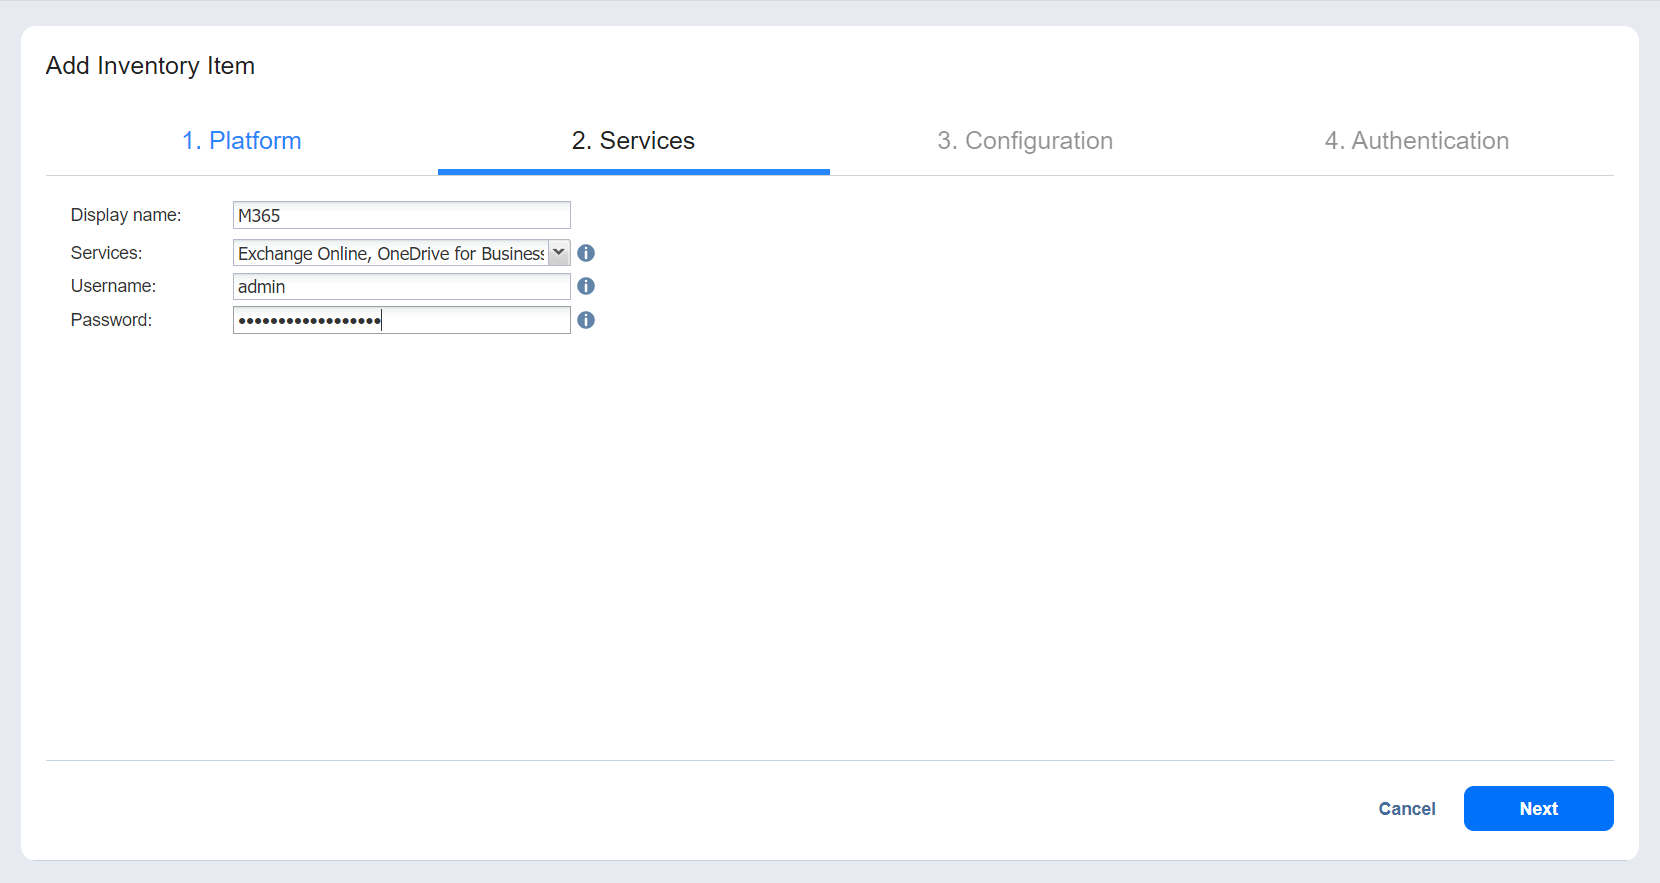
On the Services page, provide the following information:
-
Display name: Enter a name for the account.
-
Services: Select the Microsoft 365 services that you want to back up:
-
Exchange Online
-
OneDrive for Business
-
SharePoint Online
-
-
Username: Provide the administrator username required for SharePoint Online support.
-
Password: Provide the administrator password required for SharePoint Online support.
-
-
Click Next to proceed.
-
On the Configuration page, choose one of the following:
-
Automatically register a new Azure AD application: When this option is selected, NAKIVO Backup & Replication automatically registers the Microsoft 365 account as a new application in Azure Active Directory and grants the required permissions after authentication.
-
Use an existing Azure AD application: When this option is selected, you can manually add an existing Microsoft 365 application already registered in Azure Active Directory.
Note
In order to add a Microsoft 365 account to NAKIVO Backup & Replication, the account has to be registered in Azure Active Directory.
-
-
Click Next to proceed.
-
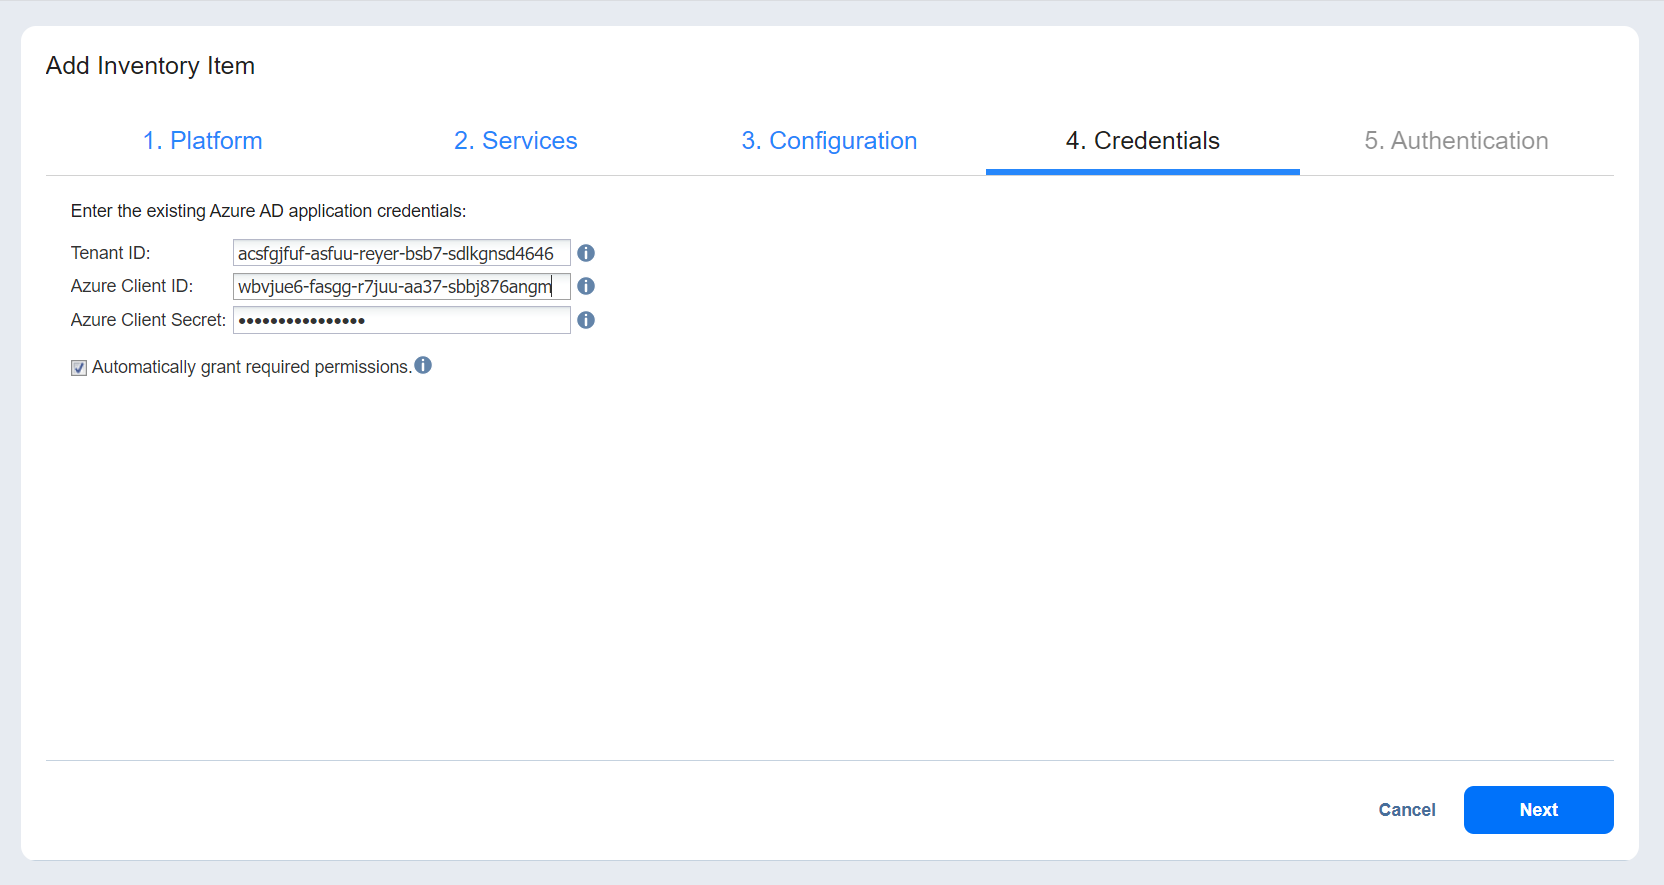
The Credentials page opens if you have chosen Use an existing Azure AD application option on the Configuration page. Provide the following information:
-
Tenant ID: Enter your Azure Tenant ID created when registering your Microsoft 365 account in the Azure Portal.
-
Azure Client ID: Enter your Azure Client ID created when registering your Microsoft 365 account in the Azure Portal.
-
Azure Client Secret: Enter your Azure Client Secret obtained from the Azure Portal. For more information on obtaining the Azure credentials, refer to the Obtaining Microsoft 365 Credentials section below.
-
-
Optionally, select Automatically grant required permissions. This allows NAKIVO Backup & Replication to automatically check the required API permissions for the selected services of your organization’s Microsoft 365 account and to add them if they are missing. If you do not select this option, you have to manually grant the required permissions. If you have selected this option, click Next. Alternatively, click Finish to complete adding the item to Inventory.
-
If you have selected Automatically grant required permissions on the Credentials page or Automatically register a new Azure AD application on the Configuration page, the Authentication page opens. Do the following:
-
Enter a name for the application in the Application name field.
-
The Code field shows the code that needs to be entered at https://microsoft.com/devicelogin.
-
Optionally, click New code to generate a new code.
-
Click Copy code to copy the displayed code.
Notes
-
The Global Administrator role must be assigned to the account in Microsoft 365 admin center for the authentication process to be successful.
-
If SharePoint Online was selected on Services page, the SharePoint Administrator role must be assigned to the account in Microsoft 365 admin center for the authentication process to be successful.
-
-
Click Finish to complete adding the item to the inventory.
Obtaining Microsoft 365 Credentials
To obtain the credentials required to add a Microsoft 365 account to Inventory in NAKIVO Backup & Replication, follow the steps below:
-
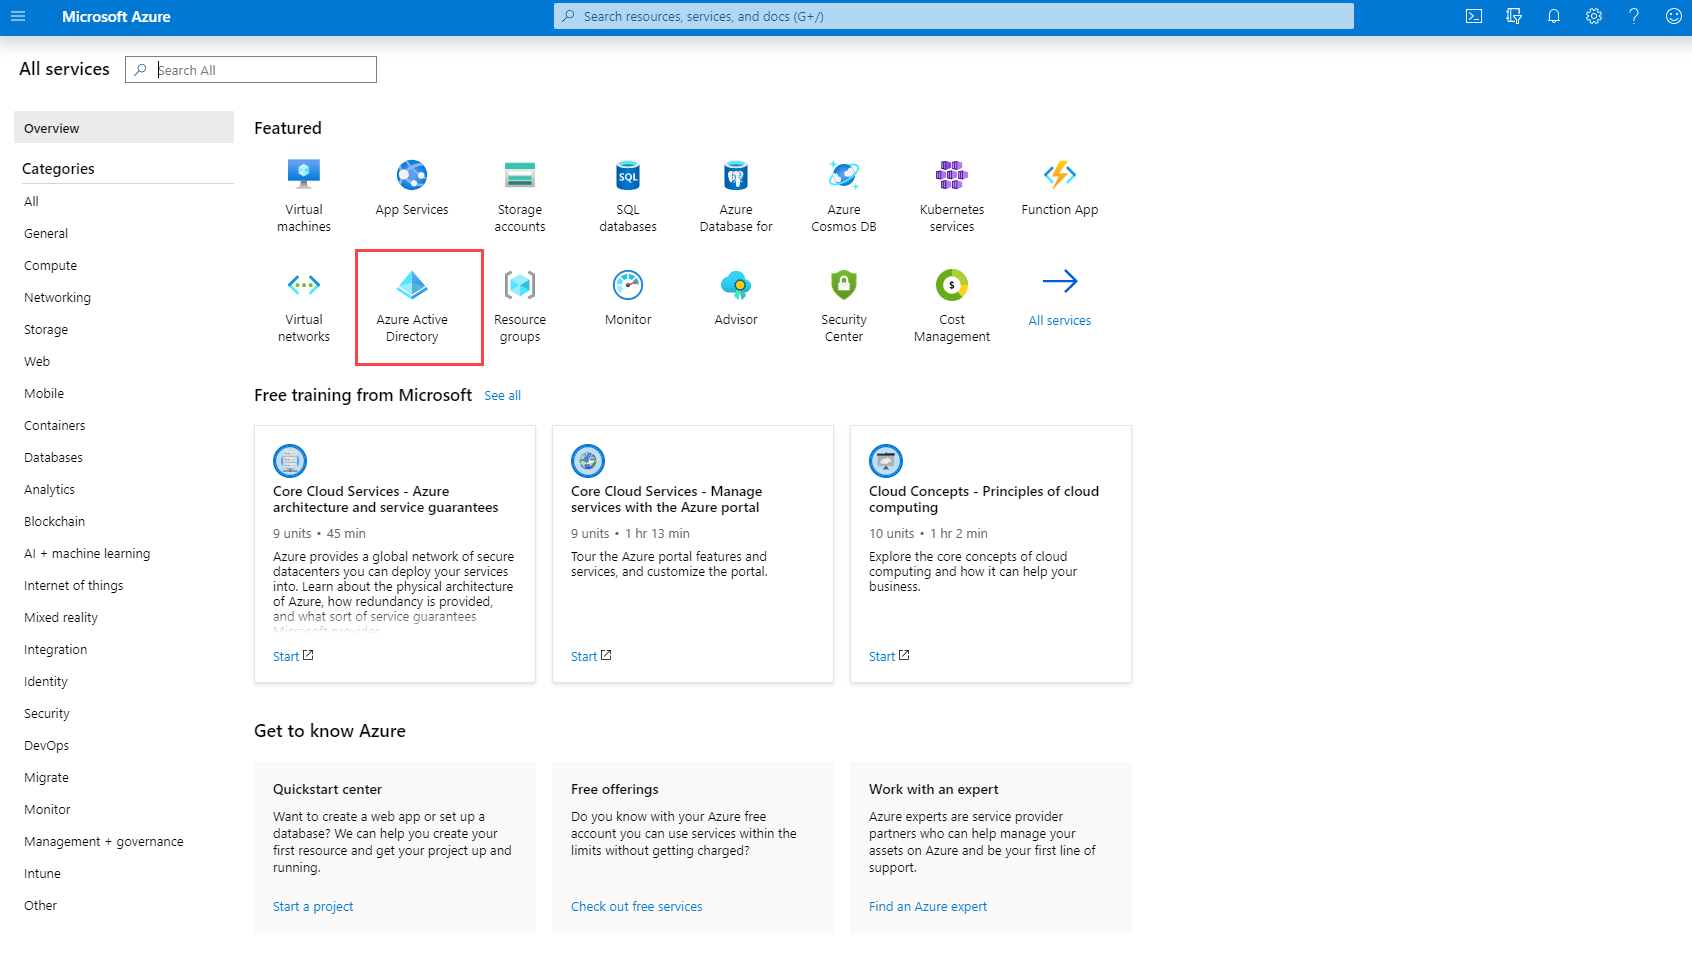
Open the Azure Portal by going to portal.azure.com
-
Sign in to Microsoft Azure with your Microsoft 365 account credentials.
-
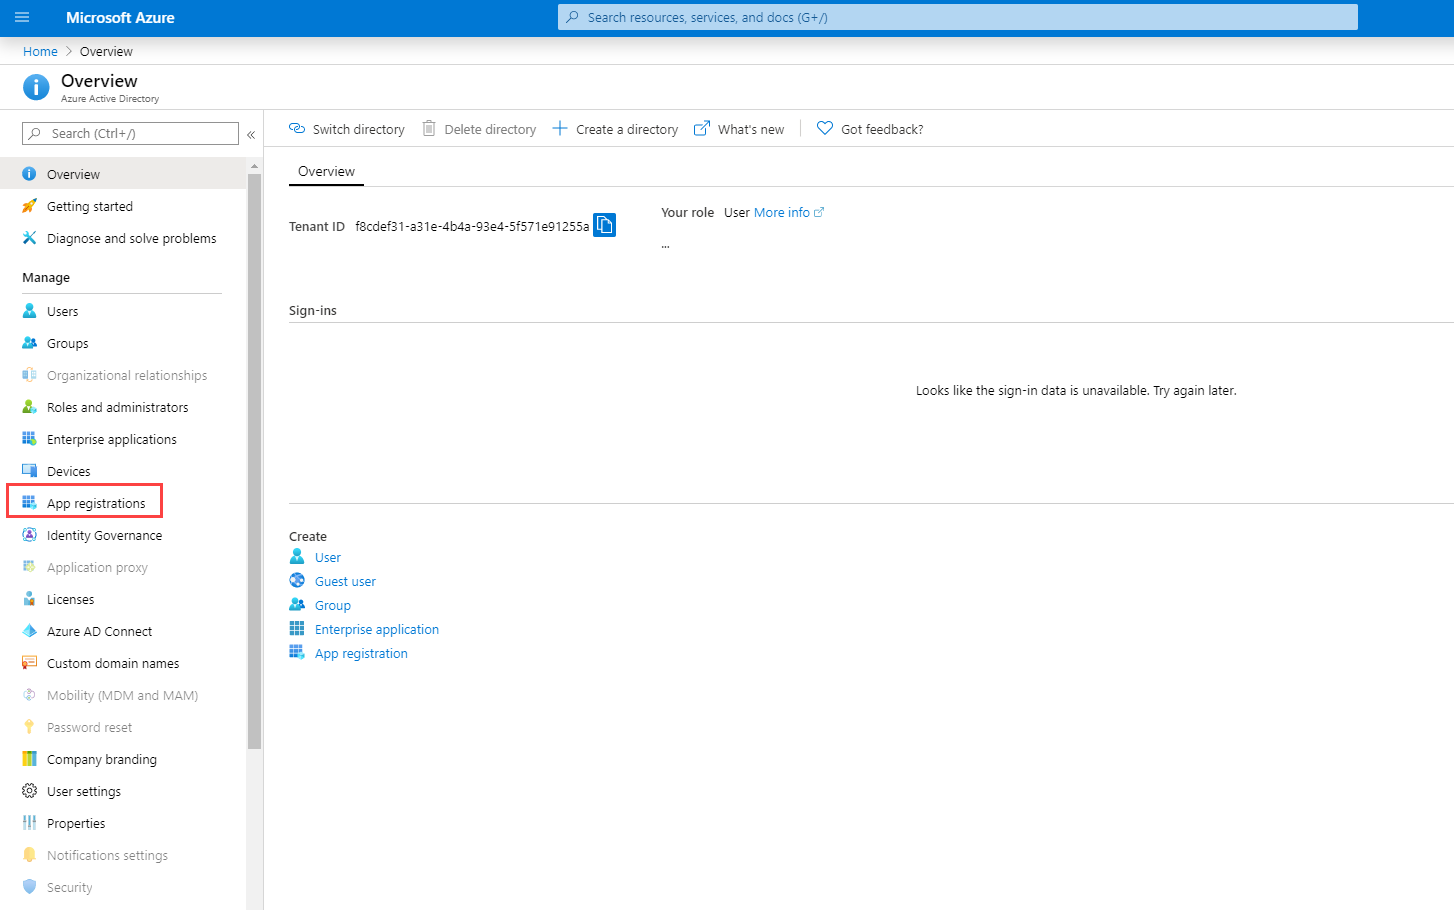
Select Azure Active Directory from the Dashboard or from the Portal Menu.
-
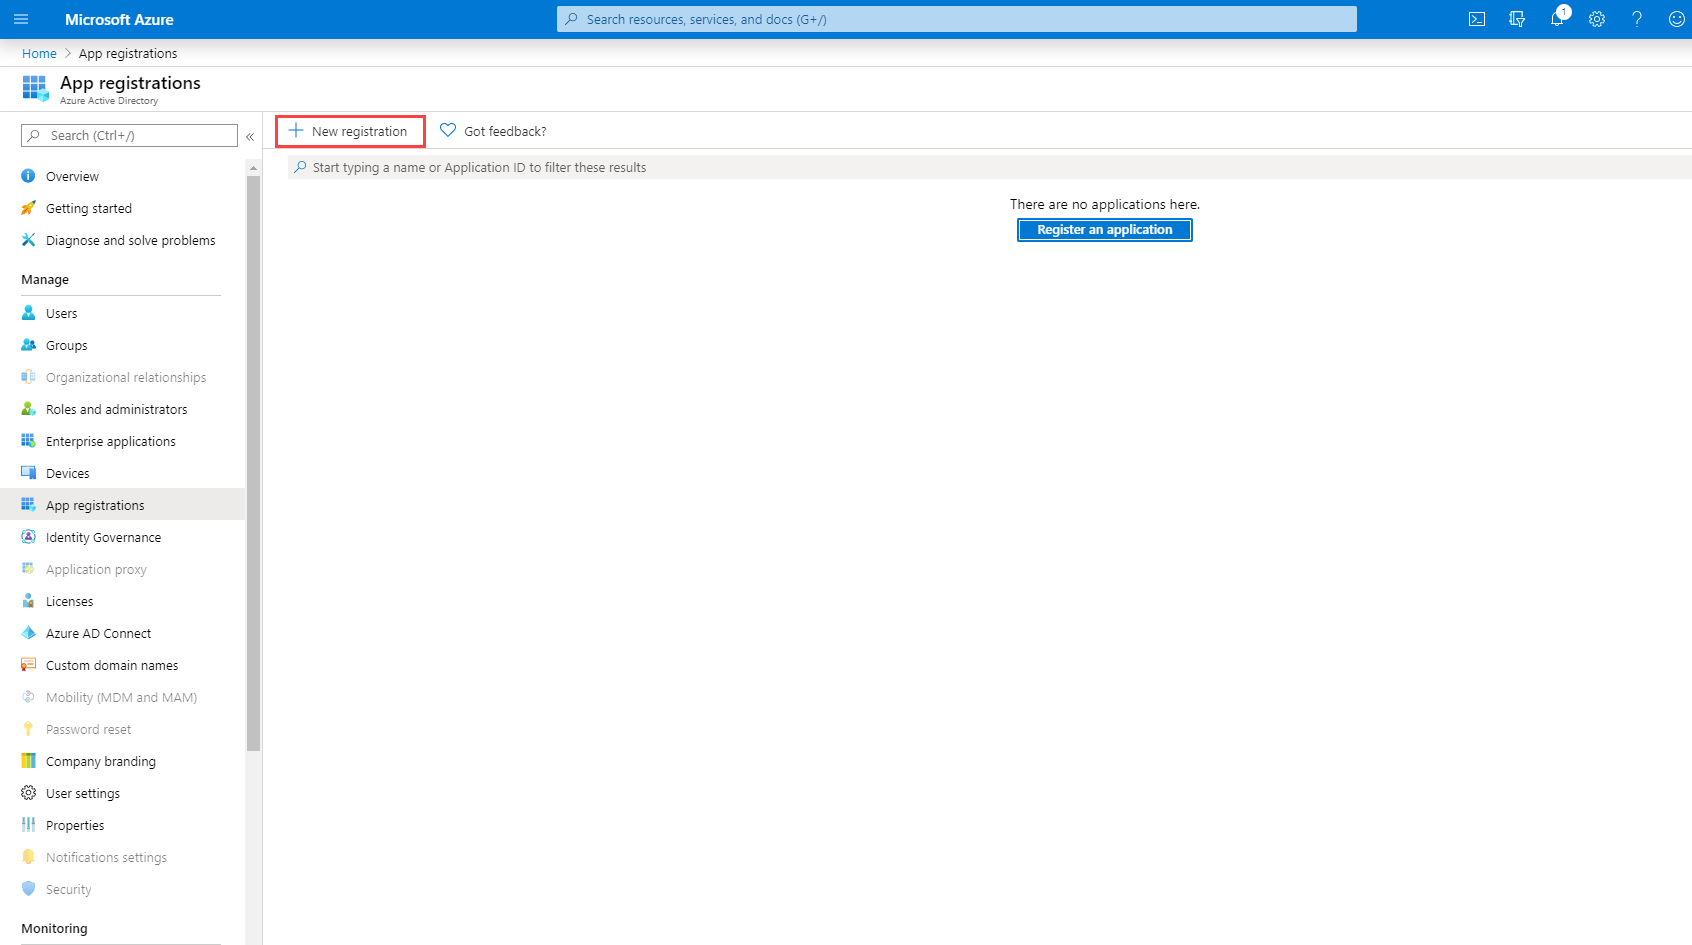
In the left menu, click App registrations.
-
Click New registration on the App registrations page.
-
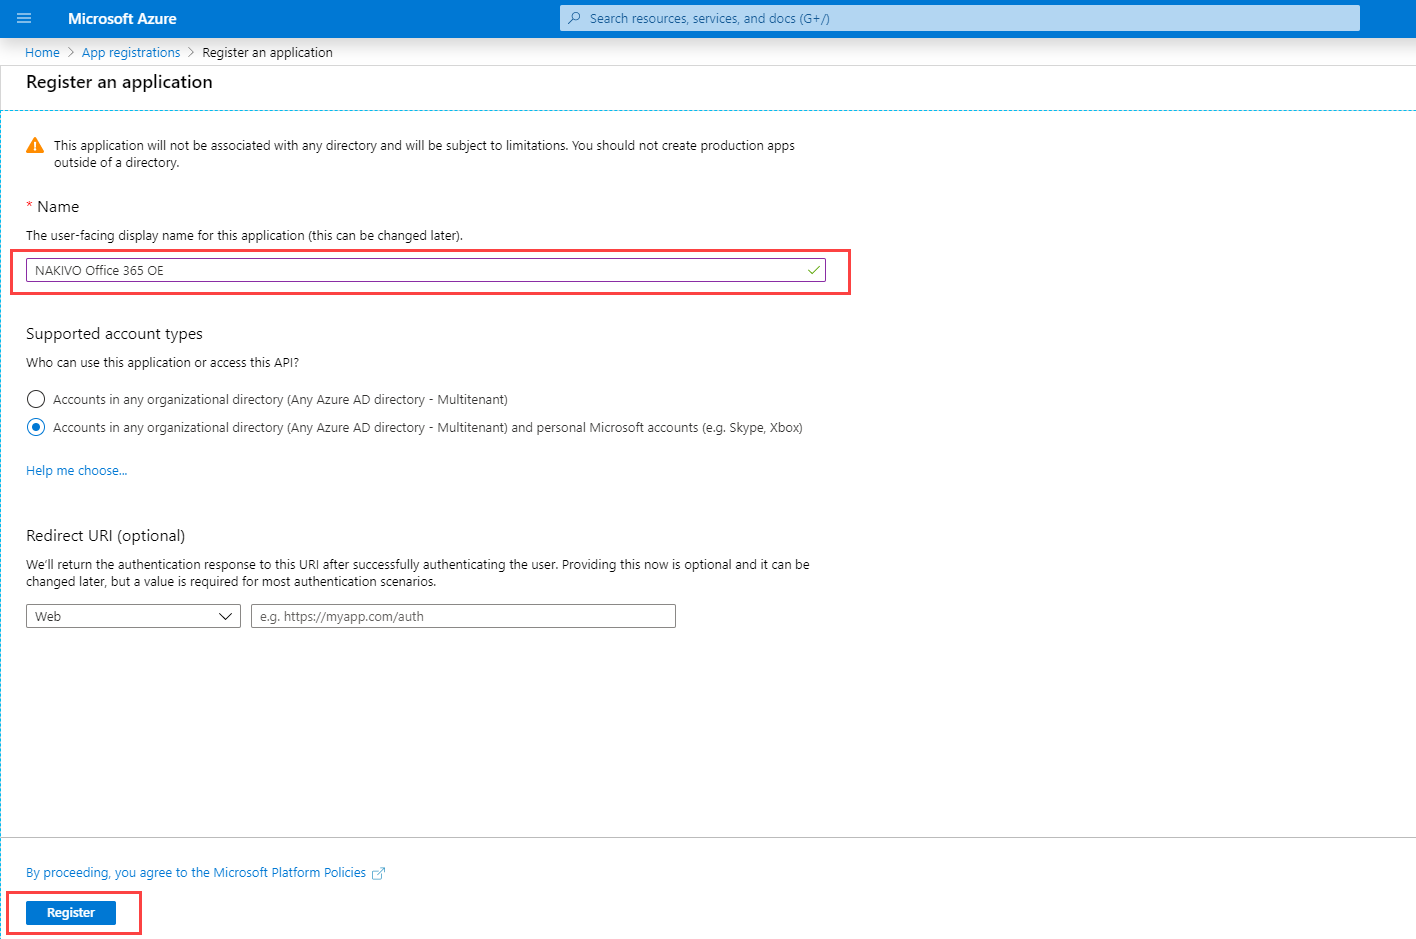
On the Register an application page, enter a name for the application and click Register.
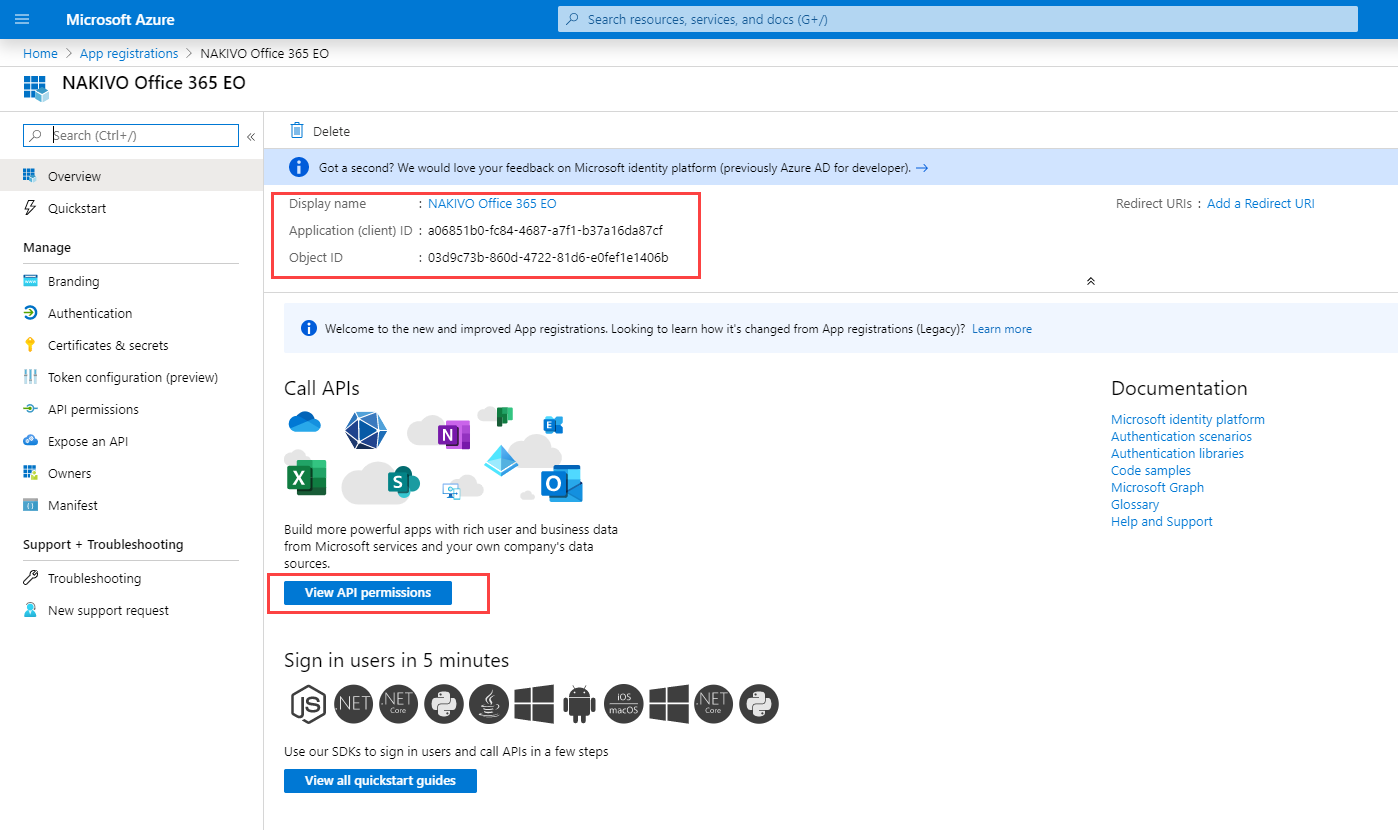
The application has been successfully registered and Tenant ID and Azure Client ID are displayed: Directory (tenant) ID and Application (client) ID respectively. -
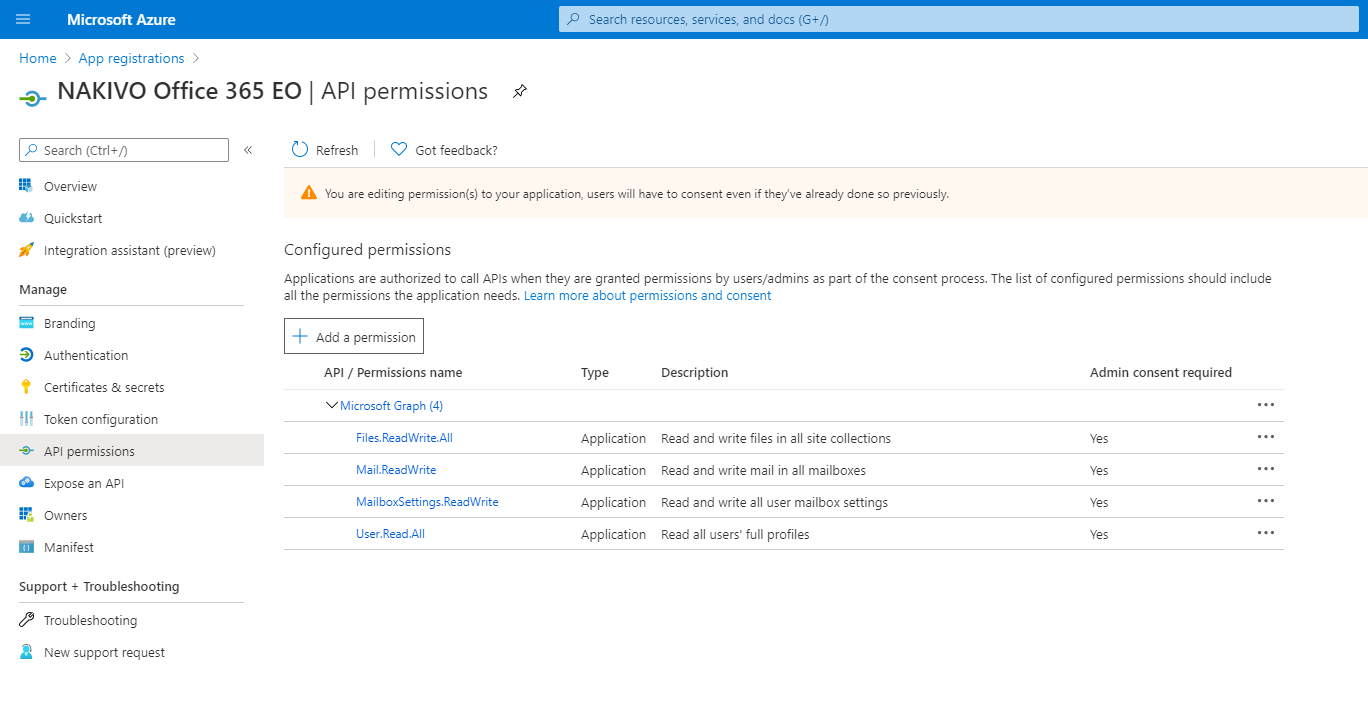
Click View API Permissions to add the necessary permissions.
-
Click Microsoft Graph.
-
Click the Application permissions tab.
-
Provide the necessary API Permissions. Refer to Required API Permissions from Microsoft 365 for details.
Notes
-
To skip discovering Exchange Online mailboxes, OneDrives or SharePoint sites in inventory, disable the API permissions for the corresponding service.
-
If the necessary Microsoft Exchange Online/OneDrive/Shaepoint API permissions are not provided, the corresponding service will not be discovered by NAKIVO Backup & Replication.
-
If the necessary API permissions for Microsoft Exchange Online contact and calendar items are not provided, the items will not be supported for backup and recovery operations.
-
To recover messages and contacts containing a lot of content, you also need to enable full_access_as_app for Office 365 Exchange Online in APIs my organization uses.
-
-
Click Update Permissions.
-
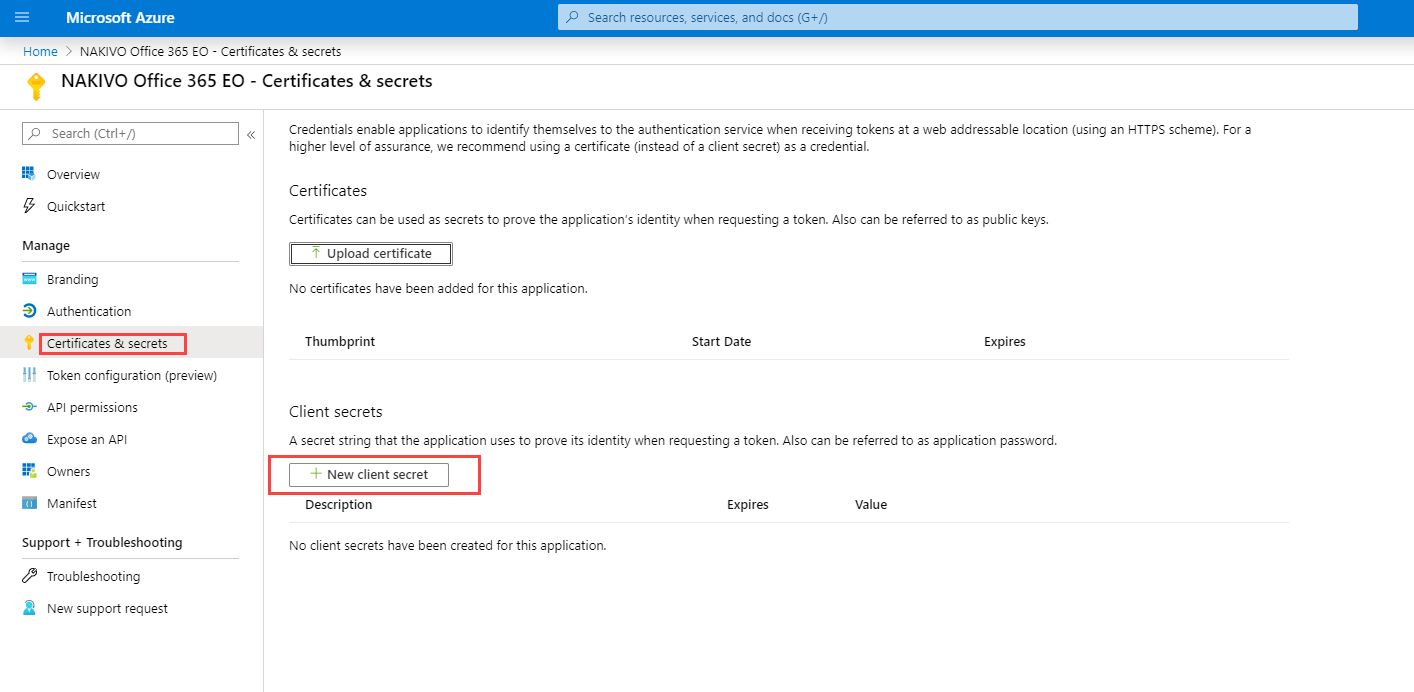
Click Certificates & secrets > New client secret to create a new client secret for your app.
-
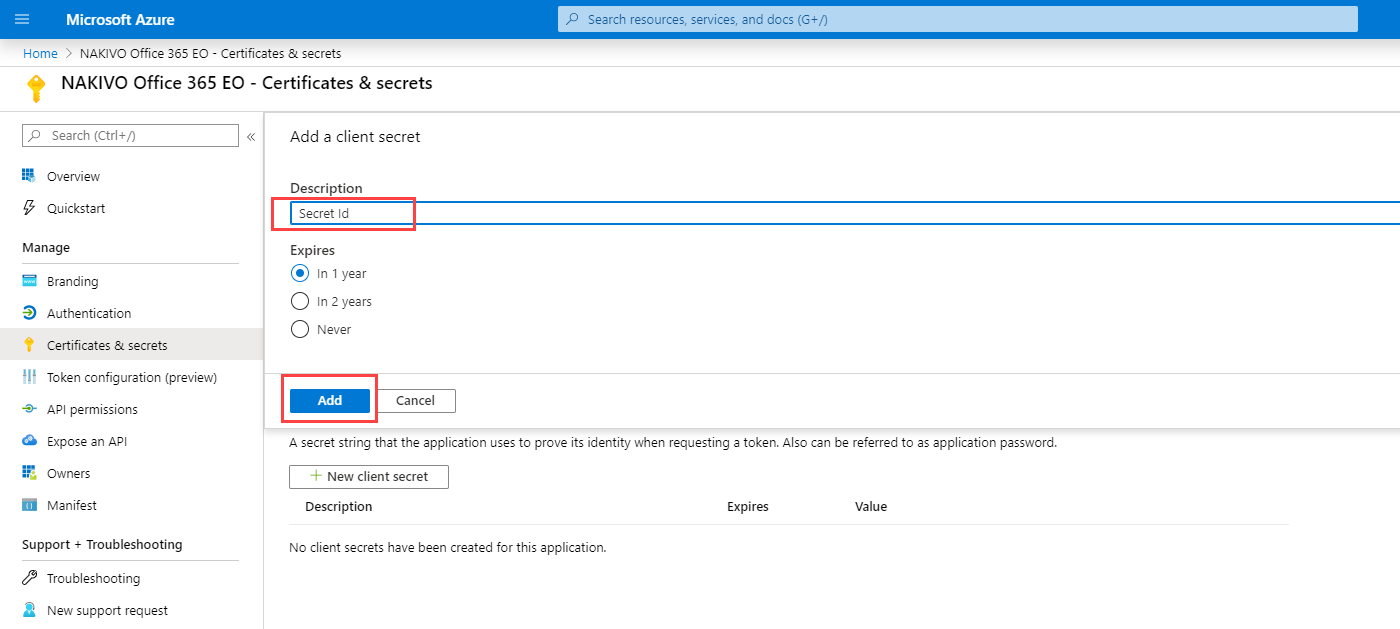
Enter a description for the client secret, select the expiration period, and click Add.
The new Client secret is generated.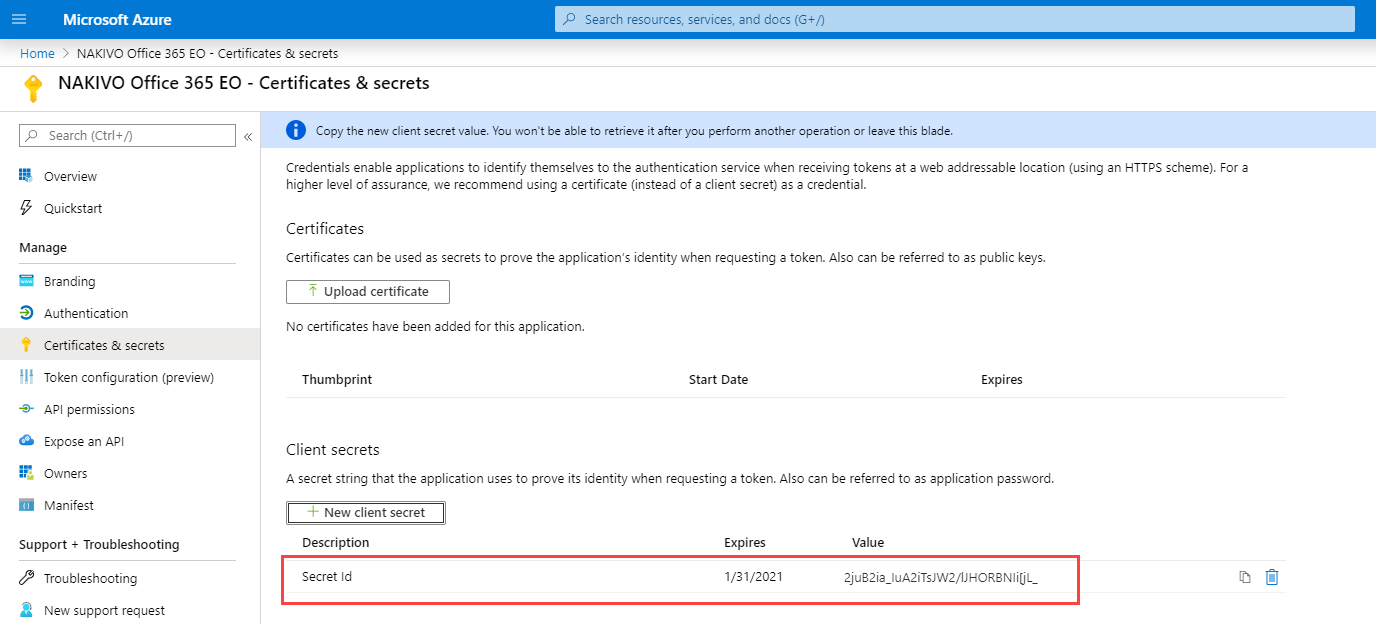
Make sure to save the client secret ID in a safe location. If you lose it, you will need to generate a new one.