Managing Tape Cartridges
The Tapes view allows you to view and manage all tape cartridges registered in the system. This section covers the following topics:
- Viewing Tapes
- Searching for Tape Cartridges
- Filtering Tape Cartridges
- Tape Cartridge Management Page
- Bulk Tape Cartridge Management
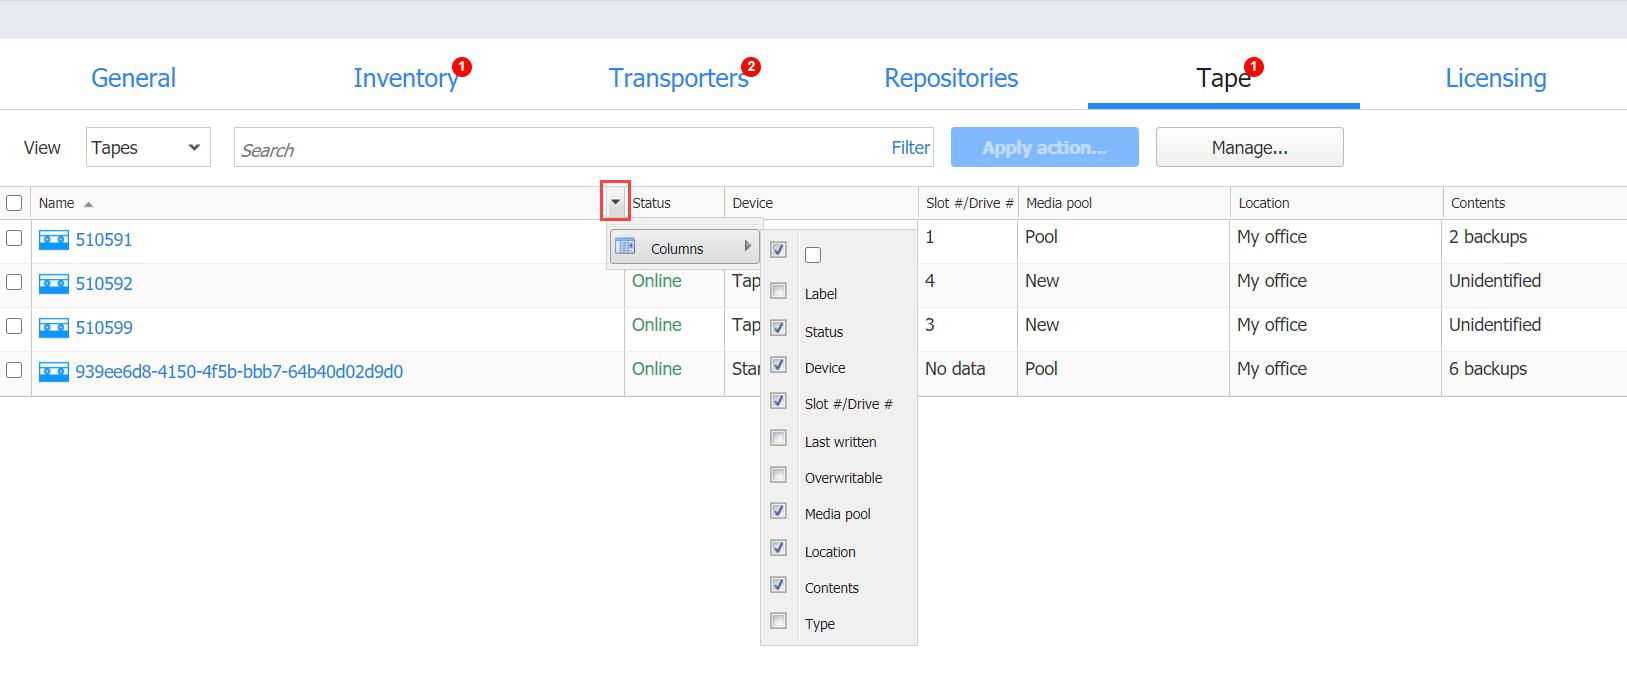
Viewing Tapes
To navigate to the Tapes view, go to Settings > Tapes and select Tapes from the View drop-down list.
The Tapes view provides you with the following information about the tape cartridges in the table:
-
Name: Displays the tape cartridge name. Clicking the name opens the tape cartridge management page. For more information, see Tape Cartridge Management Page.
-
Label: Displays the label assigned to the tape cartridge ("none" for tape cartridges without labels)
-
Status: Displays the current status of the tape cartridge - Scanning / Online / Reading / Writing / Erasing / Warning / Error / Offline.
-
Device: Displays the name of the tape device that contains the tape cartridge.
-
Slot#/Drive#: Displays the slot/drive number in which the tape cartridge currently is.
-
Last Written: Displays the date of the last recording on the tape cartridge.
-
Overwritable: Displays the date when all recovery points on this tape cartridge will expire.
-
Media Pool: Displays the name of the media pool that the tape cartridge belongs to.
-
Location: Displays the name of the device location that the tape cartridge belongs to.
-
Contents: Indicates the contents of the tape cartridge: number of backups present on the tape cartridge, the tape cartridge is empty, unidentified or contains the 3rd party data.
-
Type: Displays the type of the tape cartridge:
-
Read/Write Tape
-
Write Protected Tape
-
Cleaning Tape
-
The columns availability within the table can be managed by clicking the small arrow in any column header and selecting/clearing the checkboxes next to the column name.
Searching for Tape Cartridges
You can search for particular tape cartridge(s) by entering its name (or part of it) into the Search box. The table will dynamically change to display the search results matching your query.
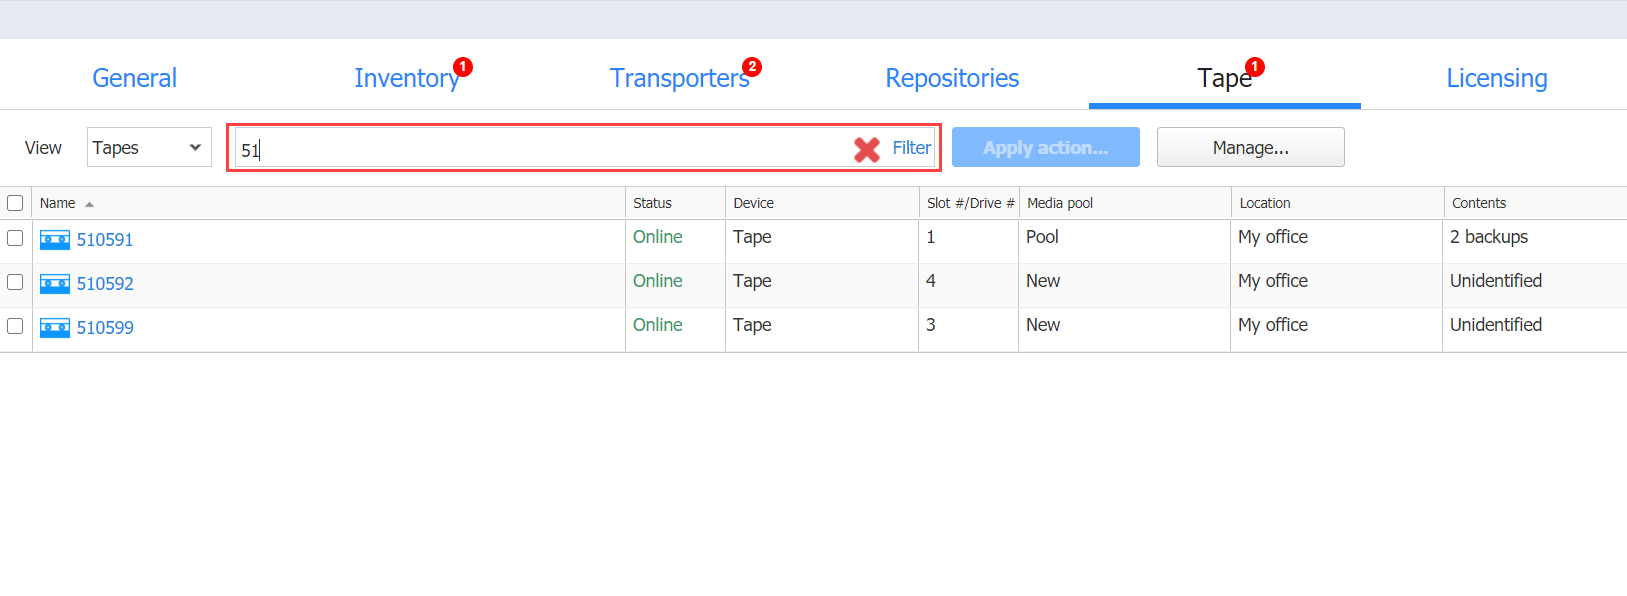
Clicking the Clear button in the search field will clear the query and the table will display all tape cartridges.
Filtering Tape Cartridges
The Tapes view also provides sophisticated filtering options that can be applied to search for particular tape cartridges. To access filtering options, click the Filter link in the Search box. In the dialog that opens you can select one or several filtering criteria that will be applied with the AND statement.
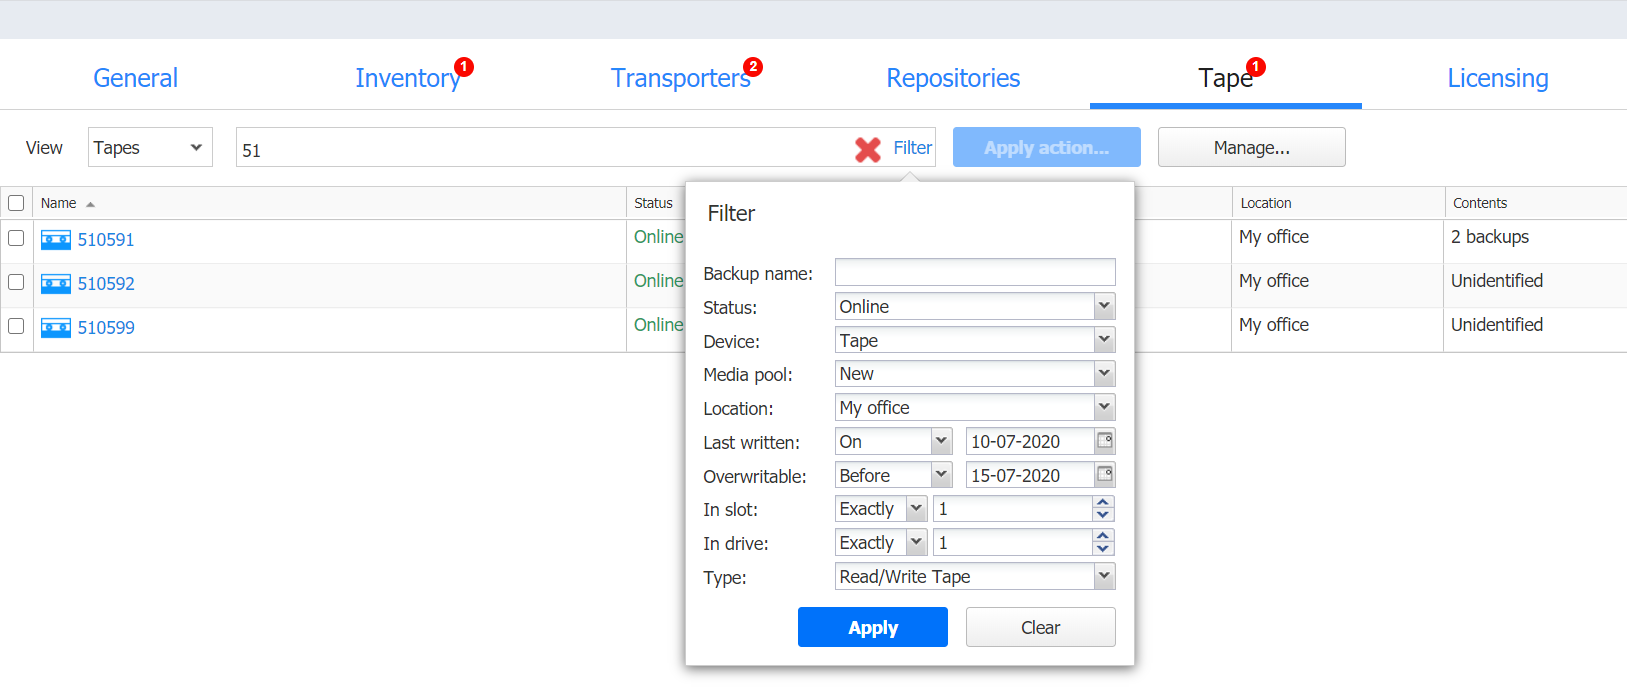
You can apply the following filtering criteria:
-
Backup name: Tape cartridges containing the backups with the provided name will be displayed.
-
Status: Tape cartridges in one of the following statuses will be displayed:
-
Offline
-
Online
-
Scanning
-
Erasing
-
Reading
-
Writing
-
Warning
-
Moving
-
Error
-
-
Device: Only the tape cartridges from the specified type device will be displayed.
-
Media Pool: Only the tape cartridges from the specified media pool will be displayed.
-
Location: Only the tape cartridges from the specified device location will be displayed.
-
Last Written: Displays the tape cartridges that have the data written to it on/before/after a specified date.
-
Overwritable: Displays the date when the tape cartridge can be overwritten (calculated using the age and retention of all recovery points on this tape cartridge) .
-
In Slot: Displays the tape cartridges in a specified slot or range of slots.
-
In Drive: Displays the tape cartridges in a specified tape drive or range of tape drives.
-
Type: Displays the tape cartridges according to their type:
-
Read/Write Tape
-
Write Protected Tape
-
Cleaning Tape
-
Note
The Search and Filter features can only be applied separately; that is, you cannot simultaneously enter a character's string and select filtering options.
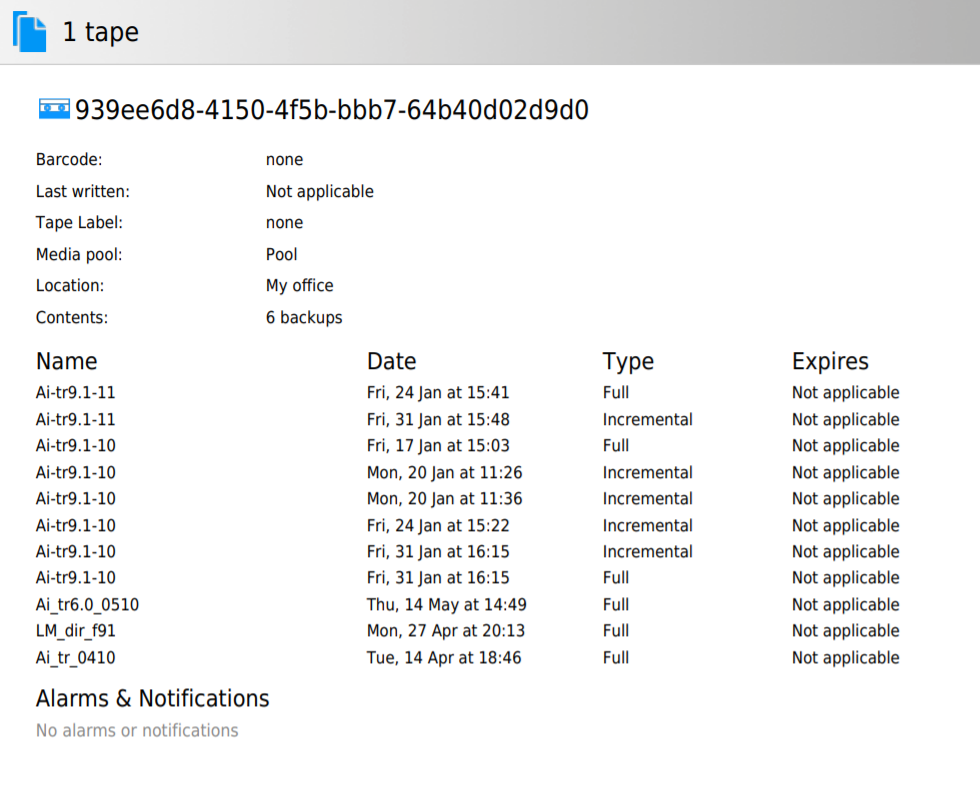
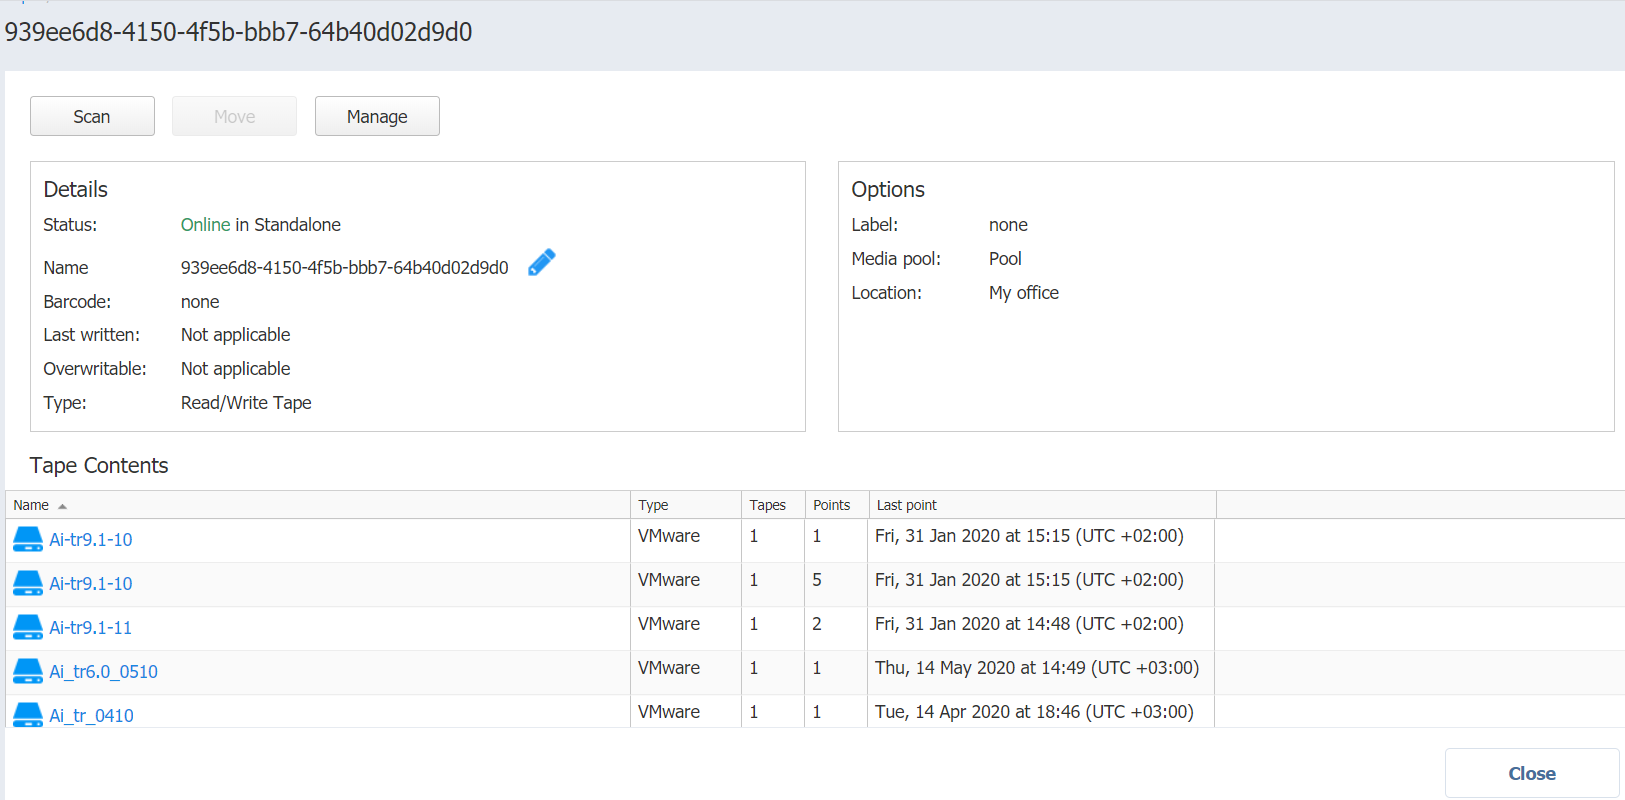
Tape Cartridge Management Page
Clicking on the tape cartridge name opens the tape cartridge management page where you can apply certain actions to the tape cartridge or get extensive information about it.
The tape cartridge management page consists of the following functional blocks:
-
Action Buttons
-
Details Pane
-
Options Pane
-
Tape Cartridge Contents Table
Action Buttons
The action buttons allow you to perform particular actions with the tape cartridge. Depending on the state of the tape cartridge, its type, status, etc., the button’s availability may vary; the button can be disabled in case a certain action cannot be applied to the tape cartridge. Hovering over the disabled button opens a tooltip describing the reason for action unavailability.
Some of the actions can be applied to several tapes at once. For more information, refer to Bulk Tape Cartridge Management.
The following actions can be applied to the tape cartridge:
-
Scanning: Scanning of the tape cartridge implies checking its contents. The system recognizes the contents to be:
-
Known NAKIVO Backup & Replication backups: Such content requires no scanning. The backups contained on this tape cartridge are displayed in the Tape Cartridge Contents Table and can be used for VM restoring.
-
Unknown NAKIVO Backup & Replication backups: The system recognizes the contents as created by NAKIVO Backup & Replication (i.e. on another product instance) but cannot be used for VM restoring until scanned.
-
Empty: The tape cartridge contains no data and is ready to be used for backing up.
-
Third Party Data: The tape cartridge contains some third-party data that cannot be recognized by NAKIVO Backup & Replication. Such tape cartridges cannot be used unless their contents are erased.
-
Incomplete Backups: The tape cartridge contains incomplete backup(s), the result of an inappropriately finished backup job (e.g. a backup copy job was stopped by the user and the backup copy was not completed). Incomplete backups cannot be used for recovery.
-
Unidentified: The contents of a newly introduced tape cartridge is unknown to the system and must be scanned first.
-
When you insert new tape cartridges into the tape device, and these tape cartridges contain backups created using another instance of NAKIVO Backup & Replication, the application opens the Scan new tape cartridges? message box, asking you to scan all tape cartridges. Clicking the Scan all link will initiate the scanning action for all newly discovered tape cartridges.
-
Editing: Clicking the Edit button opens the Edit Tape dialog where you can:
-
Create or change a label for the tape for easier tape identifying.
-
Assign the tape to a pre-created media pool.
-
Allocate the tape to a pre-created location.
The newly added details are displayed in the Options pane.
-
-
Moving: This action allows you to move the tape cartridge to an available drive slot or tape drive. Occupied drive slots or tape drives are disabled in the menu.
-
Protecting: Applying this action to the tape cartridge makes it protected from data overwriting. This action is only available on tape cartridges that contain recovery points. Recovery from protected tape cartridges is available. Protected tape cartridges can be reverted by clicking the Unprotect button. Clicking the Protect or Unprotect button requires confirmation.
-
Marking as free: Marking the tape cartridge as free makes it eligible for writing backups to it. Marking the tape cartridge as free does not erase the data right away: the next time, the product needs a tape cartridge for writing data, it can take this tape cartridge and do a quick-erase before writing new data to it. The button is not available in case the tape cartridge is protected or empty. Marking the tape cartridge as free requires confirmation. The confirmation box displays detailed information about the data that is about to be deleted. This action cannot be undone.
-
Marking as cleaning: Specialized tape cartridges designed for tape drive cleaning need to be marked as cleaning tapes. For the tape cartridges that have been marked as cleaning tapes, though still need to be reverted to normal tapes, the Mark as cleaning button is substituted with the Mark as data button.
Important
Currently, the cleaning tapes inserted into the device are not automatically recognized by the system as cleaning. Instead, the system identifies the tapes to contain a 3rd party data. It is a user's responsibility to mark the tape as cleaning once the tape is inserted into the device and discovered. Otherwise, the cartridge will be performing the drive's cleaning automatically every time the library is refreshed -
Retiring: The tape cartridges marked as retired will not be used for new backups. Recovery from retired tape cartridges is still available. The action is not available for tape cartridges marked as free or do not contain recovery points. This action requires your confirmation.
-
Erasing: The contents of the tape can be erased using:
-
Quick erase: The data is marked as deleted without actual data deletion. Such data can still be recovered if necessary.
-
Full erase: Deletes the data from the tape forever.
Keep in mind that both methods can be very time-consuming.Clicking the Erase button opens the Erase selected tape? dialog providing detailed information about the data that is about to be deleted and allows choosing the erase method
-
-
Removing: Clicking this button will physically remove the tape cartridge from the tape device. The button is only available for the offline tape cartridges. The action requires your confirmation.
Details Pane
The Details pane provides full information about the tape:
-
Status: Displays the status of the tape cartridge and the current tape device name and drive slot #/tape drive #. The tape cartridge can be in one of the following statuses: Scanning / Online / Reading / Writing / Erasing / Warning/ Moving / Error / Offline
-
Name: Displays the name of the tape cartridge. Can be modified by clicking the Edit button.
-
Barcode: Displays the tape cartridge barcode if available.
-
Last written: Displays the date of the last write operation.
-
Overwritable: Displays the date when all recovery points on this tape cartridge will be expired.
-
Type: Displays the type of the tape cartridge: Read/Write Tape / WORM Tape / Write Protected Tape / Cleaning Tape.
Options Pane
In the Options pane, you can view the tape cartridge label, media pool and device location where the tape cartridge belongs. Changing this information is available via the Edit button.
Tape Cartridge Contents Table
The Tape Contents table provides information about the backups residing on the tape cartridge and allows for recovering VMs from backups right from the table. In case the tape cartridge contains no backups, the table displays generic information about the tape cartridge contents:
-
"This tape contains third party data."
-
"This tape cannot be identified due to a lack of barcode. Please scan the tape in order to discover its content."
-
"This tape is empty."
-
"This tape contains backups.": The tape contains backups created by NAKIVO Backup & Replication but has not been scanned yet.
-
A grid of tape backups in case the tape contains backups.
If the tape cartridge contains backups and has been scanned already, the Tape Contents table displays the backups in the grid and provides the following information:
-
Name: Displays the name of the backup. Clicking on the name of the backup opens the Recovery page.
-
Type: Displays the type of a backup: VMware VM, Hyper-V VM or EC2 instance.
-
Tapes: Shows the number of tape cartridges this backup is stored on.
-
Points: Displays the number of recovery points in the backup.
-
Last point: Displays the date of the most recent recovery point in the backup.
-
Location: Displays the location the tape cartridge is assigned to.
The Tape Contents table can be modified to display the column you need by clicking on the arrow icon in the table header, and selecting the required columns.
Clicking the column's header sorts the contents of the column.
Recovery Page
Clicking on a backup name in the Tape Cartridge Contents table opens the Recovery page where you can view the backup information as well as see all recovery points available for this backup. From here, you can also initiate the recovery process.
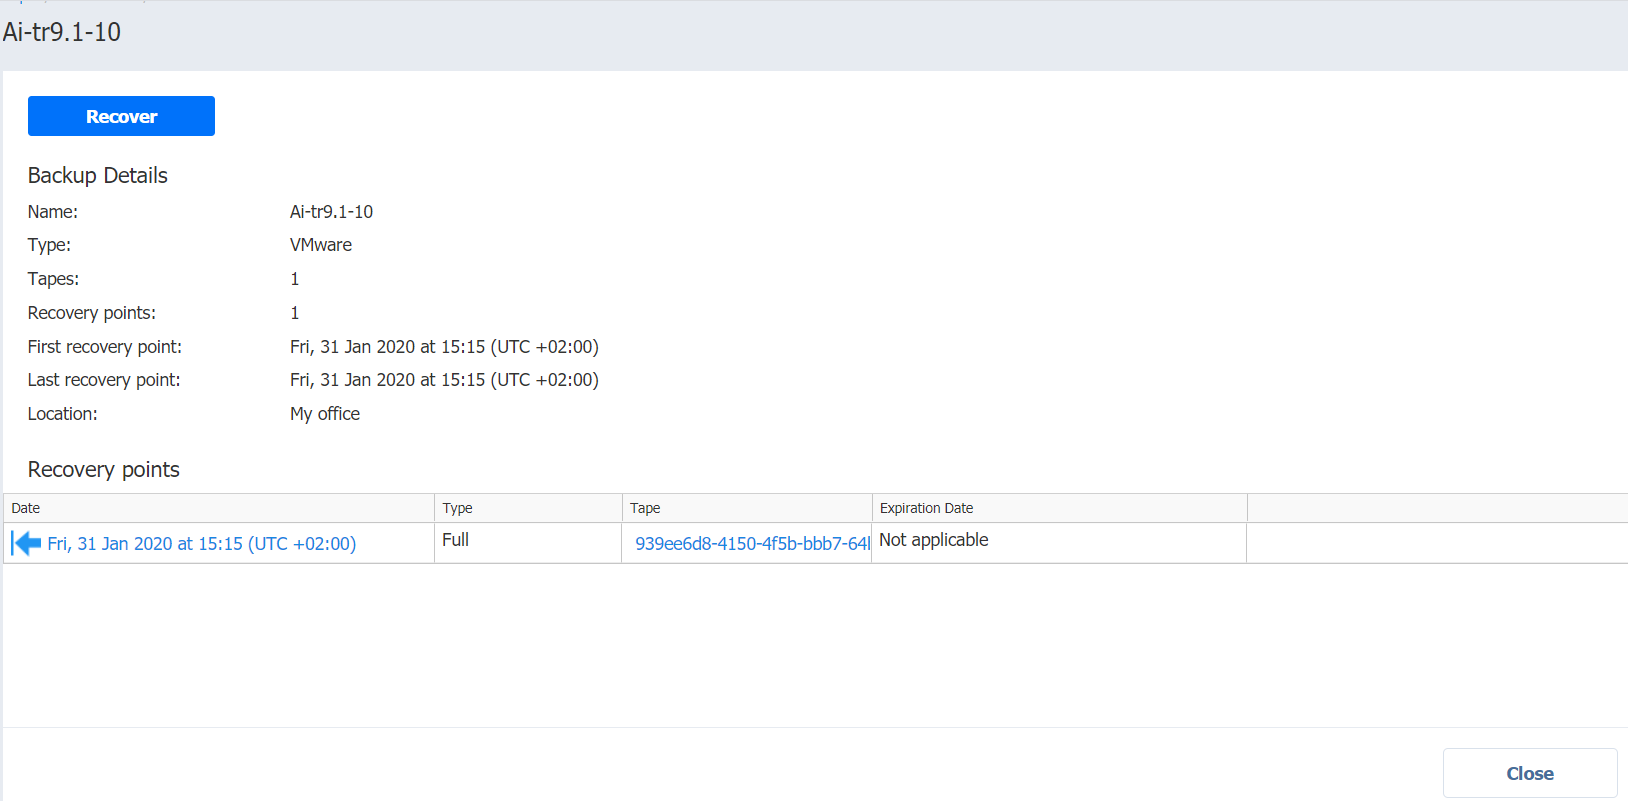
The Backup Details section provides the following information about the backup:
-
Name: Shows the name of the backup.
-
Type: Shows the type of backup: VMware, Hyper-V VM, EC2 instance or physical machine.
-
Tapes: Shows the number of tape cartridges this backup is stored on.
-
Recovery points: Shows the number of recovery points within the backup.
-
First recovery point: Shows the date of the latest recovery point of the backup.
-
Last recovery point: Shows the date of the most recent recovery point of the backup.
-
Location: Shows the location the backup is assigned to.
The Recovery points table lists all the recovery points available for the current backup and provides the following information:
-
Date: Indicates the date the recovery point was created. Clicking on the recovery point, you can start the Recovery Wizard with the current backup and recovery point selected.
-
Type: Indicates the type of backup: Full or Incremental.
-
Tape: Indicates the name of the tape cartridge the backup is stored on.
-
Expiration date: Indicates the date when the recovery point expires.
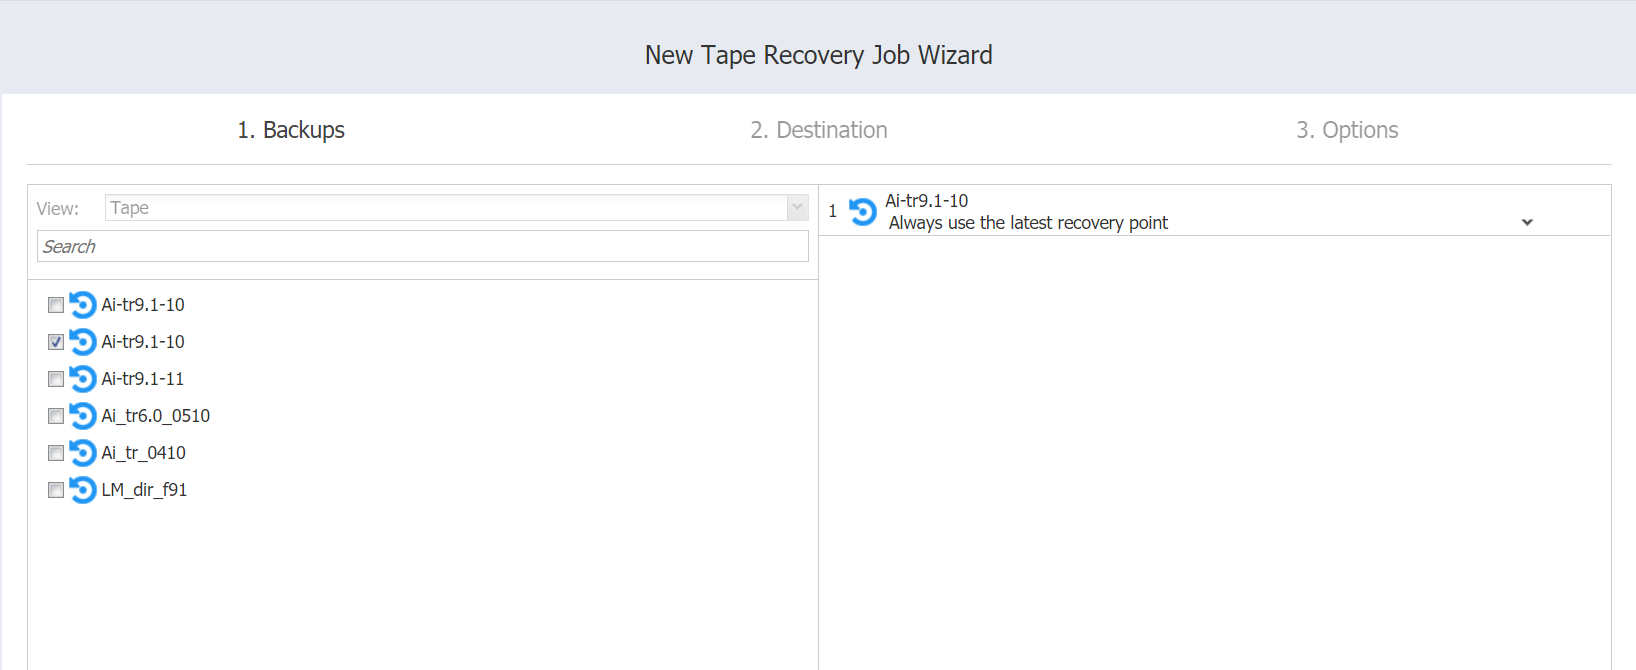
Clicking either the Recover button or the name of the recovery point opens the Recovery Job Wizard. For more information about recovering from tape cartridge, refer to Recovery From Tape .
Bulk Tape Cartridge Management
Certain actions can be applied to several tape cartridges simultaneously. While being on the Tapes view, select the checkbox next to the tape cartridges you need to apply an action to, and click Apply action. In the dialog that opens, select an action to apply. Note that the availability of actions depends on various factors, thus not all actions may be available. For actions description, refer to Action Buttons.
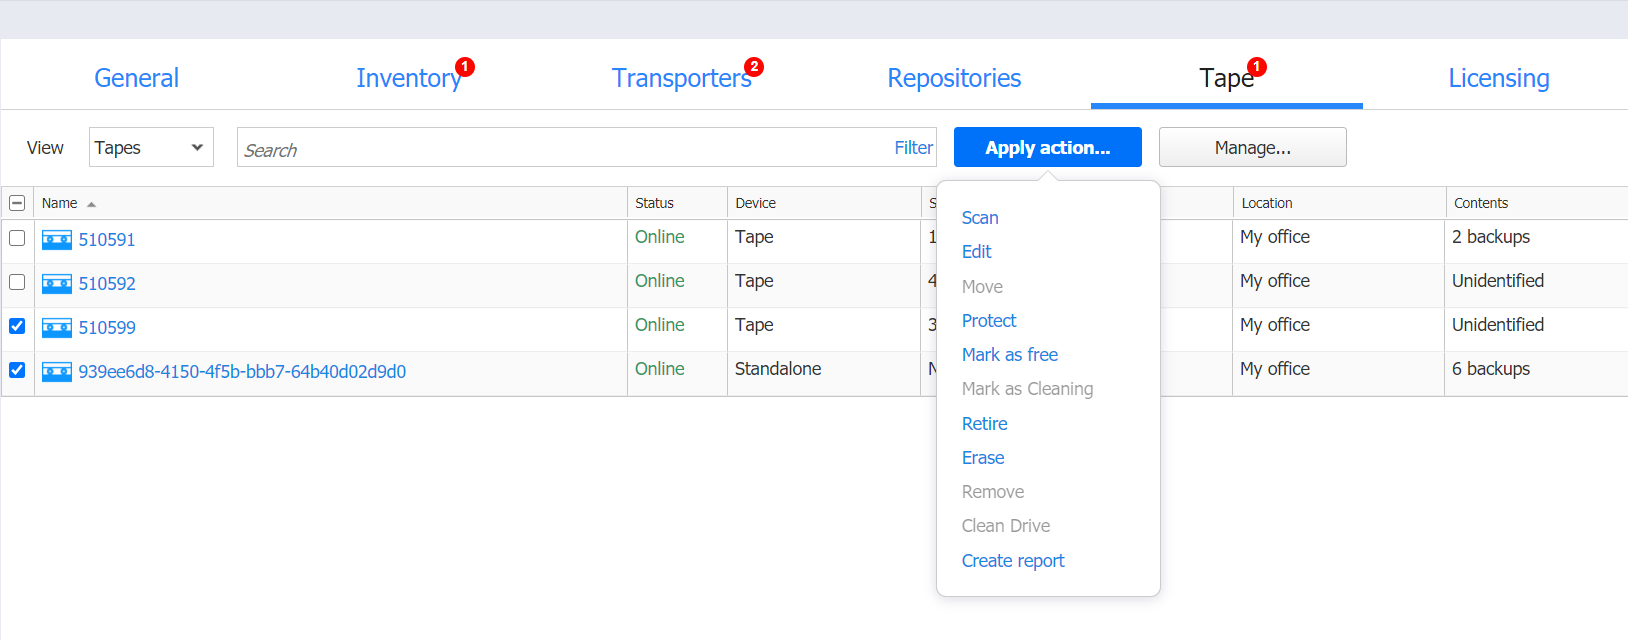
The Create report action is unique to the bulk tape cartridge management and is used to generate reports about selected tape cartridges. The report is created as a PDF file and is stored locally on your computer.